I first fell in love with the Wisconsin Apple Kringle at a quaint little bakery during a road trip through the Midwest. The moment that warm, flaky pastry filled with spiced apples melted in my mouth, I knew I was onto something special. I couldn’t shake the craving for it once I returned home, but let’s be real – driving hours to chase a pastry isn’t exactly convenient! So, I decided to take on the challenge of recreating this delicious treat in my own kitchen, hoping to not only save myself some time but maybe even make it better than the original.
Let me tell you, perfecting the Wisconsin Apple Kringle was no walk in the park. It took me five attempts (yes, five!) to get the dough just right and ensure that every bite had that ideal balance of sweetness and spice. There were times when my dough turned out tougher than shoe leather or my filling was so runny it could have been classified as apple soup! But each failure taught me something new about creating that elusive flaky texture and getting the spices just right, and I laughed my way through every kitchen disaster.
But after all that trial and error, I can confidently say it was worth every minute! The final result is a show-stopping pastry that’s golden-brown and irresistibly flaky on the outside, with a luscious filling of spiced apples that’ll have your taste buds dancing. Topped off with a sweet glaze that brings everything together perfectly, this Wisconsin Apple Kringle is wonderful for breakfast or dessert – or both if you’re feeling indulgent! So grab your apron and let’s make some magic happen in the kitchen; I promise you won’t regret it!
These Wisconsin Apple Kringle are…
…an irresistible combination of buttery pastry and spiced apple goodness that will leave you craving more!
1. They deliver an incredible depth of flavor thanks to the perfect blend of spices and sweet apples. The combination of cinnamon and brown sugar not only enhances the natural sweetness of the apples but also creates a warm, aromatic experience that fills your kitchen while baking—truly the essence of fall in every bite.
2. You’ll love the flaky, tender texture that melts in your mouth. By using cold, cubed butter in the dough, I ensure that it creates those beautiful layers as it bakes, resulting in a crispy outer layer while keeping the inside soft and delightful.
3. With my handcrafted technique, I roll and fold the dough to create a unique structure that elevates this kringle above ordinary pastries. This method allows for an exquisite rise and contributes to that desirable flaky quality, making each slice a revelation.
4. This recipe offers exceptional value when compared to store-bought or café versions. With simple ingredients you likely have on hand, plus an easy-to-follow process, you can create a gourmet dessert or breakfast treat at a fraction of the cost—and with far better taste!
PS These Wisconsin Apple Kringle are best served warm, making them an ideal treat for gatherings or cozy mornings at home!
Ingredients for the Wisconsin Apple Kringle
Each ingredient in this dish plays an essential role in flavor and texture. Here’s what you’ll need:
Dough
2 cups all-purpose flour: Provides the structure and base for the flaky pastry.
1 cup unsalted butter (cold and cubed): Creates a rich, tender texture with its buttery flavor.
1 tsp salt: Enhances the overall taste and balances sweetness.
1/4 cup granulated sugar: Adds a hint of sweetness to the dough.
1/4 cup cold water (as needed): Helps bind the dough while keeping it cool for flakiness.
Filling
3 cups apples (peeled, cored, and diced): Offers natural sweetness and tartness for a fresh flavor.
1 tsp cinnamon: Infuses warmth and spice that complements the apples beautifully.
1/2 cup brown sugar: Enhances the filling with deep caramel notes.
2 tbsp lemon juice: Brightens and balances the sweetness of the apple filling.
1 tbsp cornstarch: Acts as a thickening agent to keep the filling from becoming too runny.
Glaze
1 cup powdered sugar: Creates a sweet topping that adds visual appeal and flavor.
2 tbsp milk: Helps achieve a smooth, pourable consistency for the glaze.
- 1 tsp vanilla extract: Introduces warmth and enhances all the other flavors in the glaze.
You MUST chill the dough. No shortcuts!
I know, I know—chilling the dough feels like extra time you just don’t have, and believe me, I tried to skip this step. I even convinced myself that maybe it would be fine if I rushed it. Spoiler alert: it wasn’t fine. The result was a sad, limp kringle that didn’t even deserve a glaze!
Chilling the dough is crucial because it allows the gluten in the flour to relax and the butter to firm up. Think of it like letting a steak rest after cooking; when you give it time, you end up with a tender and juicy piece. For our Wisconsin Apple Kringle, resting the dough ensures a flaky texture and rich flavor that you simply can’t achieve by skipping this essential step.
What does chilling the dough do?
- Texture — Chilling allows the butter to solidify, creating distinct layers in the pastry that lead to a flakier bite.
- Flavor — The resting time develops deeper flavors as the ingredients meld together, enhancing every mouthful.
- Ease of handling — A chilled dough is much easier to roll out without sticking or tearing, making your assembly process smoother.
- Browning — The cold butter helps create steam during baking, leading to a beautifully golden crust that’s visually appetizing.
- Shelf life — Chilled dough can be stored longer without losing quality, meaning you can prepare ahead for those unexpected brunch guests!
Different chilling times
- 15 minutes (okay) — Not enough time for optimal texture; the dough may still be difficult to handle and won’t have developed full flavor.
- 30 minutes (good) — This is the bare minimum for a decent kringle; you’ll notice an improvement in texture but still not at its best.
- 1 hour (better) — Ideal for achieving flakiness and flavor; your kringle will come out much more enjoyable than at shorter chilling times.
- Overnight (best) — Full flavor development and perfect texture. If you can plan ahead, this is where your kringle reaches its peak!
Be warned: skipping or skimping on the chilling time is the biggest mistake you can make with this recipe. You’ll end up with a dense pastry that lacks character—trust me, I’ve been there!
How to make Wisconsin Apple Kringle
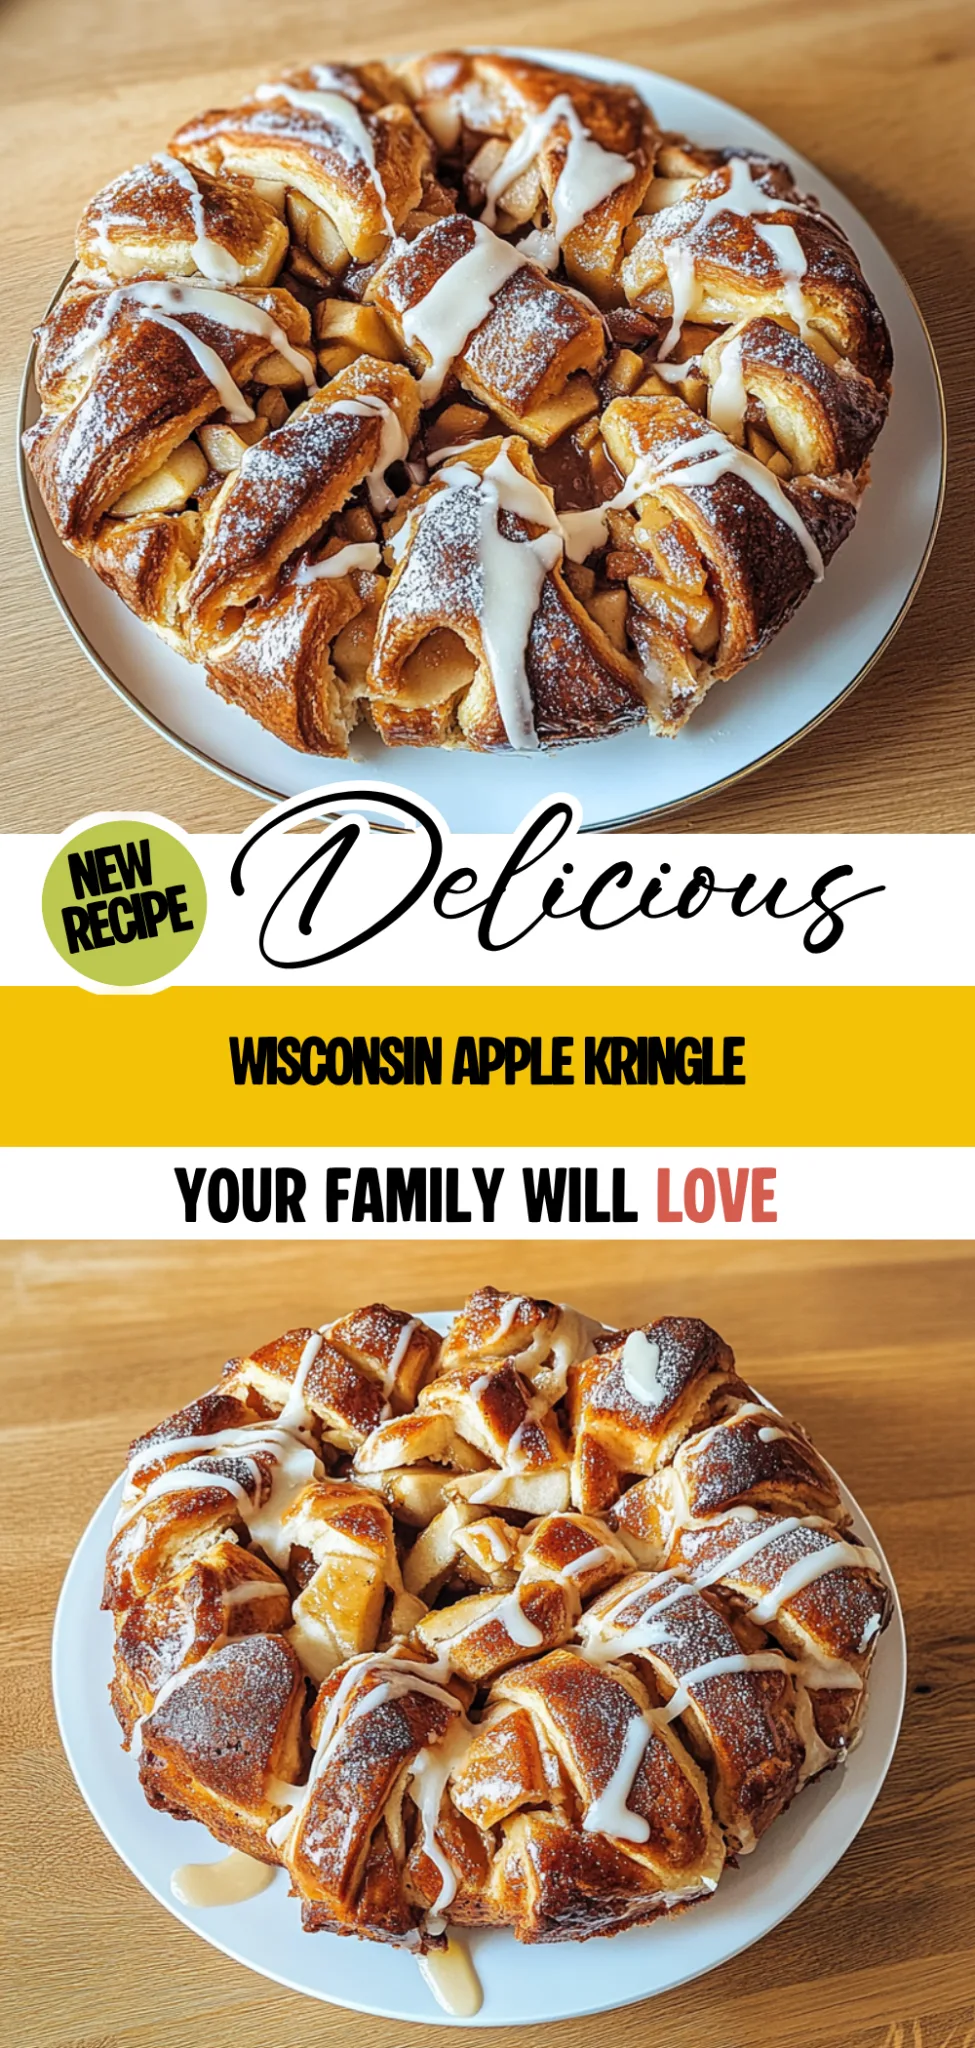
Are you ready to see how straightforward it is to make the Wisconsin Apple Kringle of your dreams??
1. PREPARE THE DOUGH
Let’s start with the base of this delicious pastry!
1. COMBINE – In a mixing bowl, combine the flour, salt, and granulated sugar. This mixture will be the foundation of your dough and helps create a balanced flavor profile.
2. CUT IN BUTTER – Cut in the cold, cubed unsalted butter until the mixture resembles coarse crumbs. This step is essential as it creates flaky layers when baked – trust me, it’s worth it!
3. ADD WATER – Gradually add cold water, mixing until the dough comes together. You may not need all of it; use just enough to hold everything nicely together.
4. CHILL – Wrap the dough in plastic wrap and refrigerate for 30 minutes. This allows the gluten to relax and makes rolling out much easier later on.
HANDY TIPS
- Use very cold butter! It helps achieve that perfect flaky texture.
- If you find your dough too crumbly after adding water, add a little more until it holds together without being sticky.
2. MAKE THE FILLING
Now for that delightful apple filling!
1. MIX INGREDIENTS – In a separate bowl, mix together the diced apples, cinnamon, brown sugar, lemon juice, and cornstarch until well combined. The lemon juice adds brightness and prevents the apples from browning while cornstarch thickens any juices released during baking.
HANDY TIPS
- For extra flavor, consider using a mix of tart and sweet apples like Granny Smith and Honeycrisp!
- Letting this mixture sit for a few minutes can help develop deeper flavors as the spices infuse into the apples.
3. ASSEMBLE THE KRINGLE
Time to bring it all together!
1. PREHEAT OVEN – Preheat your oven to 375°F (190°C). This ensures your kringle gets that perfect golden-brown finish.
2. ROLL OUT DOUGH – Roll out the chilled dough on a floured surface into a rectangle about ¼ inch thick. Make sure it’s even so it bakes uniformly – nobody likes uneven pastries!
3. ADD FILLING – Spread the apple filling down the center of the dough, leaving space on the edges for folding over later. Don’t skimp on filling!
4. FOLD AND SEAL – Fold the edges over the filling and pinch to seal tightly. It’s important to ensure no filling escapes while baking.
5. TRANSFER AND BAKE – Carefully transfer your kringle to a baking sheet lined with parchment paper and bake for 30 minutes or until golden brown and fragrant throughout your kitchen.
HANDY TIPS
- Want an even more beautiful finish? Brush the top with an egg wash before baking for a glossy look!
- Keep an eye on your kringle; ovens vary in temperature and you want that lovely golden color without burning.
4. GLAZE THE KRINGLE
To finish off this beautiful pastry!
1. WHISK GLAZE – In a small bowl, whisk together powdered sugar, milk, and vanilla extract until smooth. The glaze should be pourable but not too runny – adjust milk as needed!
2. DRIZZLE OVER KRINGLE – Drizzle this sweet glaze over your warm kringle right after it comes out of the oven for that irresistible finish.
HANDY TIPS
- If you want to experiment with flavors, try adding almond extract instead of vanilla for an interesting twist!
- Drizzling while warm allows it to slightly soak in making every bite extra delicious.
Make this Wisconsin Apple Kringle once, and I guarantee it’ll become a beloved addition to your breakfast table or dessert spread! Happy baking! – Nagi x
FAQ – Wisconsin Apple Kringle
🍏 How long will the Wisconsin Apple Kringle keep?
The Wisconsin Apple Kringle will stay fresh for about 3 days when stored in an airtight container at room temperature. After that, you might notice a decline in quality — I’d say it’s about 80% as good on day 4 and drops to around 60% by day 5. If you want to keep it longer, consider refrigerating it, which can extend its shelf life to about a week. Just make sure to let it come back to room temperature before serving for the best flavor and texture!
❄️ Can I freeze the Wisconsin Apple Kringle?
Absolutely! You can freeze the kringle either baked or unbaked. If freezing unbaked, assemble the kringle, wrap it tightly in plastic wrap, and then place it in a freezer-safe bag or container. It can be frozen for up to 3 months. When you’re ready to bake, simply remove it from the freezer and let it thaw overnight in the fridge before baking at 375°F (190°C) for about 35-40 minutes. If freezing baked, allow it to cool completely before wrapping; it will last similarly in the freezer.
🥛 Can I make this recipe dairy-free?
While this recipe calls for unsalted butter, you can easily substitute with a dairy-free alternative like vegan butter or coconut oil to achieve similar results. The filling is naturally dairy-free as well! Just ensure that any store-bought substitutes don’t contain hidden dairy ingredients. In my experience, using vegan butter yields a deliciously flaky dough that’s almost indistinguishable from the original — perfect for those avoiding dairy.
🔄 Can I use a different type of apple for the filling?
Definitely! While I prefer using tart apples like Granny Smith for their balance of sweetness and tanginess, you can experiment with other varieties such as Honeycrisp or Fuji. Just keep in mind that sweeter apples might require slightly less sugar in the filling. For example:
- Granny Smith: Tart and firm, holds shape well.
- Honeycrisp: Sweet and crispy; reduce brown sugar by about 1/4 cup.
- Fuji: Very sweet; consider reducing sugar even more if you use these.
⚖️ What happens if I skip chilling the dough?
Chilling the dough is crucial for creating a flaky texture and preventing shrinkage during baking. If you skip this step, you’ll likely end up with a tougher pastry that doesn’t rise properly. Trust me — I’ve tried skipping it out of impatience (err…yes, I know). 😅 The dough needs time to relax, which allows the gluten to settle down and helps maintain its structure while baking.
🍰 Can I add nuts or other fillings to my kringle?
Yes! Adding nuts like chopped pecans or walnuts can enhance both flavor and texture beautifully. Just mix them into your apple filling before assembling — about 1/2 cup should do nicely. You could also experiment with spices like nutmeg or allspice for added depth of flavor if you’re feeling adventurous! Just remember not to overload your filling so that it remains manageable when rolling up.
🤔 Did you really test this recipe multiple times?
Yes, I really did test this kringle recipe more times than I’d like to admit—about seven times! Each time was an adventure filled with little tweaks until perfection was achieved (and perhaps a few apple-related disasters along the way). The result? A wonderfully flaky pastry with just the right amount of sweetness that makes every bite worth all that effort!
Troubleshooting
I will continue to add more to this Troubleshooting section as I start seeing questions coming through from people who have made the recipe.
Troubleshooting tips
“My kringle turned out too thin and flat! 😩”
- You might have rolled your dough out too thin. Aim for a rectangle that is about 1/4 inch thick for the best rise and texture.
- If your dough was too warm when you assembled it, it may have spread during baking. Make sure your dough is well chilled before rolling it out.
I bet your kringle still had all those yummy apple flavors though!
“My kringle filling leaked everywhere! 😱”
- This can happen if you didn’t seal the edges of your dough properly. Take extra care to pinch and seal them tightly so the filling stays inside during baking.
- Using too much liquid in the apple filling can also cause leakage; make sure to stick with the specified amounts of lemon juice and cornstarch to help thicken it.
At least the kitchen smelled amazing, right?
“The crust of my kringle was way too tough! 😩”
- If you overworked your dough while mixing or rolling it out, it could develop gluten, leading to a tougher texture. Mix just until combined and handle gently!
- Not using enough cold butter can also contribute to a dense crust; ensure your butter is cold and cubed before mixing in.
I bet it still tasted great, even if the texture was a bit off!
“My glaze turned out all lumpy! 😕”
- This usually happens if you didn’t sift your powdered sugar before mixing or if you added the milk too quickly without whisking properly. Take your time when incorporating each ingredient!
- Using cold milk instead of room temperature can also lead to clumping, so make sure it’s slightly warmed up for a smoother glaze.
Even lumpy, I’m sure that glaze added a sweet touch to your kringle!
“My apples turned mushy and fell apart! 😢”
- If your apples were overly ripe or cooked for too long during preparation, they may have broken down too much. Choose firm apples like Granny Smith or Honeycrisp for better texture.
- Not using cornstarch in the filling can also lead to excess moisture, making them mushy—don’t skip that step!
They might not have held their shape perfectly, but they were probably still deliciously spiced!
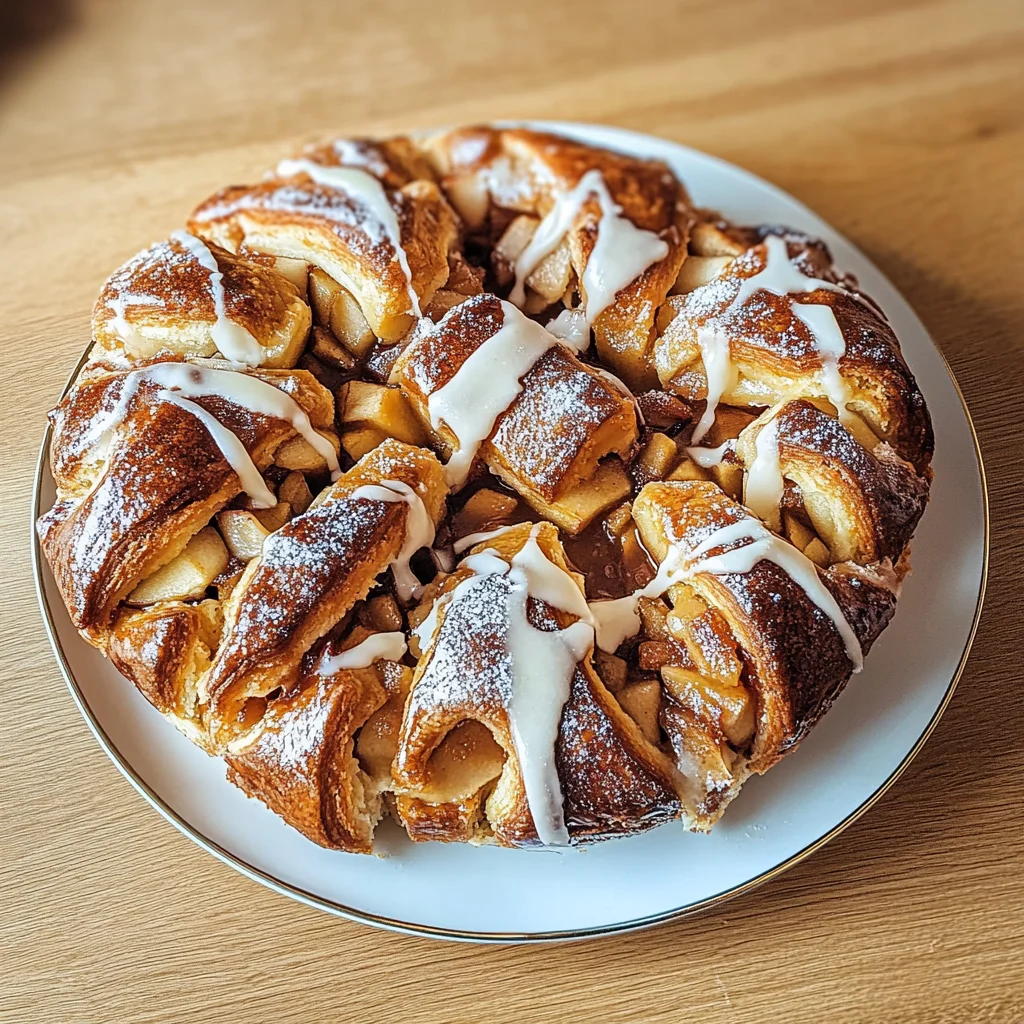
Wisconsin Apple Kringle
Ingredients
Method
- In a mixing bowl, combine flour, salt, and sugar. Cut in the cold butter until the mixture resembles coarse crumbs.
- Gradually add cold water, mixing until the dough comes together. Wrap in plastic wrap and refrigerate for 30 minutes.
- In a separate bowl, mix diced apples, cinnamon, brown sugar, lemon juice, and cornstarch until well combined.
- Preheat the oven to 375°F (190°C). Roll out the chilled dough on a floured surface into a rectangle.
- Spread the apple filling down the center of the dough, leaving space on the edges. Fold the edges over the filling and pinch to seal.
- Transfer to a baking sheet lined with parchment paper. Bake for 30 minutes or until golden brown.
- In a small bowl, whisk together powdered sugar, milk, and vanilla until smooth. Drizzle over the warm kringle.