It all started one sunny afternoon when I found myself at a charming café, indulging in their signature dessert: a slice of white chocolate raspberry cake that was nothing short of heavenly. The combination of creamy white chocolate and tart raspberries danced on my palate, leaving me utterly enchanted. I knew I had to recreate this masterpiece at home—not just because my wallet was starting to feel the pinch from those frequent café visits, but also because I wanted to put my own spin on it and make it even better.
After several attempts and a few minor kitchen disasters (let’s just say I may have mistaken baking powder for baking soda once), I finally landed on the perfect recipe for my White Chocolate Raspberry Dream Cake. It took me about a week of testing—trying different ratios of ingredients and techniques to achieve that ideal balance between rich and refreshing. Each iteration brought me closer to the dreamy texture I envisioned, but let’s just say some cakes didn’t quite rise to the occasion… literally!
But oh boy, was it worth every bit of flour-covered chaos! The final result is a luscious and decadent cake featuring layers of silky white chocolate ganache and juicy fresh raspberries that sing together in perfect harmony. With its moist crumb and delightful burst of tartness, this cake is sure to impress at any special occasion or simply when you want to treat yourself (because who needs an excuse?). I can’t wait for you to dive into this scrumptious creation—trust me, your taste buds will be throwing a party!
These White Chocolate Raspberry Dream Cake are…
….the ultimate indulgence for anyone who loves a harmonious blend of flavors!
1. They have a deliciously sweet and tangy flavor that comes from the combination of luscious white chocolate and fresh raspberries. The sweetness of the white chocolate perfectly balances the tartness of the raspberries, creating a cake that delights the palate with every bite.
2. Incredibly moist texture – each slice is soft and tender, thanks to a careful balance of butter and milk in the cake batter. This moisture ensures that every layer melts in your mouth, making it a truly dreamy experience that’s hard to resist.
3. A key technique involves folding whipped heavy cream into the white chocolate filling, which creates an airy and light consistency. This method not only enhances the richness but also ensures that every forkful feels like a cloud of flavor, elevating this cake beyond ordinary desserts.
4. Cost-effective indulgence – making this White Chocolate Raspberry Dream Cake at home allows you to enjoy gourmet quality without breaking the bank. With accessible ingredients like all-purpose flour and fresh raspberries, you can create an impressive dessert for special occasions without the restaurant price tag.
PS This cake yields about 12 generous slices, perfect for sharing at gatherings or celebrating life’s sweet moments!
Ingredients You’ll Need
Each ingredient in this dish plays an essential role in flavor and texture. Here’s what you’ll need:
- 2 cups all-purpose flour: Provides structure and a light crumb to the cake.
- 1 cup granulated sugar: Sweetens the cake and contributes to its moistness.
- 1 tbsp baking powder: Acts as a leavening agent for a fluffy texture.
- 1/2 tsp salt: Enhances the sweetness and balances flavors.
- 1/2 cup unsalted butter (softened): Adds richness and moisture to the cake.
- 1 cup milk: Keeps the cake tender and adds creaminess.
- 2 large eggs: Bind the ingredients together and enrich the flavor.
- 1 tsp vanilla extract: Infuses the cake with warm, sweet notes.
You must cool the cakes completely. Trust me!
I know, I know — it feels like a pain to wait. I tried to rush this step once, thinking I could just frost the cake while it was still warm. Spoiler alert: the frosting melted into a gooey mess, and I was left with a sad, lopsided dessert that tasted good but looked like it had been through a blender! Lesson learned.
Cooling the cakes completely is crucial because it allows them to firm up and set properly. Think of it like letting dough rest before baking — if you skip that step, you end up with a sticky, uneven texture. For this White Chocolate Raspberry Dream Cake, cooling ensures each layer maintains its structure and doesn’t turn into a mushy disaster when you slice into it. Trust me; your guests will thank you when they see those beautiful layers of cake intact!
What does cooling the cakes do?
- Texture — Cooling helps the cake firm up, preventing it from crumbling or falling apart during slicing.
- Moisture retention — A warm cake can release steam, making it drier; cooling locks in moisture for that dreamy texture.
- Flavor development — As the cake cools, the flavors settle and become more pronounced, especially the vanilla notes that harmonize with the raspberries.
- Easier frosting application — A cooled cake provides a stable surface for frosting without melting or sliding off.
- Layer stability — Ensuring each layer is fully cooled prevents shifting and guarantees your cake stands tall and proud when assembled.
Different cooling times
- 10 minutes (okay) — Just enough to handle safely but still warm; risk of melting frosting if applied too soon.
- 30 minutes (good) — Cools enough for easier handling but may still be slightly warm at the center.
- 1 hour (better) — Most of the heat dissipates; safe for frosting but still might be slightly soft inside.
- 2 hours or more (best) — Completely cool throughout; perfect for layering and frosting without any risk of melting.
Remember, patience is key! The most common mistake here is trying to frost too soon. Don’t be tempted by that delicious cake aroma wafting through your kitchen! If you frost while it’s warm, you’ll end up with an unintentional melted frosting puddle instead of a beautifully decorated cake.
How to make White Chocolate Raspberry Dream Cake
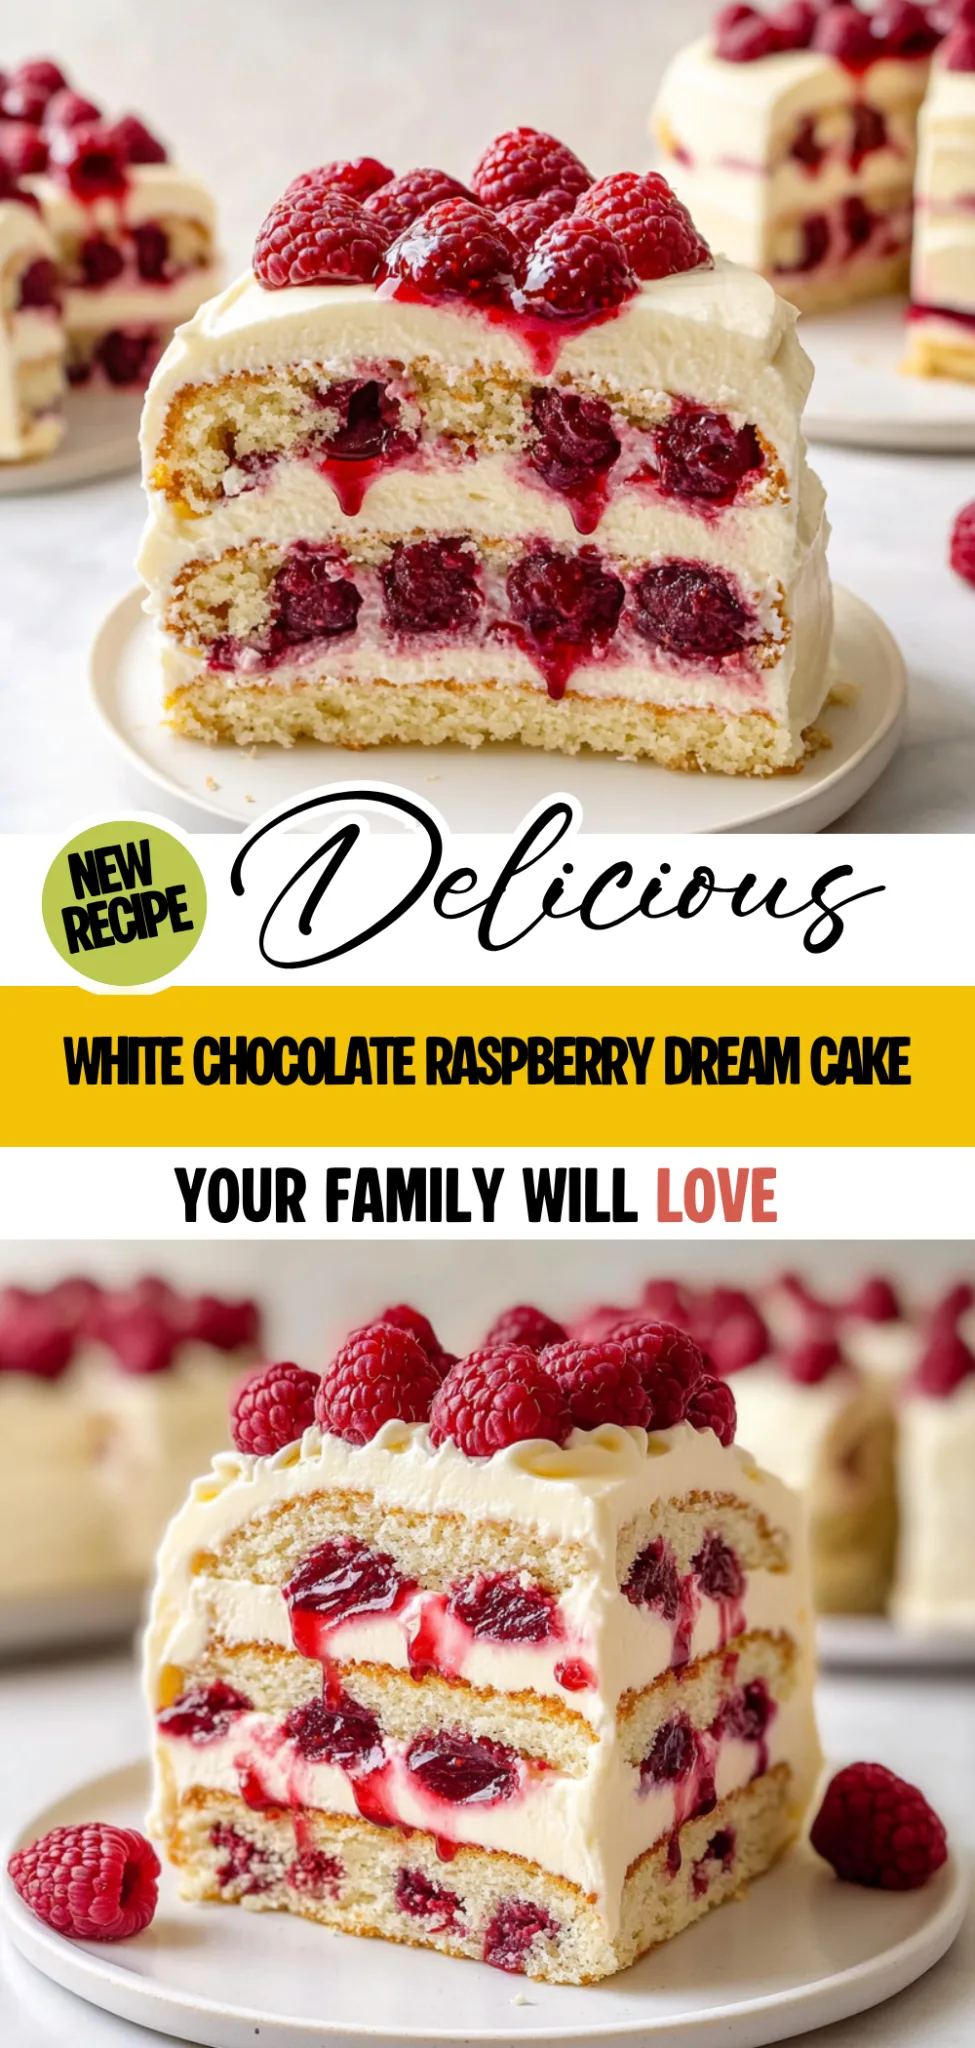
Are you ready to see how straightforward it is to make the White Chocolate Raspberry Dream Cake of your dreams??
1. PREPARE THE CAKE
Let’s kick off by creating a moist and fluffy cake that sets the foundation for our delightful dessert!
1. Preheat – Preheat the oven to 350°F (175°C). Greasing and flouring two 9-inch round cake pans ensures your cake layers release easily after baking. This step is crucial, as a well-prepared pan prevents any sticky situations!
2. Combine Dry Ingredients – In a large mixing bowl, combine 2 cups of all-purpose flour, 1 cup of granulated sugar, 1 tablespoon of baking powder, and ½ teaspoon of salt. This mixture provides the structure and sweetness needed for your cake.
3. Add Wet Ingredients – Add in ½ cup of softened unsalted butter, 1 cup of milk, 2 large eggs, and 1 teaspoon of vanilla extract. Beat with an electric mixer on medium speed for about 2 minutes until the batter is smooth and well combined.
4. Divide Batter – Divide the batter evenly between the prepared pans. This ensures both layers bake uniformly, giving you that perfect height when stacked.
5. Bake – Bake for 25 minutes or until a toothpick inserted in the center comes out clean. You want the tops to be lightly golden and spring back when touched.
6. Cool – Cool the cakes in the pans for 10 minutes before removing them from the pans to cool completely on wire racks. This helps set the structure before layering.
HANDY TIPS
- For best results, use room temperature ingredients; this helps create a more homogenous batter.
- If you want extra flavor, consider adding a bit of almond extract along with vanilla.
2. MAKE THE FILLING
Now it’s time to whip up that luscious raspberry filling that will add a fresh burst of flavor!
7. Heat Cream – In a small saucepan, heat 1 cup of heavy cream until just simmering but not boiling. This step is key as it allows for proper melting without scorching your chocolate.
8. Melt Chocolate – Remove from heat and add in 8 ounces of chopped white chocolate. Stir until melted and smooth; this creates a creamy base for your filling.
9. Fold in Raspberries – Allow to cool slightly before folding in 1 cup of fresh raspberries and ¼ cup of powdered sugar. The cooling process prevents the raspberries from breaking down too much.
HANDY TIPS
- For an even more intense raspberry flavor, consider mashing some raspberries lightly before folding them in.
- You can substitute half of the heavy cream with mascarpone cheese for an even richer filling!
3. PREPARE THE FROSTING
Let’s create that dreamy frosting that will elevate our cake to another level!
10. Beat Butter – In a large bowl, beat 1 cup of softened unsalted butter until creamy and pale—this should take about a minute.
11. Add Sugar Gradually – Gradually add in 4 cups of powdered sugar while alternating with ¼ cup of heavy cream and 1 teaspoon of vanilla extract, beating until smooth and fluffy. This method ensures your frosting is light and doesn’t become too thick or grainy.
HANDY TIPS
- If your frosting is too thick, add more cream one tablespoon at a time until you reach your desired consistency.
- For added flavor depth, sift cocoa powder into your frosting if you want to make it chocolatey!
4. ASSEMBLE THE CAKE
It’s time to put everything together into one stunning masterpiece!
12. Layer Cake – Place one cake layer on a serving plate and spread half of the raspberry filling over the top evenly using an offset spatula.
13. Add Second Layer – Top with the second cake layer and spread the remaining filling over it as well; this creates that delicious surprise when you cut into it!
14. Frost Cake – Frost the sides and top of the cake generously with the prepared frosting using a large spatula or knife for smoothness—don’t worry about perfection here; rustic is charming!
15. Garnish – Finally, garnish with additional fresh raspberries if desired; they not only look beautiful but also give guests an idea of what’s inside!
Make this stunning White Chocolate Raspberry Dream Cake once, and I guarantee it will become your go-to showstopper for special occasions! Happy baking! – Nagi x
FAQ – White Chocolate Raspberry Dream Cake
🍰 How long will this cake keep?
This White Chocolate Raspberry Dream Cake can be stored at room temperature for up to 2 days, but I recommend refrigerating it to maintain its freshness. In the fridge, it will stay delicious for about 4-5 days, though I found it to be 97% as good on day 3. Just make sure to cover it well to prevent it from drying out. If you notice any condensation when you take it out of the fridge, let it sit at room temperature for a bit before serving.
❄️ Can I freeze this cake?
Absolutely! You can freeze the cake layers individually wrapped in plastic wrap and then placed in a zip-top bag for up to 3 months. For the filling, I recommend freezing it separately as well. To thaw, transfer the cake layers to the fridge overnight. Allow the raspberry filling to come to room temperature before using it again. Just a heads-up: freezing may slightly change the texture of the raspberries in the filling, but they’ll still taste fantastic!
🌾 Can I make this cake gluten-free?
Yes, you can! I tested this recipe using gluten-free all-purpose flour, and it worked surprisingly well. Just ensure your gluten-free flour blend contains xanthan gum or add about 1/4 teaspoon if not included. The texture is slightly different—more tender—but still incredibly delicious! Just remember that gluten-free cakes tend to dry out faster, so consume them within a few days or keep them well-wrapped.
🍫 What can I substitute for white chocolate in the filling?
If you’re not a fan of white chocolate or want a darker flavor, you can use semi-sweet or dark chocolate instead. However, because dark chocolate has less sugar than white chocolate, I suggest adding an extra tablespoon of powdered sugar to balance out the sweetness. The flavor profile will shift more towards rich and chocolaty rather than creamy and sweet, which can be delightful too!
🥛 Do I really need heavy cream for the frosting?
Yes! Heavy cream is essential for achieving that light and fluffy texture in the frosting. It helps create a beautifully smooth consistency that spreads easily without being too stiff. If you’re looking for a lighter alternative, you could try using half-and-half; however, keep in mind that it won’t be quite as rich and creamy.
⏱️ Can I skip cooling time after baking?
Nope! You cannot skip cooling the cake layers after baking—trust me on this one! Cooling allows the crumb structure to set properly; if you frost them while they’re still warm, you’ll end up with melted frosting and soggy layers. It’s best to let them cool in their pans for about 10 minutes before transferring them to wire racks until completely cooled—patience is key!
🤔 How many times did you test this cake recipe?
Let’s just say my kitchen was filled with raspberry dreams (and some disasters) during testing! I made this cake seven times before landing on this perfect balance of flavors and textures. Each iteration taught me something new about how white chocolate interacts with raspberries and how important each ingredient is in creating that lush experience we all crave!
Troubleshooting
I will continue to add more to this Troubleshooting section as I start seeing questions coming through from people who have made the recipe.
Troubleshooting tips
“My cake layers came out too flat! 😩”
- Your baking powder may have lost its potency. If it’s been sitting in your pantry for a while, it might not provide the lift you need for those fluffy layers.
- You might have overmixed the batter after adding the dry ingredients, which can lead to a denser cake. Mixing too much develops gluten and makes the cake tough.
- Another possibility is that your oven temperature was off. If it was too low, the cake wouldn’t rise properly. Invest in an oven thermometer to check!
I bet they were still YUM though!
“My cake is so dry, it’s like eating cardboard! 😭”
- You might have overbaked your cake layers. Even a couple of minutes past the recommended 25 minutes can lead to dryness, so set a timer!
- Additionally, if you used too much flour by packing it into the measuring cup instead of spooning it, this could also contribute to a dry texture.
- Not using enough moisture in the batter can also result in dryness. Make sure you’re measuring your milk accurately!
I bet they were still YUM though!
“The frosting is way too thick! How do I fix this? 🤔”
- You may not have added enough heavy cream when mixing your frosting. This helps achieve that perfect fluffy texture.
- If your butter was too cold when you started mixing, it can make blending difficult. Always ensure it’s softened to room temperature!
- Lastly, if you added too much powdered sugar, the frosting could become overly thick and stiff. Remember to add it gradually!
I bet they were still YUM though!
“The surface of my cake cracked while baking! 😳”
- Your oven temperature may have been too high. A rapid rise can cause cracking on the surface, so make sure your oven is at 350°F (175°C) as specified.
- Another reason could be that you didn’t cool the cakes gradually before removing them from the pans. Sudden temperature changes can lead to cracks.
I bet they were still YUM though!