I still remember the first time I bit into a grilled Mediterranean veggie quesadilla at my favorite little café down the street. It was one of those meals that seemed simple but packed a punch with its vibrant flavors and gooey cheese. I couldn’t shake the craving for days, and it got me thinking: why not recreate this deliciousness at home? Not only would I save some bucks, but I was determined to make it even better—more veggies, more cheese, and a touch of my own flair.
Let me tell you, perfecting my Grilled Mediterranean Veggie Quesadillas wasn’t exactly a walk in the park. After about five attempts (and a few questionable dinner choices that my family politely endured), I finally landed on the right combination of grilled veggies and melty cheese that would make anyone drool. Each iteration had its own set of challenges—I experimented with different cheeses, grilling times, and even tried sneaking in some herbs that didn’t quite work out. Let’s just say, my kitchen looked like a veggie battlefield!
But oh boy, was it worth every bit of effort! The final result is nothing short of mouthwatering: crispy on the outside with that irresistible cheesy pull when you take a bite, bursting with the smoky flavors of perfectly grilled Mediterranean vegetables. The blend of textures from the crunchy peppers and soft zucchini creates a symphony in your mouth that’s hard to resist. Trust me, once you try these bad boys, you’ll be hooked! So grab your skillet and let’s get cooking—I can’t wait for you to experience these heavenly quesadillas!
These Grilled Mediterranean Veggie Quesadillas are…
….the ultimate fusion of flavor and convenience that will have you coming back for seconds!
1. They deliver a vibrant burst of flavors from the combination of grilled zucchini, bell peppers, and sweet cherry tomatoes. Each bite is a celebration of Mediterranean ingredients, enhanced with a drizzle of olive oil and a sprinkle of oregano, making these quesadillas irresistibly delicious.
2. Enjoy a wonderful contrast in texture with soft melted mozzarella and crumbled feta nestled between perfectly grilled veggies. The slight crunch from the peppers and zucchini adds an exciting dimension, creating a delightful chewiness that elevates each quesadilla.
3. The grilling technique used for the vegetables brings out their natural sweetness while adding a smoky depth to the dish. By grilling them before assembling the quesadillas, I found it enhances the overall flavor profile and ensures every bite is packed with that delicious charred goodness.
4. They offer incredible value, as you can whip up these Grilled Mediterranean Veggie Quesadillas using fresh ingredients that are both affordable and widely available. With just a handful of veggies and some cheese, you can create a satisfying meal at home that rivals any restaurant offering without breaking the bank.
PS These quesadillas are perfect for quick meals or snacks and can easily be customized with your favorite vegetables!
Ingredients You’ll Need
Each ingredient in this dish plays an essential role in flavor and texture. Here’s what you’ll need:
- 1 medium Zucchini (sliced): Adds a subtle sweetness and a tender crunch.
- 1 medium Red Bell Pepper (sliced): Provides a burst of sweetness and vibrant color.
- 1 medium Yellow Bell Pepper (sliced): Contributes a mild flavor with a hint of earthiness.
- 1 medium Red Onion (sliced): Offers a sharp yet sweet bite that enhances the overall taste.
- 1 cup Cherry Tomatoes (halved): Brings juicy freshness and acidity to balance the flavors.
- 2 cups Shredded Mozzarella Cheese: Melts beautifully, creating a creamy and stretchy texture.
- 1 cup Feta Cheese (crumbled): Adds a tangy richness that elevates the Mediterranean profile.
- 4 large Flour Tortillas: Serve as the hearty base, holding all the delicious fillings together.
- 2 tablespoons Olive Oil: Helps with grilling while adding depth and richness.
- 1 teaspoon Dried Oregano: Infuses an aromatic herbaceous note characteristic of Mediterranean cuisine.
- 1 teaspoon Salt (to taste): Enhances all the flavors, bringing them together harmoniously.
- 1 teaspoon Black Pepper (to taste): Adds warmth and a mild kick to round out the seasoning.
You Must Grill the Vegetables. No Shortcuts!
I have a confession: I tried to rush through this step by using raw veggies, hoping for the same delicious results. Spoiler alert: it didn’t work! After several failed attempts (and a few too many sad quesadillas), I can assure you that grilling the vegetables is non-negotiable if you want that smoky, charred flavor that truly elevates this dish.
Grilling the veggies transforms them in a way that raw vegetables simply can’t compete with. Think of it like roasting tomatoes for a sauce; it enhances their sweetness and deepens their flavor profile. When you grill zucchini, bell peppers, onions, and cherry tomatoes, the heat caramelizes their natural sugars and creates those beautiful char marks. This not only boosts their flavor but also gives your quesadillas that irresistible taste of summer.
What does grilling the vegetables do?
- Flavor — Grilling intensifies the natural sweetness of the vegetables while adding a smoky depth that elevates every bite.
- Texture — The grilling process softens the veggies to just the right tenderness, giving them a pleasing mouthfeel without turning them into mush.
- Color — Charred edges give your quesadillas an appealing look with vibrant colors that make them more appetizing.
- Moisture content — Grilling helps release excess moisture from veggies like zucchini and bell peppers, preventing soggy quesadillas.
- Aromatics — The grilling process activates compounds in the veggies that enhance their aroma, making your kitchen smell utterly divine.
Different grilling times
- 3 minutes (okay) — Slightly warm with minimal char; the flavors are present but muted.
- 5 minutes (good) — The veggies start to soften, but they lack that deeply charred taste and texture.
- ⭐️ 8 to 10 minutes⭐️ — Ideal! The vegetables become tender and perfectly caramelized with lovely grill marks.
- Beyond 12 minutes (diminishing returns) — Risk of burning or overcooking; they may become too soft and lose their vibrant color.
Don’t skip grilling those vegetables! The most common mistake is underestimating how long they need on the grill. If you pull them off too soon, you’ll miss out on all those lovely flavors and textures that make these quesadillas shine. Trust me; it’s worth every minute spent waiting for that perfect char!
How to make Grilled Mediterranean Veggie Quesadillas
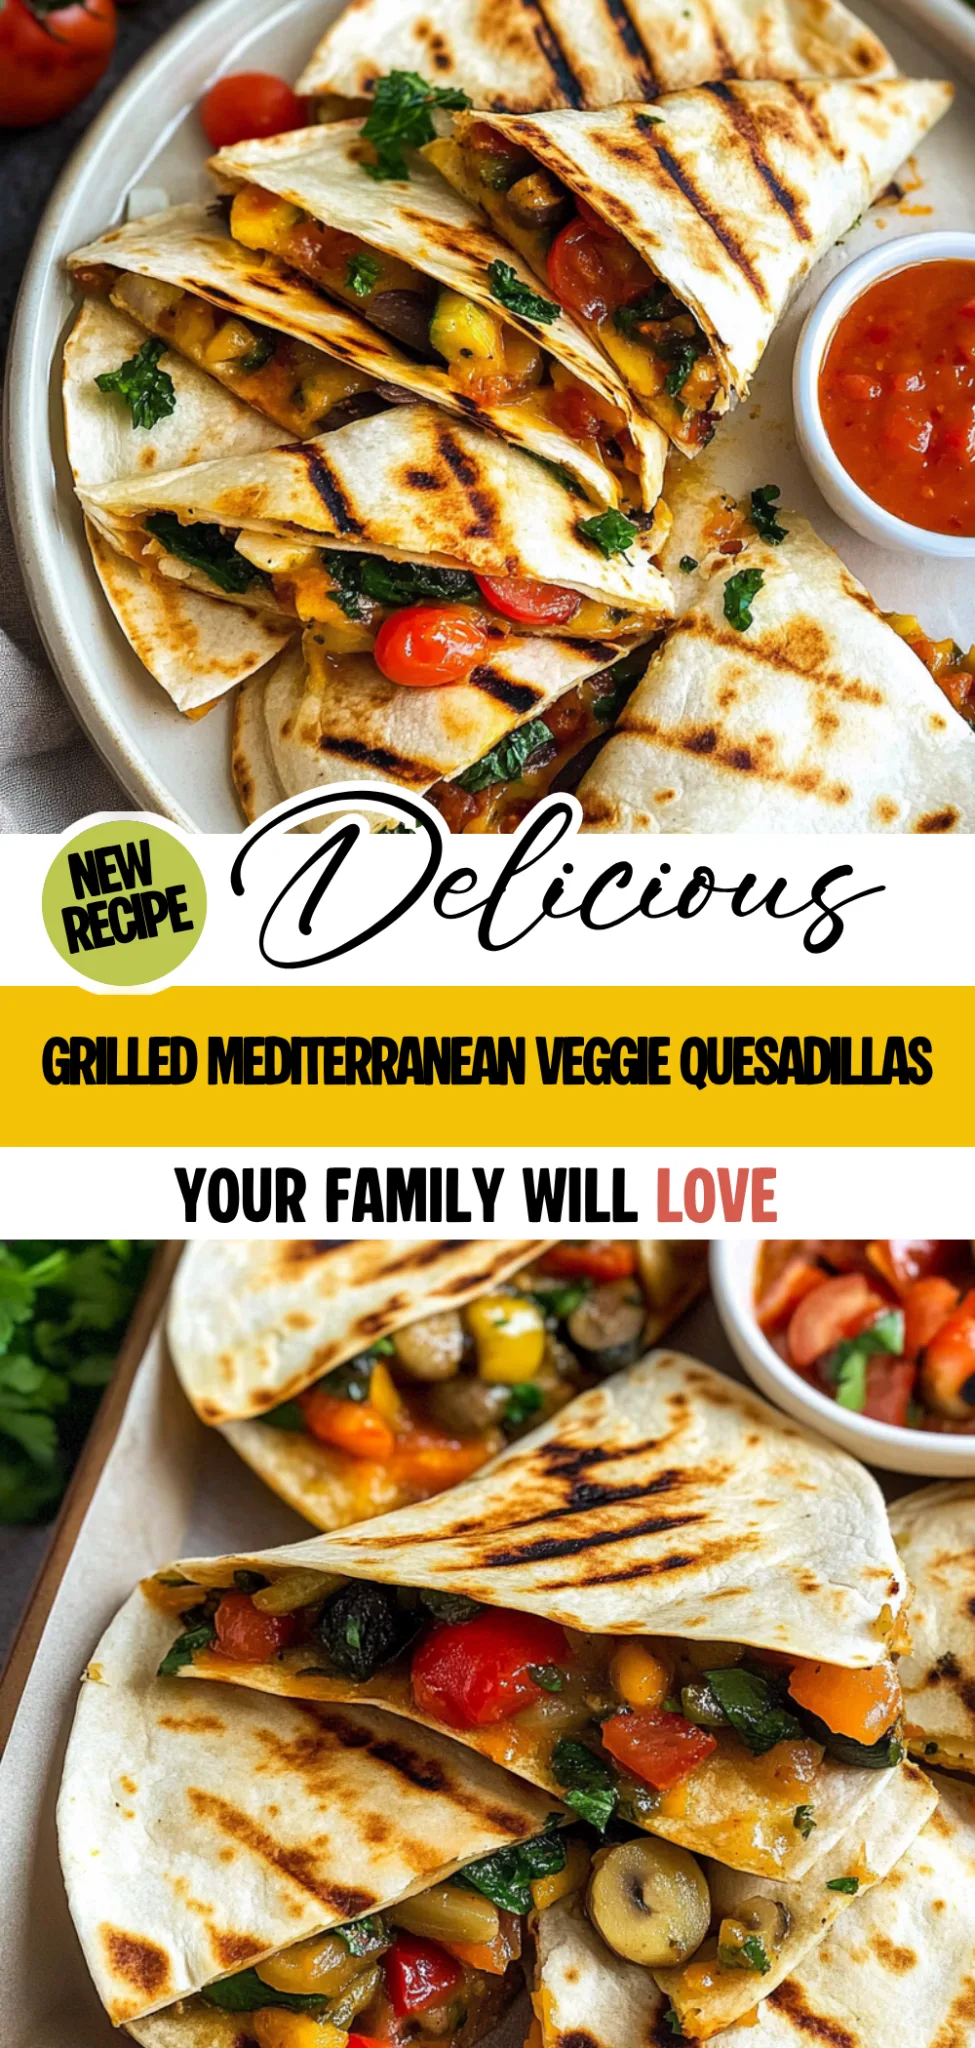
Are you ready to see how straightforward it is to make the Grilled Mediterranean Veggie Quesadillas of your dreams??
1. PREPARE THE VEGETABLES
Let’s kick things off by prepping our delicious veggies!
1. Preheat – Preheat the grill to medium-high heat. This ensures that your vegetables will get that fantastic grilled flavor and beautiful char marks!
2. Combine – In a large bowl, combine the sliced zucchini, red bell pepper, yellow bell pepper, red onion, and halved cherry tomatoes. Having all your veggies together makes for easy tossing and flavor absorption!
3. Drizzle – Drizzle the vegetables with olive oil, then sprinkle with oregano, salt, and black pepper. Toss everything together until the veggies are evenly coated; this not only enhances their flavor but also helps them grill beautifully.
HANDY TIPS
- Choose vibrant vegetables for a more colorful dish!
- Feel free to add other Mediterranean favorites like eggplant or artichokes if you have them on hand.
2. GRILL THE VEGETABLES
Now it’s time to unleash those flavors on the grill!
4. Place – Place the seasoned vegetables directly on the grill. Cook them for about 8-10 minutes, turning occasionally with tongs until they are tender and slightly charred. The grill’s heat caramelizes the sugars in the vegetables, enhancing their natural sweetness!
HANDY TIPS
- Keep an eye on your veggies as grilling times may vary based on thickness.
- If you’re using a grill basket, it can help contain smaller pieces like cherry tomatoes!
3. ASSEMBLE THE QUESADILLAS
Let’s get cheesy!
5. Layer – On one half of each tortilla, layer a generous amount of grilled vegetables followed by shredded mozzarella cheese and crumbled feta cheese. The combination of cheeses adds creaminess and tanginess that complements the grilled veggies perfectly!
6. Fold – Fold each tortilla in half to cover the filling securely. This helps keep all those tasty ingredients inside while cooking.
HANDY TIPS
- You can use whole wheat tortillas for a healthier option!
- If you want extra flavor, consider sprinkling some extra oregano over the cheese before folding.
4. COOK THE QUESADILLAS
Time to bring everything together in a warm embrace!
7. Heat – Heat a skillet over medium heat (you can use a non-stick pan or cast iron for better results). Cook each quesadilla for about 3-4 minutes on each side until they are golden brown and the cheese is melted and gooey. Don’t rush this step; that perfect crispness is worth it!
HANDY TIPS
- For an extra crispy finish, brush the outside of each quesadilla with a little olive oil before placing them in the skillet.
- If you’re making multiple quesadillas at once, keep cooked ones warm in a low oven while you finish up!
5. SERVE
Let’s dig in!
8. Cut – Once cooked, carefully cut the quesadillas into wedges and serve them warm with salsa or sour cream on the side for dipping.
Make these once, and I wager they will invade your dreams every night too! – Nagi x
FAQ – Grilled Mediterranean Veggie Quesadillas
🥙 How long will these quesadillas keep in the fridge?
These quesadillas will stay fresh in the fridge for up to 3 days if stored properly in an airtight container. By day 3, they retain about 97% of their original flavor and texture. After that, you might notice the veggies losing some crunch, and the cheese could become a bit rubbery. If you plan to eat them later, I recommend reheating in a skillet to revive that delicious melty cheese!
⏰ Can I skip grilling the vegetables?
No, you can’t skip grilling the vegetables! Trust me, I tried it once (and regretted it). Grilling not only enhances the flavors through caramelization but also gives those lovely char marks that make these quesadillas irresistible. Cooking them on medium-high heat for about 8-10 minutes brings out their natural sweetness and adds depth to every bite.
❄️ Can I freeze these quesadillas for later?
Yes, you can freeze these quesadillas! To do this, assemble them as instructed but don’t cook them. Wrap each quesadilla tightly in plastic wrap or aluminum foil and place them in a freezer-safe bag. They’ll last up to 3 months in the freezer. When you’re ready to enjoy them, let them thaw in the fridge overnight before cooking as directed; this ensures even heating and preserves that delicious melty goodness!
🌱 Can these be made dairy-free?
Absolutely! To make these quesadillas dairy-free, substitute the mozzarella and feta with vegan cheese alternatives or omit cheese altogether. There are many great plant-based cheeses available now that melt beautifully. Just ensure you check labels for any hidden dairy ingredients. You can also enhance flavor with additional spices or nutritional yeast — it adds a cheesy flavor without the dairy!
🔄 What can I use instead of zucchini?
If you don’t have zucchini on hand or aren’t a fan, you can substitute it with yellow squash or even eggplant! Both options work wonderfully grilled and add a nice texture. Just slice them similarly to zucchini and follow the same grilling instructions. I’ve tried both variations, and they were equally delightful — so feel free to experiment!
🔍 Why do I need to toss the vegetables in olive oil before grilling?
Tossing your veggies in olive oil is crucial because it helps them grill evenly while preventing sticking to the grill grates. It also aids in achieving that beautiful char while locking in moisture—resulting in tender yet slightly crispy veggies. Plus, it’s where all that seasoning gets its chance to shine! If you skip this step, you might end up with dry veggies that lack flavor.
🎨 Can I customize the filling with other ingredients?
Definitely! The beauty of quesadillas is their versatility—feel free to add other veggies like mushrooms or spinach based on your preference or what’s on hand. You could even throw in some cooked protein like chicken or beans for extra heartiness. Just make sure not to overfill; otherwise, flipping them might become a challenge (trust me, I’ve learned this lesson!).
Troubleshooting
I will continue to add more to this Troubleshooting section as I start seeing questions coming through from people who have made the recipe.
Troubleshooting tips
“My quesadillas came out way too soggy! 😩”
- This could be due to the moisture from the grilled vegetables, especially if you used larger cherry tomatoes or didn’t drain them well. Excess moisture can make the tortillas soggy instead of crisp.
- Another reason might be that the tortillas were not cooked long enough in the skillet. Make sure you’re allowing enough time for them to develop a golden-brown crust.
- I bet they were still YUM though!
“Why are my quesadilla fillings oozing out everywhere? 😱”
- If you overstuffed your tortillas with grilled vegetables and cheese, it can lead to spillage when cooking. Make sure to layer a moderate amount of filling so there’s enough tortilla to hold everything together.
- Additionally, not folding the tortilla properly could also contribute to this issue. Ensure that you fold it securely before cooking.
- I bet they were still YUM though!
“My quesadillas burnt on the outside but were cold inside! 🔥”
- This usually happens if your skillet is too hot. You want medium heat for even cooking; too high, and the outside will char before the cheese has melted inside.
- Cooking them for too short a time may also prevent the insides from warming up thoroughly while achieving a golden crust on the outside.
- I bet they were still YUM though!
“The grilled veggies got too blackened and bitter! 😬”
- If your grill was set too high or if you left them on for too long without turning, they can easily char and develop a bitter taste. Aim for medium-high heat and keep an eye on them!
- Also, ensure you are tossing the veggies regularly while grilling; this helps achieve an even char without excessive burning.
- I bet they were still YUM though!