I first stumbled upon the idea of Vegan Pumpkin Pop Tarts during a cozy autumn afternoon at my favorite café. They had this divine pumpkin pastry that was so good I could hardly concentrate on my book. I found myself daydreaming about how I could recreate that warm, spiced goodness in my own kitchen. But let’s be honest, buying those little pastries can really add up! I figured if I made them at home, not only could I control the ingredients and make them vegan, but I could also indulge without breaking the bank.
After diving headfirst into my baking escapades, I realized perfecting these Vegan Pumpkin Pop Tarts wasn’t as easy as it looked. It took me five attempts—yep, five!—to get the dough just right without it turning into a sad, soggy mess or a brick-like structure. Each trial had me tweaking the spices or adjusting the glaze until I finally nailed that perfect balance of flaky crust and luscious filling. Let’s just say there were a few “interesting” taste tests along the way that made me question my baking skills!
But oh boy, was it worth every mishap! The final product is nothing short of dreamy: crisp on the outside with a tender, spiced pumpkin filling that’s bursting with flavor, all topped off with a sweet glaze that takes it over the top. These Vegan Pumpkin Pop Tarts are not just a treat; they’re an experience—a delightful combination of texture and taste that’ll make your kitchen smell like autumn itself. Trust me, you’ll want to whip up a batch (or two) and bask in the glory of your homemade masterpiece!
These Vegan Pumpkin Pop Tarts are….
….the ultimate fall treat that will leave you craving more!
1. They deliver an irresistible spiced pumpkin flavor that combines the warmth of cinnamon, nutmeg, and ginger with the natural sweetness of pumpkin puree. I’ve carefully balanced these spices to create a filling that feels like a warm hug on a chilly day, elevating these pop tarts beyond any store-bought version.
2. Flaky, tender crust – the dough made with solid coconut oil creates a beautifully flaky texture while keeping the pop tarts light and airy. This technique not only enhances the crunch but also provides a satisfying bite that perfectly complements the creamy filling.
3. Easy-to-make dough – using just flour, coconut oil, and maple syrup, this recipe simplifies traditional pastry-making techniques. By opting for solid coconut oil instead of butter, I found it helps achieve that perfect balance of flakiness and tenderness without compromising on flavor or requiring advanced skills.
4. Budget-friendly indulgence – making these Vegan Pumpkin Pop Tarts at home is not only cost-effective but also allows for customization based on your preferences. With basic pantry staples, I’ve created a treat that’s accessible for everyone, proving that you don’t have to splurge to enjoy gourmet flavors at home.
PS These Vegan Pumpkin Pop Tarts are perfectly handheld! They make for an ideal snack or dessert that’s easy to share (or keep all to yourself!).
Ingredients for the Vegan Pumpkin Pop Tarts
Each ingredient in this dish plays an essential role in flavor and texture. Here’s what you’ll need:
Dough
2 cups all-purpose flour (plus extra for dusting): Provides the structure and flaky texture of the pop tarts.
1/2 cup coconut oil (solid, not melted): Adds richness and helps create a tender, flaky crust.
1/4 cup maple syrup (or agave syrup): Naturally sweetens the dough while adding depth of flavor.
1/4 cup cold water (as needed): Helps bind the ingredients together and keeps the dough manageable.
1/2 teaspoon salt: Enhances the overall flavors of the dough.
Filling
1 cup pumpkin puree (canned or homemade): The star of the filling, bringing a creamy texture and rich pumpkin flavor.
1/4 cup brown sugar: Adds sweetness and a hint of molasses flavor to complement the spices.
1 teaspoon cinnamon: Infuses warmth and that classic autumn spice essence.
1/2 teaspoon nutmeg: Deepens the spiced flavor profile with its earthy notes.
1/4 teaspoon ginger: Offers a zesty kick that balances the sweetness of the filling.
1 tablespoon cornstarch (for thickening): Ensures the filling holds together nicely without being runny.
1 teaspoon vanilla extract: Elevates all the flavors with its sweet aromatic essence.
Glaze
1 cup powdered sugar: Creates a sweet, smooth topping that adds a delightful finish.
2 tablespoons non-dairy milk (or more for desired consistency): Adjusts the glaze’s thickness for perfect drizzling over the pop tarts.
- 1/2 teaspoon vanilla extract: Infuses the glaze with additional sweetness and flavor.
You Must Chill the Dough. Trust Me!
I know, I know—chilling the dough sounds like a tedious extra step that could easily be skipped. I tried to rush it once, and let’s just say my pop tarts ended up as sad, flaky messes that barely held their shape. So, I’m here to save you from that heartbreak!
Chilling the dough is non-negotiable because it allows the coconut oil to solidify, which is crucial for achieving that tender yet flaky texture we all crave in a pop tart. Think of it like resting a steak; just as resting allows the juices to redistribute for a succulent bite, chilling your dough creates layers that will puff up beautifully in the oven, making each bite of your vegan pumpkin pop tarts a delightful experience.
What Does Chilling the Dough Do?
- Texture — Chilling helps create a flakier crust by ensuring the solid coconut oil remains intact during baking.
- Structure — It allows the gluten in the flour to relax, preventing tough dough and resulting in a more tender pastry.
- Ease of Handling — A chilled dough is much easier to roll out without sticking or tearing, leading to better-shaped pop tarts.
- Flavor Development — The resting time lets flavors meld together; you’ll notice a richer taste compared to skipping this step.
- Baking Consistency — Chilled dough bakes more evenly, helping prevent burnt edges while ensuring a golden brown finish.
Different Chilling Times
- 15 minutes (fair) — Dough is slightly chilled but still too soft; results in less flakiness and can be tough when baked.
- 30 minutes (good) — The minimum time recommended; gives decent structure but may still lack optimal texture.
- 1 hour (very good) — Not only does this allow for better flavor melding, but the texture improves significantly with noticeable flakiness.
- ⭐️ 2 hours or more ⭐️ (excellent) — Ideal for achieving perfect pop tarts; every bite will be tender and flaky with a rich flavor profile.
Beware! The most common mistake is skipping or rushing the chilling process. If you try to handle warm dough, you’ll end up with sticky, unmanageable pastry that won’t hold its shape when baking. Trust me on this one—no shortcuts here!
How to make Vegan Pumpkin Pop Tarts
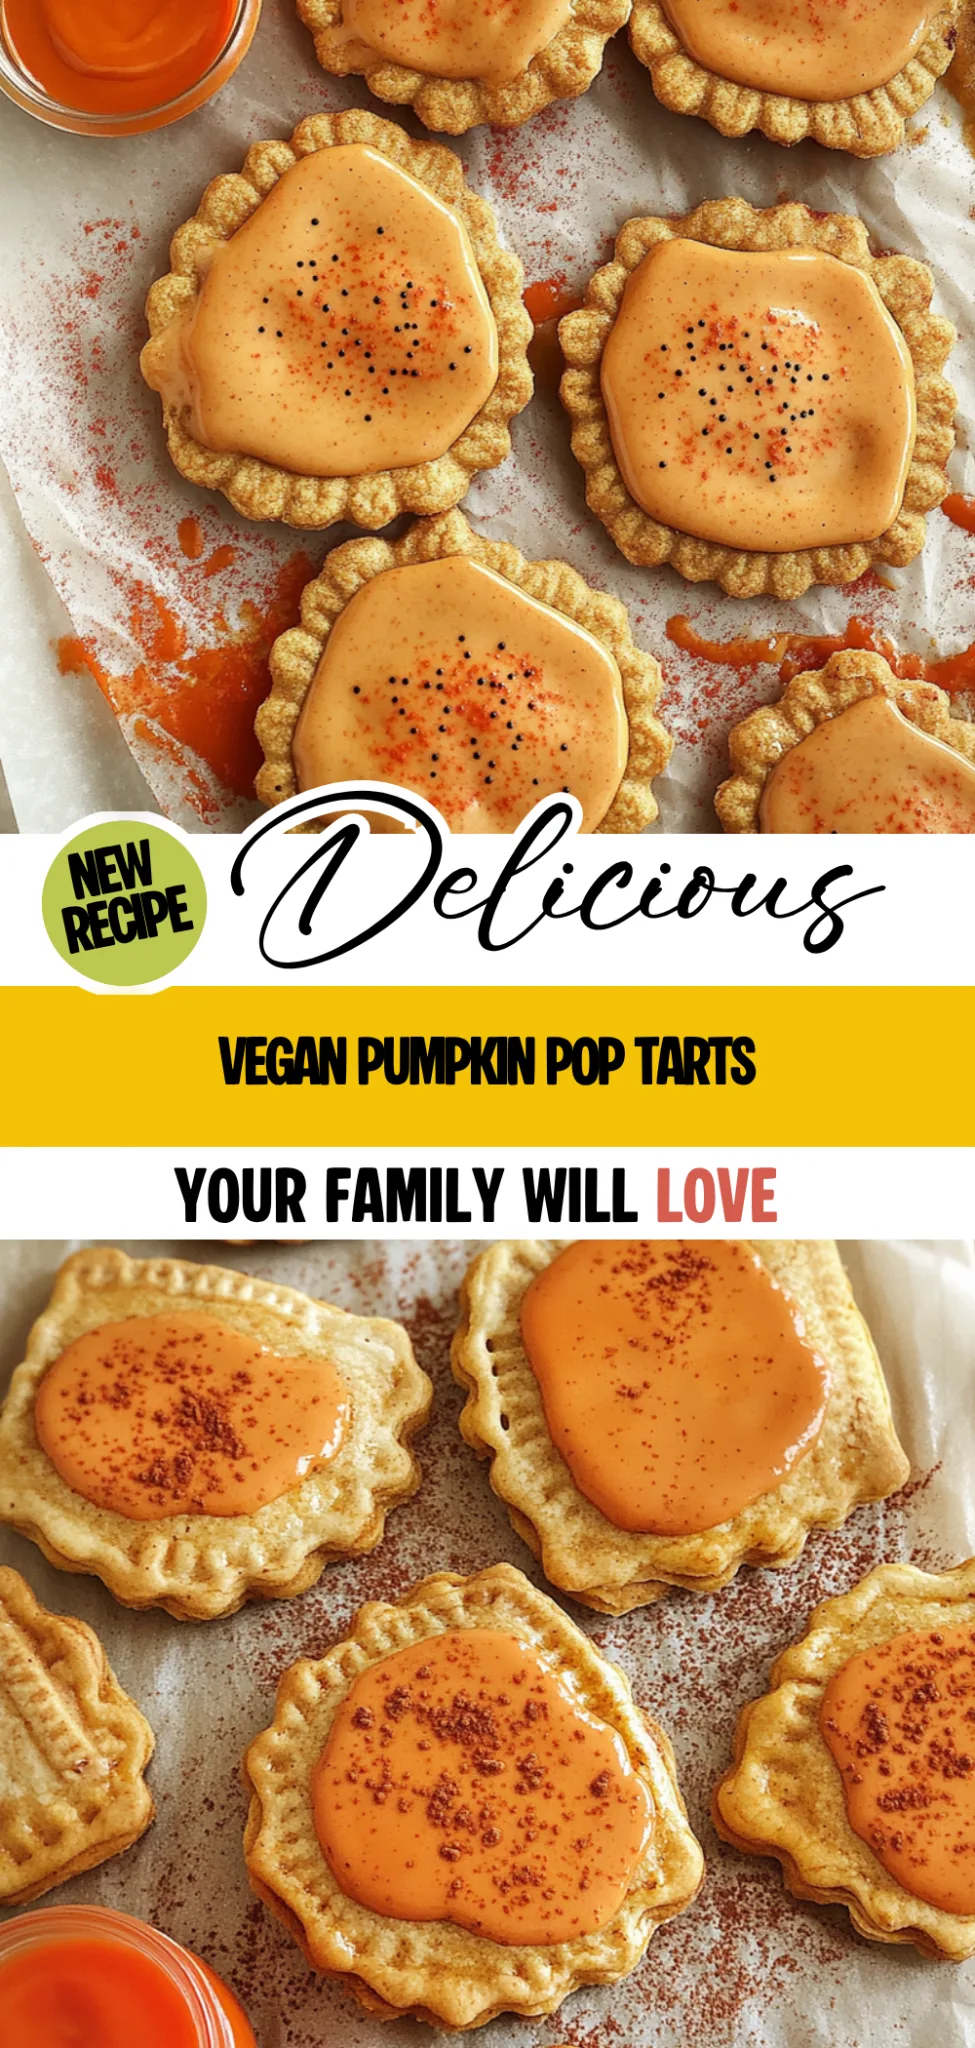
Are you ready to see how straightforward it is to make the Vegan Pumpkin Pop Tarts of your dreams??
1. MAKE THE DOUGH
Let’s kick things off with a buttery, flaky dough that will hold all that delicious filling!
1. COMBINE – In a mixing bowl, combine the flour and salt. This gives your dough a nice base flavor. Next, add the solid coconut oil and mix until the mixture resembles coarse crumbs. This step is crucial because using solid coconut oil ensures your crust will be flaky and tender!
2. STIR IN – Gradually stir in the maple syrup and cold water until a dough forms. You want it to be just moist enough to hold together without being sticky. Once combined, wrap the dough in plastic wrap and refrigerate for 30 minutes; this helps chill the fats for that perfect texture.
HANDY TIPS
- For extra flakiness, make sure your coconut oil is very cold before adding it to the flour.
- Don’t skip chilling the dough! It helps prevent shrinkage while baking.
2. PREPARE THE FILLING
Now let’s create that dreamy pumpkin filling that brings all the autumn vibes!
3. MIX – In a bowl, combine the pumpkin puree, brown sugar, cinnamon, nutmeg, ginger, cornstarch, and vanilla extract until smooth. The cornstarch helps thicken the filling so it doesn’t ooze out during baking! You’ll want this mixture to be well-blended for even spicing throughout your pop tarts.
HANDY TIPS
- Feel free to use homemade pumpkin puree if you have it on hand; just ensure it’s thick enough.
- Adjust spices according to your preference — love more cinnamon? Go for it!
3. ASSEMBLE THE POP TARTS
It’s time to bring everything together and shape these delightful pastries!
4. PREHEAT – Preheat your oven to 375°F (190°C). While it’s heating up, roll out the chilled dough on a floured surface to about 1/8 inch thick. This thickness ensures you have a nice balance between crust and filling.
5. CUT – Cut the rolled-out dough into rectangles about 3×4 inches in size. Remember, these will be your pop tart bases! Place about a tablespoon of filling on half of these rectangles—don’t overfill or they might burst during baking!
6. FOLD AND SEAL – Fold the other half of each rectangle over and seal the edges with a fork by pressing down firmly; this not only seals them but adds a decorative touch too! Place your assembled pop tarts on a baking sheet lined with parchment paper for easy cleanup.
HANDY TIPS
- If you’re feeling creative, use cookie cutters for fun shapes instead of rectangles!
- Always leave some space between each pop tart on the baking sheet; they expand as they bake.
4. BAKE
Let’s get these beauties in the oven so you can enjoy their warm scent filling your kitchen!
7. BAKE – Bake for 20-25 minutes or until they are golden brown and fragrant! Keep an eye on them towards the end; you want that lovely color but don’t let them burn! Once they’re done, remove from the oven and let them cool completely before glazing.
HANDY TIPS
- For even cooking, rotate your baking sheet halfway through baking.
- If you prefer a softer pastry, reduce baking time slightly — aim for around 20 minutes.
5. MAKE THE GLAZE
A sweet drizzle makes everything better! Let’s finish off our pop tarts with a glaze.
8. WHISK – In a bowl, whisk together powdered sugar, non-dairy milk, and vanilla extract until smooth and pourable but not too runny! Drizzle generously over cooled pop tarts once they’re set — this adds an irresistible sweetness that complements the spiced pumpkin filling perfectly.
HANDY TIPS
- Add more non-dairy milk gradually if your glaze is too thick — you want it pourable!
- Consider adding food coloring for festive occasions — it’s all about presentation!
Once you’ve made these Vegan Pumpkin Pop Tarts from scratch, you’ll realize just how rewarding homemade treats can be! With every bite bursting with spiced pumpkin goodness topped with a sweet glaze, you’ll be counting down until you can make them again! Make these once, and I wager they will invade your dreams every night too! – Nagi x
FAQ – Vegan Pumpkin Pop Tarts
🥧 How long will these pop tarts keep?
These Vegan Pumpkin Pop Tarts are best enjoyed fresh, but they can be stored for up to 5 days. I recommend keeping them in an airtight container at room temperature for the first two days, where they’ll remain about 97% as good. After that, you can transfer them to the fridge to maintain freshness, although they might lose a bit of their crispness. If you want to enjoy them longer, you can freeze them!
❄️ Can I freeze these pop tarts for later?
Absolutely! To freeze, let the baked pop tarts cool completely and then place them in a single layer on a baking sheet. Freeze until solid, then transfer them to a freezer-safe bag or container. They can be frozen for up to 3 months. To thaw, simply leave them at room temperature for about an hour or reheat in the oven at 350°F (175°C) for about 10 minutes until warmed through.
🌾 Are these pop tarts gluten-free?
While this recipe uses all-purpose flour, you can make these Vegan Pumpkin Pop Tarts gluten-free by substituting with a gluten-free all-purpose blend that includes xanthan gum. I’ve had success using brands like Bob’s Red Mill or King Arthur Flour. Just keep in mind that the texture may vary slightly; they might not be as flaky as the original version, but they’ll still be delicious!
🍯 Can I substitute maple syrup with another sweetener?
Yes, you can use agave syrup as a direct one-to-one substitution if you’re looking for an alternative to maple syrup. However, if you’re considering other sweeteners like coconut sugar or honey (keeping in mind honey isn’t vegan), you’ll need to adjust the liquid content slightly because they have different moisture levels. In my testing, I’ve found that sticking with liquid sweeteners works best for maintaining that perfect dough consistency.
🥄 Do I really have to chill the dough?
Yes, chilling the dough is essential! This step solidifies the coconut oil and allows the gluten to relax, which results in flakier pop tarts. Trust me on this one; skipping it might lead to tough and chewy pastries instead of tender ones. So, resist the urge—30 minutes in the fridge is well worth it!
🔍 Why do I need cornstarch in the filling?
The cornstarch acts as a thickening agent in your pumpkin filling, helping it hold its shape when baked and preventing it from becoming too watery. Without it, you may end up with soggy pop tarts—definitely not what we want! I’ve tested this several times, and skipping it just doesn’t yield good results.
🎉 Can I add any extras or variations to this recipe?
Definitely! You can customize your Vegan Pumpkin Pop Tarts by adding chocolate chips or nuts into the filling for some extra flavor and texture. Additionally, feel free to experiment with spices—adding a pinch of cloves or allspice can give your filling a unique twist. Just keep an eye on proportions to ensure you don’t overpower the pumpkin flavor!
Troubleshooting
I will continue to add more to this Troubleshooting section as I start seeing questions coming through from people who have made the recipe.
Troubleshooting tips
“My pop tarts came out too thick! 😩”
- You might have rolled your dough out thicker than the specified 1/8 inch. A thicker dough can result in a heavy, dense pop tart rather than the light and flaky texture we want.
- It’s also possible that your dough was too cold when you rolled it out, making it harder to flatten properly.
- Don’t worry though—thicker pop tarts can still be delicious, just like a cozy pumpkin hug!
“The edges of my pop tarts split open while baking! 😱”
- This could be due to overfilling your pop tarts with the pumpkin mixture. If there’s too much filling, it expands during baking and can push the edges apart.
- Alternatively, if the dough was not sealed tightly enough with a fork, that could lead to escaping filling as well.
- But hey, at least they still taste amazing—who doesn’t love a little extra pumpkin goodness?
“My pop tarts are really dry and crumbly! 😢”
- If you didn’t add enough cold water when forming your dough, it can result in a dry texture. Be sure to add just enough water until the dough comes together without being sticky.
- Additionally, if you overbaked them even slightly, they can become dry. Keep an eye on them towards the end of baking!
- Even if they were on the drier side, I’m sure they were still YUM with that spiced pumpkin filling!
“My pop tarts are unevenly browned! 🔥”
- This might happen if your oven temperature is not accurate or if you placed them too close together on the baking sheet. Make sure to space them out for even heat circulation.
- It’s also possible that your baking sheet wasn’t lined properly or is dark-colored, which can cause uneven browning.
- But hey, those rustic-looking treats might just give them character—and they’re still delicious!
“I can’t get my pop tarts to hold their shape! 😖”
- If your dough was too warm when rolling or cutting out shapes, it might lose its form as it bakes. Make sure your coconut oil is solid and keep the dough chilled before rolling.
- Also, be careful not to stretch the dough too much while assembling; handle it gently!
- No worries though—sometimes imperfect shapes make for the best stories at the dessert table!