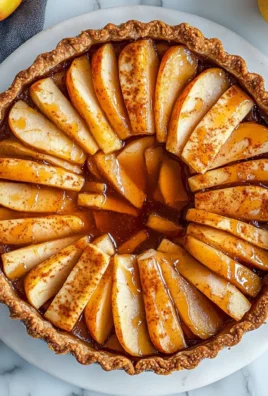
I’ve always had a soft spot for dessert, but there’s something about Toffee Apple Pie that really tugs at my heartstrings. It all started on a chilly autumn afternoon when I stumbled upon this delightful little café tucked away in a quiet street. Their version was so decadent, with the crunch of the crust mingling perfectly with the sweet, gooey toffee sauce drizzled over warm apples. I knew right then and there that I had to recreate it at home—not just because I wanted to relive that moment, but also because, let’s be honest, who wouldn’t want to whip up a slice of happiness without shelling out a fortune?
After several attempts—and quite a few kitchen disasters—I finally nailed my take on Toffee Apple Pie. Honestly, you wouldn’t believe how many times I miscalculated the sugar-to-apple ratio or ended up with a soggy bottom (thanks, overly juicy apples!). Each time, I learned something new: balancing sweetness with tartness, perfecting that flaky crust, and figuring out the right amount of toffee sauce to ensure it wasn’t just a gooey mess. It took me three weekends and an unfortunate number of late-night snack runs, but I was determined to get it just right.
And let me tell you—it was worth every single trial! The final result is nothing short of heavenly: a deliciously sweet and crunchy apple pie crowned with a rich toffee sauce that oozes pure joy. The texture is perfectly balanced—crispy on the outside while remaining tender and luscious inside—and the flavor? Oh boy, it’s like an apple orchard met a candy shop! I’m beyond excited for you to try this recipe; trust me, you’re going to want to keep this one in your back pocket for every gathering or cozy night in.
These Toffee Apple Pie are…
…a delightful treat that takes the classic apple pie to a whole new level of indulgence!
1. They deliver a sweet, caramelized flavor that perfectly balances the tartness of the apples. By incorporating brown sugar and a touch of cinnamon, I achieved a depth of flavor that harmonizes beautifully with the toffee sauce, making each bite an unforgettable experience.
2. The crisp yet tender crust offers a satisfying crunch while cradling the luscious apple filling. Using cold, cubed unsalted butter in the dough ensures that the layers bake up flaky and golden, providing that perfect contrast to the soft apples inside.
3. A key technique I swear by is chilling the dough before rolling it out. This step not only helps to keep the butter solid during baking, but it also results in a flaky texture that elevates this Toffee Apple Pie above store-bought versions.
4. Exceptional value comes from crafting this pie at home. With simple ingredients like flour and butter, you can create a stunning dessert that rivals any bakery offering at a fraction of the cost and with more love baked in!
PS This Toffee Apple Pie serves about 8 generous slices—perfect for sharing with family or friends during special occasions!
Ingredients You’ll Need
Each ingredient in this dish plays an essential role in flavor and texture. Here’s what you’ll need:
- 2 cups all-purpose flour (plus extra for dusting): Provides the structure and base for a flaky crust.
- 1 cup unsalted butter (cold and cubed): Creates a rich, buttery flavor and tender texture.
- 1/4 cup granulated sugar: Sweetens the crust just enough to balance the filling.
- 1/4 cup ice water (more if needed): Helps bind the dough without making it tough.
- 1 pinch salt: Enhances overall flavor and balances sweetness.
- 6 medium apples (peeled, cored, and sliced): The star ingredient that adds natural sweetness and tartness.
- 1 tablespoon lemon juice: Prevents browning and brightens the apple flavor.
- 1/2 cup brown sugar (packed): Contributes deep caramel notes to the filling.
- 1 teaspoon cinnamon: Infuses warm spice that complements the apples beautifully.
- 1/4 teaspoon nutmeg: Adds a hint of warmth and earthiness to the filling.
- 2 tablespoons all-purpose flour: Helps thicken the filling and keeps it from becoming too runny.
- 1 cup brown sugar (packed): Forms the base of the luscious toffee sauce with rich sweetness.
- 1/2 cup unsalted butter: Gives a creamy texture and enhances the richness of the sauce.
- 1/4 cup heavy cream: Adds smoothness and depth to the toffee sauce.
- 1 teaspoon vanilla extract: Introduces warmth and complexity to round out the flavors.
The Dough Must Chill — No Skips!
I know, I know—chilling the dough for 30 minutes might feel like an unnecessary step that adds time to your baking plans. Trust me, I tried to find a shortcut, thinking I could skip this and still get a flaky crust for my Toffee Apple Pie. Spoiler alert: I was wrong! After several attempts with different chilling times, I discovered that patience really does pay off.
So why is this chilling step so critical? Think of it like letting your muscles relax after a workout. When you chill the dough, the cold butter stays solid instead of melting into the flour, which creates those beautiful flaky layers we all love in a pie crust. This process also allows the gluten in the flour to rest, resulting in a tender texture that won’t leave you wrestling with your slice of pie.
What does chilling the dough do?
- Flakiness — Chilling keeps the butter cold, ensuring it creates steam while baking and results in a flaky crust.
- Tenderness — Resting allows gluten to relax, which helps avoid toughening the dough during rolling and baking.
- Ease of handling — A chilled dough is firmer and easier to roll out without sticking or tearing.
- Structure — The cooling process helps the crust hold its shape better when baked, preventing shrinkage.
- Flavor development — A bit of chilling enhances the overall flavor as it allows time for ingredients to meld together.
Different chilling times
- 15 minutes (okay) — You’ll achieve some flakiness, but the crust will likely be harder to work with and might shrink during baking.
- 30 minutes (good) — Standard recommendation; you get decent flakiness and tenderness, making it much easier to roll out.
- 1 hour (better) — The longer chill improves both flavor and texture; you’ll notice a more pronounced flakiness in each bite.
- Overnight (best) — If you’re really serious about your pie crust game, letting it chill overnight enhances all qualities for a truly exceptional result.
Before you dive into making this Toffee Apple Pie, let me just warn you: don’t skip or rush through the chilling process! The most common mistake is thinking that just because it’s “only” 30 minutes, you can afford to cut corners. Trust me—you’ll regret it when your crust turns out dense instead of light and flaky.
How to make Toffee Apple Pie

Are you ready to see how straightforward it is to make the Toffee Apple Pie of your dreams??
1. PREPARE THE PIE CRUST
Let’s kick things off with a buttery, flaky crust that sets the stage for your delicious filling!
1. COMBINE – In a mixing bowl, combine 2 cups of all-purpose flour, 1/4 cup of granulated sugar, and a pinch of salt. This mixture forms the base of your crust, giving it the right sweetness and texture.
2. ADD BUTTER – Add 1 cup of cold, cubed unsalted butter to the bowl. Using a pastry cutter or your fingers, mix until the mixture resembles coarse crumbs. This is crucial for creating a flaky texture; you want to keep that butter nice and cold!
3. MIX IN WATER – Gradually add 1/4 cup of ice water, mixing until the dough just comes together. If needed, add more water, one tablespoon at a time. Don’t overwork the dough; we want it tender!
4. CHILL – Form the dough into a disk, wrap it in plastic wrap, and refrigerate for at least 30 minutes. Chilling helps relax the gluten in the flour and solidifies the butter for a better crust.
HANDY TIPS
- 💡 TIP: For an even flakier crust, use a mix of half all-purpose and half pastry flour!
- ⚠️ Cooling — Make sure your butter is cold; this will prevent a greasy dough!
2. MAKE THE FILLING
Now let’s get those apples dressed up in their sweet spices!
5. TOSS APPLES – In a large bowl, toss together 6 peeled, cored, and sliced medium apples with 1 tablespoon of lemon juice. The lemon juice adds brightness and prevents browning!
6. ADD SUGAR AND SPICES – Then sprinkle in 1/2 cup packed brown sugar, 1 teaspoon cinnamon, 1/4 teaspoon nutmeg, and 2 tablespoons all-purpose flour. Mix well until the apples are evenly coated; this mixture will create that luscious filling as they bake.
HANDY TIPS
- 💡 TIP: I like to use a mix of tart and sweet apples for depth of flavor!
- ⚠️ Don’t skip the lemon juice — it keeps your apple filling fresh and vibrant!
3. ASSEMBLE AND BAKE THE PIE
Time to bring everything together into a beautiful pie!
7. PREHEAT OVEN – Preheat your oven to 375°F (190°C). This ensures that your pie bakes evenly from start to finish.
8. ROLL OUT CRUST – Roll out half of your chilled pie crust on a floured surface until it’s about 1/8 inch thick. Carefully fit it into a pie dish without stretching it too much; you want it snugly fitted.
9. FILL AND COVER – Pour in the apple mixture and spread it evenly over the crust. Roll out another layer of pie crust and place it on top; seal the edges by crimping them together gently.
10. CUT SLITS – Use a sharp knife to cut slits into the top crust for steam to escape – this keeps your pie from bubbling over!
HANDY TIPS
- 💡 TIP: For an extra touch, brush the top crust with an egg wash before baking for a beautiful golden finish!
- ⚠️ Don’t forget those slits; nobody likes an explosive pie!
4. BAKE AND PREPARE TOFFEE SAUCE
The aroma will start wafting through your kitchen as this beauty bakes!
11. BAKE PIE – Bake in your preheated oven for about 45 minutes or until the crust is golden brown and the apples are tender when pierced with a fork.
12. MAKE TOFFEE SAUCE – While baking, prepare your toffee sauce by combining 1 cup packed brown sugar, 1/2 cup unsalted butter, and 1/4 cup heavy cream in a saucepan over medium heat. Stir continuously until melted and smooth – about 5 minutes.
13. STIR IN VANILLA – Remove from heat and stir in 1 teaspoon vanilla extract; let cool slightly as you wait for your pie.
HANDY TIPS
- 💡 TIP: If you prefer thicker sauce, let it simmer longer while stirring gently!
- ⚠️ Be cautious — hot sugar can be very dangerous if splattered!
5. SERVE WITH A DRIZZLE OF TOFFEE SAUCE
Finally, slice up that gorgeous pie and indulge in some sweet magic!
14. SLICE AND DRIZZLE – Slice the pie into generous wedges and drizzle each serving with warm toffee sauce before serving.
What you’ve just created is nothing short of spectacular—a lovely Toffee Apple Pie that’s sure to be a hit at any gathering! With layers of buttery crust wrapped around tender spiced apples topped with warm toffee sauce—what’s not to love? Make this once, and I wager they will invade your dreams every night too! – Nagi x
FAQ – Toffee Apple Pie
🍏 Can I use a store-bought pie crust instead of making my own?
Yes, you absolutely can use a store-bought pie crust if you’re short on time or just prefer the convenience. However, I highly recommend making your own for a fresher flavor and better texture. The homemade crust will be flakier and more buttery, which perfectly complements the sweet filling of this Toffee Apple Pie. If you go with store-bought, opt for a high-quality option for the best results!
🥶 Can I freeze the Toffee Apple Pie before baking it?
Yes, you can freeze the assembled pie before baking! Just wrap it tightly in plastic wrap and then in aluminum foil to prevent freezer burn. When you’re ready to bake, there’s no need to thaw it first; simply add an extra 10-15 minutes to the baking time at 375°F (190°C). I’ve done this several times, and it’s a fantastic way to have dessert ready at a moment’s notice!
❄️ Do I really need to chill the pie crust?
YES, YOU DO! Chilling the pie crust is crucial because it helps solidify the butter. This results in a flakier and more tender crust once baked. If you skip this step, you’ll end up with a tougher texture that isn’t nearly as enjoyable. Trust me; I tested it multiple ways, and chilling the dough always yielded the best results!
🌾 Can this recipe be made gluten-free?
Definitely! You can substitute the all-purpose flour with a gluten-free all-purpose blend. Many of these blends work well in pies without altering the taste significantly. Just ensure that your blend contains xanthan gum or add it separately according to package instructions for optimal structure. I’ve tried this method before, and it was just as delicious!
🍬 Is there a way to reduce the sugar in the filling?
No, unfortunately not without affecting the overall flavor and texture of the pie. I tried reducing the brown sugar in various tests, but each time it led to apples that were less caramelized and a filling that didn’t hold together as nicely. Stick with 1/2 cup of brown sugar for a perfectly balanced flavor — sometimes you just have to embrace a little sweetness!
🔥 What if my apples are too tart?
If your apples are overly tart, consider adding an extra tablespoon of sugar to balance out their natural acidity. Also, mixing different apple varieties can help; for example, using sweeter apples like Fuji or Gala alongside tart ones like Granny Smith creates a delightful harmony of flavors. In my experiments, this blend brought out an amazing depth in every bite.
😋 Can I add other ingredients or flavors to customize this pie?
Absolutely! Feel free to experiment by adding chopped nuts like pecans or walnuts for added crunch or even raisins for some chewiness. For extra flavor depth, consider incorporating spices such as ginger or allspice into your filling mixture — they work wonderfully with apples! Just remember not to overdo it; you want those lovely apple flavors to shine through!
Troubleshooting
I will continue to add more to this Troubleshooting section as I start seeing questions coming through from people who have made the recipe.
Troubleshooting tips
“My pie crust was too tough! 😩”
- You might have overworked your dough when mixing in the cold butter. The more you handle the dough, the tougher it becomes due to gluten development.
- Another culprit could be adding too much flour during rolling out; this can dry out your dough and affect its texture.
I bet it still tasted delicious!
“The filling was way too watery! 😳”
- This can happen if you didn’t coat your apples with enough flour before assembling. The flour helps absorb some of the juices released by the apples while baking.
- If you used very juicy apple varieties without balancing them with firmer ones, this can lead to excess liquid in your pie.
I bet it was still YUM though!
“Why is my crust so pale and undercooked? 🤔”
- It sounds like your oven wasn’t preheated properly before baking. A fully preheated oven helps ensure that your crust cooks evenly and achieves a nice golden color.
- If your pie was placed on a cool surface or rack, it might not have received enough heat for proper browning.
I bet it still tasted amazing!
“My pie is misshapen and wonky! 😅”
- If your pie crust shrank during baking, it may be that you rolled it out too thinly or didn’t allow it to rest long enough after rolling. Resting helps prevent shrinkage.
- Another reason could be that you didn’t cut enough slits in the top crust for steam to escape, causing bubbling and unevenness.
I bet it was still a hit at the table!