I first stumbled upon a decadent pumpkin marble cake at a charming little café while visiting a friend in autumn. The way the rich chocolate swirled through the vibrant orange batter was simply mesmerizing, and it tasted like fall wrapped in a cozy blanket. I knew I had to recreate that magic at home, especially since I’m always looking for ways to indulge without compromising my vegan lifestyle. Plus, let’s be honest—baking this beauty from scratch is way more cost-effective than splurging at a café every weekend!
After diving into my kitchen, I quickly realized that crafting the perfect Pumpkin Marble Cake (vegan) was going to be more of a challenge than I anticipated. I lost track after my fifth attempt—who knew getting that luscious swirl just right could be so tricky? My goal was to achieve a moist texture that didn’t scream “healthy” while still making it completely plant-based. With each iteration, I learned something new, like how important it is to balance the spices and chocolate for that harmonious flavor, even if it meant a few messy disasters along the way!
But oh boy, was it worth every mishap! The final result is nothing short of heavenly: a deliciously moist vegan pumpkin marble cake with a rich chocolate swirl that’s perfect for any fall gathering. It’s got that tender crumb that melts in your mouth and an irresistible flavor combo that’ll have everyone asking for seconds. So grab your mixing bowls and get ready to impress—this cake is not just a treat; it’s an experience you won’t want to miss!
These Pumpkin Marble Cake (vegan) are….
…a delightful fusion of flavors and textures that will leave you craving more!
1. They deliver an incredible depth of flavor with warm spices dancing through each bite, thanks to the combination of cinnamon and nutmeg. These aromatic spices elevate the pumpkin puree, creating a cozy fall essence that makes this cake perfect for seasonal gatherings.
2. Moist and tender texture – each slice is soft and fluffy with a satisfying crumb. The unsweetened applesauce serves as a fantastic egg substitute, ensuring that the cake remains incredibly moist while allowing the pumpkin’s natural creaminess to shine through.
3. Simple technique – using canned pumpkin puree saves time while still providing that rich, pumpkin flavor we love. This method allows for a quick preparation without sacrificing quality, so you can whip up this Pumpkin Marble Cake (vegan) with ease.
4. Budget-friendly – with common pantry staples like flour, sugar, and cocoa powder, this recipe is both accessible and economical. You can enjoy a delicious homemade cake without breaking the bank or compromising on taste.
PS This Pumpkin Marble Cake (vegan) makes a generous 9-inch round cake, perfect for sharing at your next fall gathering!
Ingredients for the Pumpkin Marble Cake (vegan)
Each ingredient in this dish plays an essential role in flavor and texture. Here’s what you’ll need:
- 1 cup canned pumpkin puree (or freshly cooked pumpkin): Provides moisture and a rich, earthy sweetness.
- 1 cup all-purpose flour: Gives structure and stability to the cake.
- 1 cup granulated sugar: Sweetens the cake and enhances its moistness.
- 1 tsp baking powder: Helps the cake rise for a light, airy texture.
- 1 tsp baking soda: Acts as a leavening agent to create fluffiness.
- 1 tsp cinnamon: Infuses warm spice notes that complement the pumpkin perfectly.
- 1/2 tsp nutmeg: Adds a hint of warmth and depth to the flavor profile.
- 1/2 tsp salt: Balances sweetness and enhances overall flavors.
- 1/2 cup unsweetened applesauce (as an egg substitute): Provides moisture and acts as a binding agent.
- 1/4 cup plant-based milk (such as almond or soy): Ensures the batter achieves a smooth, pourable consistency.
Chocolate Swirl Batter
- 1/2 cup cocoa powder: Delivers rich chocolate flavor that swirls beautifully through the cake.
- 1/4 cup granulated sugar: Adds sweetness to the chocolate layer, balancing its bitterness.
- 1/4 cup plant-based milk: Creates a silky texture for easy mixing into the batter.
The Baking Pan Must Be Prepped Perfectly. Seriously!
I know, I know—greasing the pan and lining it with parchment paper seems like one of those annoying steps that you could potentially skip. But trust me, I tried to take a shortcut to save time, and let’s just say I ended up with a cake that was more like a puzzle than a dessert! Spoiler alert: no one wants to spend 30 minutes trying to get their beautiful cake out of a sticky pan.
So why is this step non-negotiable? Well, think of it like dressing your cake for success. The greased surface allows for easy release, while the parchment paper acts like a safety net, ensuring every last crumb comes out intact. It’s especially important when working with moist batters like our pumpkin mixture—which is packed with canned pumpkin puree and applesauce—because they can easily cling to the pan if not properly prepared.
What does prepping the baking pan do?
- Easy release — Greasing and lining the pan ensures your cake slides out effortlessly without leaving behind half of it stuck to the bottom.
- Prevents burning — Proper preparation helps prevent the edges from overcooking while ensuring even baking throughout.
- Retains moisture — A lined pan helps maintain the moisture in your pumpkin batter, resulting in a tender and moist cake.
- Uniform shape — With a well-prepped pan, you’ll get a beautifully shaped cake that holds its marbled design instead of crumbling apart.
- Less cleanup — Lining your pan minimizes mess on the sides, making cleanup after baking much easier.
Different preparation times
- No prep (0 stars) — You’ll likely end up with a stuck mess that’s impossible to salvage as an elegant dessert.
- Quick greasing only (1 star) — The cake might come out, but expect some parts to stick and tear, ruining its beauty.
- Greasing + parchment lining (5 stars) — Your cake releases cleanly and looks stunning, ready for all those Instagram photos!
Be warned: the most common mistake is thinking you can skip the parchment paper. I’ve been there—trust me when I say there’s nothing more disheartening than watching your hard work crumble into an unrecognizable heap because it got stuck. Don’t let that happen to you!
How to make Pumpkin Marble Cake (vegan)
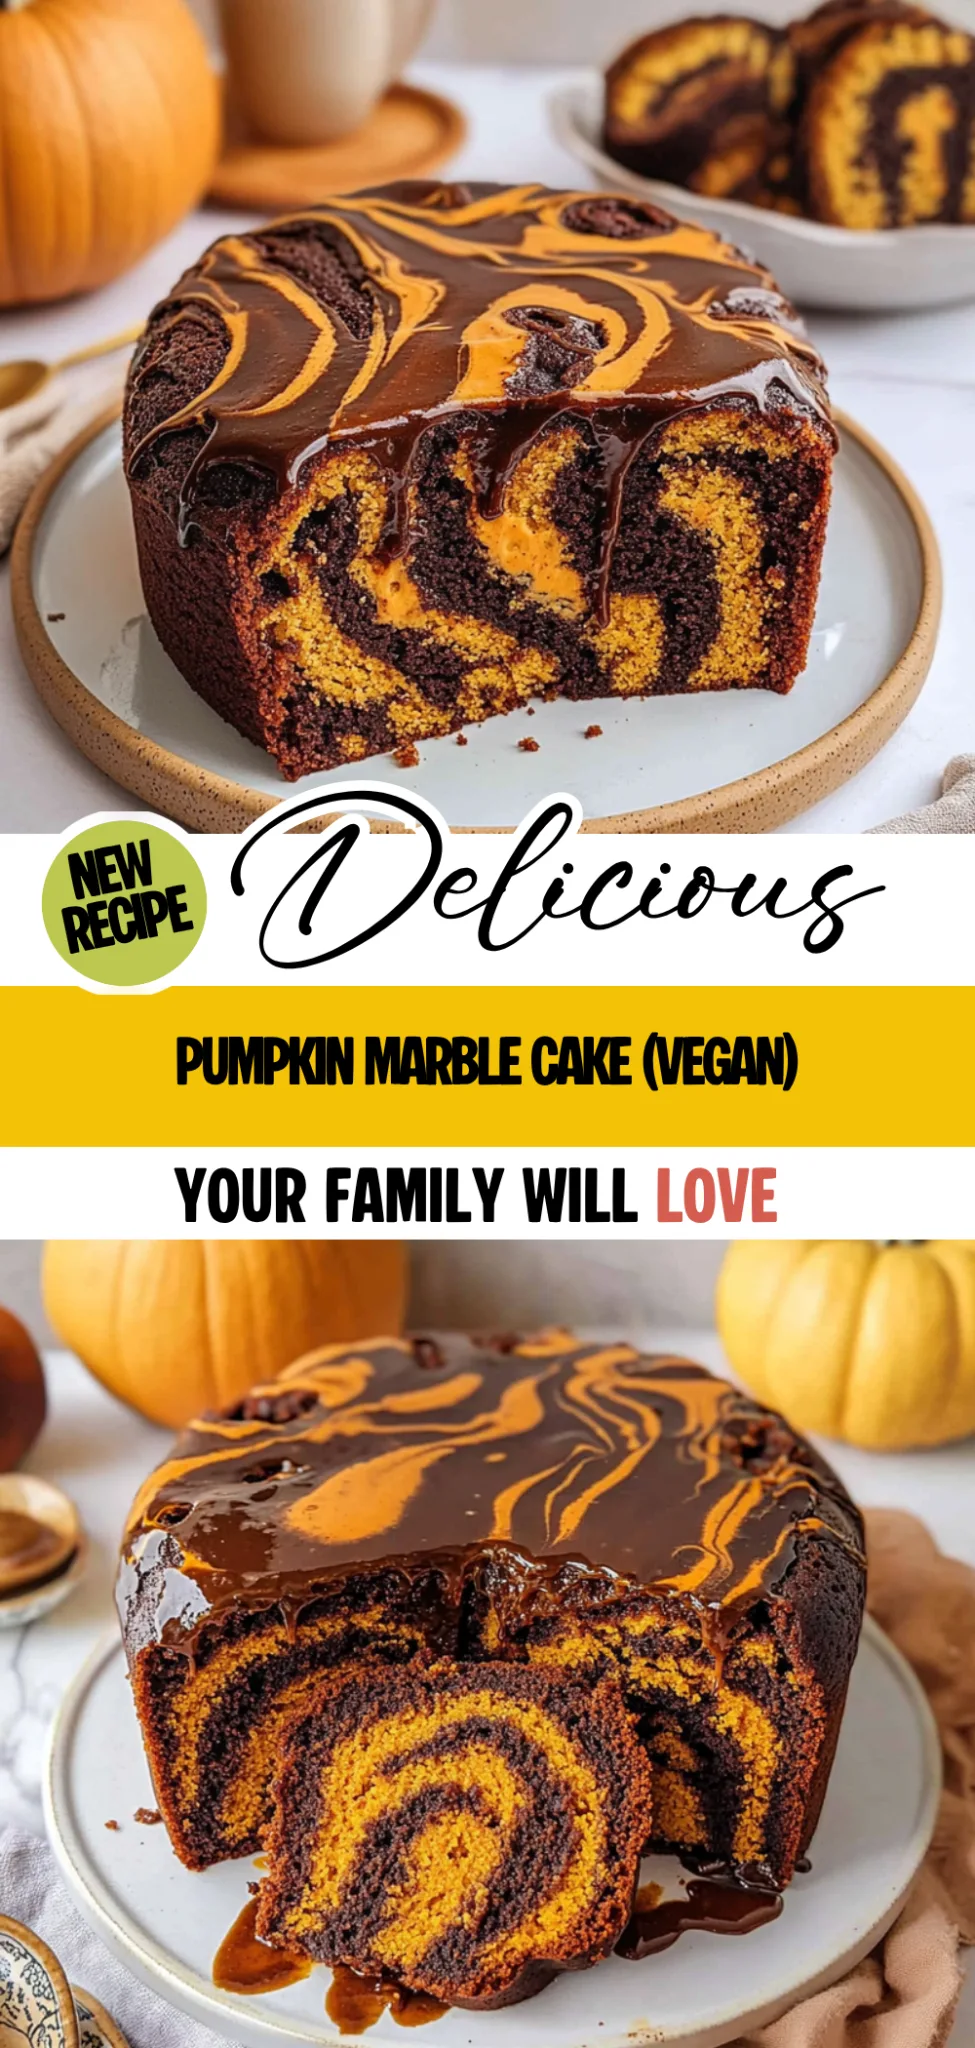
Are you ready to see how straightforward it is to make the Pumpkin Marble Cake (vegan) of your dreams??
1. PREPARE THE OVEN AND PAN
Let’s get started by setting the stage for your delicious cake!
1. Preheat – Preheat your oven to 350°F (175°C) and grease a 9-inch round cake pan. This ensures that your cake bakes evenly and doesn’t stick to the pan.
2. Line – Line the bottom of the pan with parchment paper for easy removal. This little trick will save you from any cake disasters when it’s time to serve!
HANDY TIPS
- If you don’t have parchment paper, simply greasing the pan well will also work, but be sure to dust it with flour afterwards.
- Consider using a springform pan for easier release.
2. MAKE THE PUMPKIN CAKE BATTER
Now let’s whip up that moist pumpkin batter!
3. Combine – In a large mixing bowl, combine the pumpkin puree, sugar, applesauce, and plant-based milk. Mix until smooth. The applesauce acts as an egg substitute here, adding moisture and sweetness without any eggs!
4. Whisk – In another bowl, whisk together the flour, baking powder, baking soda, cinnamon, nutmeg, and salt. This step is crucial as it ensures even distribution of the leavening agents and spices throughout your batter.
5. Mix – Gradually add the dry ingredients to the wet ingredients, stirring until just combined. Be careful not to over-mix; a few lumps are perfectly fine!
HANDY TIPS
- Use canned pumpkin puree for convenience or roast fresh pumpkin for a more intense flavor.
- Make sure your baking powder and soda are fresh; they’re key for that perfect rise!
3. PREPARE THE CHOCOLATE SWIRL BATTER
Let’s add some irresistible chocolate goodness!
6. Mix – In a separate bowl, mix together the cocoa powder, sugar, and plant-based milk until smooth. This rich chocolate swirl will beautifully contrast with the warm pumpkin flavor.
HANDY TIPS
- For an extra depth of flavor in your chocolate batter, consider adding a splash of vanilla extract!
- You can adjust the sweetness of this layer by adding more or less sugar based on your taste preference.
4. COMBINE AND SWIRL
Time to create that stunning marbled effect!
7. Pour – Pour half of the pumpkin batter into the prepared cake pan. This forms a lovely base for your marble design!
8. Spoon – Spoon half of the chocolate batter over the pumpkin batter, then repeat with the remaining batters. Layering them this way creates those gorgeous swirls when mixed together!
9. Swirl – Use a knife or skewer to gently swirl the batters together for a marbled effect. Don’t overdo it; you want distinct swirls visible!
HANDY TIPS
- Try different swirling patterns—zig-zags or circular motions can create unique effects!
- If you want more pronounced chocolate ribbons, reserve some chocolate batter for drizzling on top before swirling.
5. BAKE THE CAKE
Almost there—just let it bake!
10. Bake – Bake in the preheated oven for 40-45 minutes, or until a toothpick inserted into the center comes out clean. You’ll know it’s done when it’s lightly golden on top and fragrant throughout your kitchen!
11. Cool – Allow the cake to cool in the pan for 10 minutes before transferring to a wire rack to cool completely. This helps prevent sogginess while allowing steam to escape.
HANDY TIPS
- For best results, avoid opening the oven door too frequently during baking; this helps maintain temperature.
- Cooling on a wire rack ensures even cooling all around—no soggy bottoms!
What an achievement! You’ve just crafted a stunningly moist vegan Pumpkin Marble Cake that’s begging to be devoured at any fall gathering! I can almost smell that sweet aroma wafting through my kitchen already! Make these once, and I wager they will invade your dreams every night too! – Nagi x
FAQ – Pumpkin Marble Cake (vegan)
How long will this cake keep?
This delicious pumpkin marble cake can be stored at room temperature for up to 3 days, and it will still be about 97% as good on day 3! To keep it fresh, I recommend covering it with a cake dome or wrapping it in plastic wrap. If you want to extend its shelf life, you can refrigerate it for up to a week, but the texture may become slightly denser. Just remember, the longer it sits, the more moisture it loses!
❄️ Can I freeze this cake?
Absolutely! Freezing is a fantastic option if you want to make this cake ahead of time. Allow the cake to cool completely before wrapping it tightly in plastic wrap and then placing it in an airtight container or a freezer-safe bag. It can be frozen for up to 3 months. To thaw, simply place it in the refrigerator overnight or let it sit at room temperature for a few hours before serving. Trust me, the marbled swirls will still look fabulous!
🌾 Is this recipe gluten-free?
While this pumpkin marble cake is not gluten-free as written, you can easily make it so by substituting the all-purpose flour with a gluten-free flour blend. I recommend using a 1: 1 gluten-free flour mix that contains xanthan gum to ensure proper structure. Just be aware that the texture may vary slightly — sometimes gluten-free cakes can turn out denser.
Can I replace the applesauce with something else?
Yes! If you don’t have unsweetened applesauce on hand, there are several alternatives you can use as an egg substitute:
- Mashed bananas: Use 1/2 cup of mashed ripe banana for a slightly fruity flavor.
- Silken tofu: Blend 1/4 cup of silken tofu until smooth for a neutral option.
- Flaxseed meal: Mix 1 tablespoon of flaxseed meal with 2.5 tablespoons of water and let it sit for about 5 minutes until thickened.
Just note that these substitutes may alter the flavor or texture slightly, but they’ll still yield a yummy cake!
Why do I need to line the pan with parchment paper?
Lining your pan with parchment paper is crucial for ensuring easy removal of your beautiful pumpkin marble cake once it’s baked. Without it, your cake could stick to the bottom and sides of the pan, leading to potential disaster when you try to flip it out! By lining with parchment, you’re essentially creating a non-stick surface that helps maintain that stunning marbled design.
How do I know when my cake is done baking?
I always rely on the trusty toothpick test! Insert a toothpick into the center of your cake about 5 minutes before the recommended baking time ends. If it comes out clean or with just a few moist crumbs clinging to it, your cake is ready. If there’s still wet batter on the toothpick, give it another few minutes in the oven and test again. Remember — overbaking can lead to dryness, so keep an eye on those last few minutes!
Can I add nuts or chocolate chips to this recipe?
Definitely! Adding nuts like walnuts or pecans provides an excellent crunch that complements the soft texture of the cake beautifully. You can stir in about 1/2 cup of chopped nuts into either batter before swirling them together. If you’re feeling indulgent, chocolate chips are another great addition — just fold in roughly 1/2 cup into either batter before pouring them into your prepared pan. Just be sure not to overdo it; too many add-ins might disrupt that lovely marbling!
Troubleshooting
I will continue to add more to this Troubleshooting section as I start seeing questions coming through from people who have made the recipe.
Troubleshooting tips
“My cake came out too flat! 😩”
- Your baking powder or baking soda may not have been fresh. If these leavening agents are old, they won’t create enough lift, leading to a flat cake.
- You might not have mixed the dry ingredients thoroughly enough before combining them with the wet ingredients. This can result in uneven rising, making the cake flat in some spots.
- If you didn’t let the batter rest before baking, it could have affected the rise. Allowing it to sit for a few minutes helps with aeration.
I bet it was still YUM though!
“My cake is so dry! 😭”
- Overmixing the pumpkin batter can lead to a dense and dry cake. Mix just until combined to keep your cake light and tender.
- If you used too much flour, this can also cause dryness. Make sure to spoon your flour into the measuring cup and level it off rather than scooping directly from the bag.
- Not using enough pumpkin puree or applesauce could make the batter too dry; be sure you’re measuring accurately.
I bet it was still YUM though!
“The top of my cake cracked! 🔥”
- This can happen if your oven temperature is too high, causing the outer layer of the cake to set before the inside has fully risen. Always preheat your oven correctly and consider using an oven thermometer.
- Overmixing can lead to excess air in the batter, which may cause it to rise too quickly and crack. Make sure to mix gently!
- If you didn’t swirl the batters enough, this can lead to uneven baking and cracking on top. A well-marbled effect helps with even rising.
I bet it was still YUM though!
“My chocolate swirl sank to the bottom! 😱”
- You may have poured all of the pumpkin batter into the pan first without layering properly. Ensure you alternate layers of both batters for better distribution.
- The chocolate batter might have been too thin if you added extra liquid, causing it to sink instead of staying suspended in the pumpkin batter.
- If you didn’t let your batters sit for a moment before pouring them into the pan, they might not hold together as well during baking.
I bet it was still YUM though!