I still remember the first time I bit into a chocolate chip cookie from my favorite bakery — it was like a warm hug on a chilly day. The combination of soft, chewy dough and gooey chocolate melted in my mouth, making it impossible to resist going back for seconds (and thirds!). Inspired by that unforgettable experience, I decided to challenge myself to recreate those Perfect, Soft and Chewy Chocolate Chip Cookies at home. After all, who wouldn’t want the luxury of fresh cookies on demand without breaking the bank or heading out into the cold?
Let me tell you, perfecting this recipe wasn’t as easy as it sounds! I went through what felt like an Olympic-sized number of batches — we’re talking about 10 attempts over two weeks of trial and error. With each iteration, I aimed to get that irresistible balance between softness and chewiness just right, while also ensuring those chocolate chips were perfectly distributed. There were some epic fails along the way (let’s just say my kitchen looked like a flour bomb exploded more than once), but each mistake taught me something new about what makes a truly great cookie.
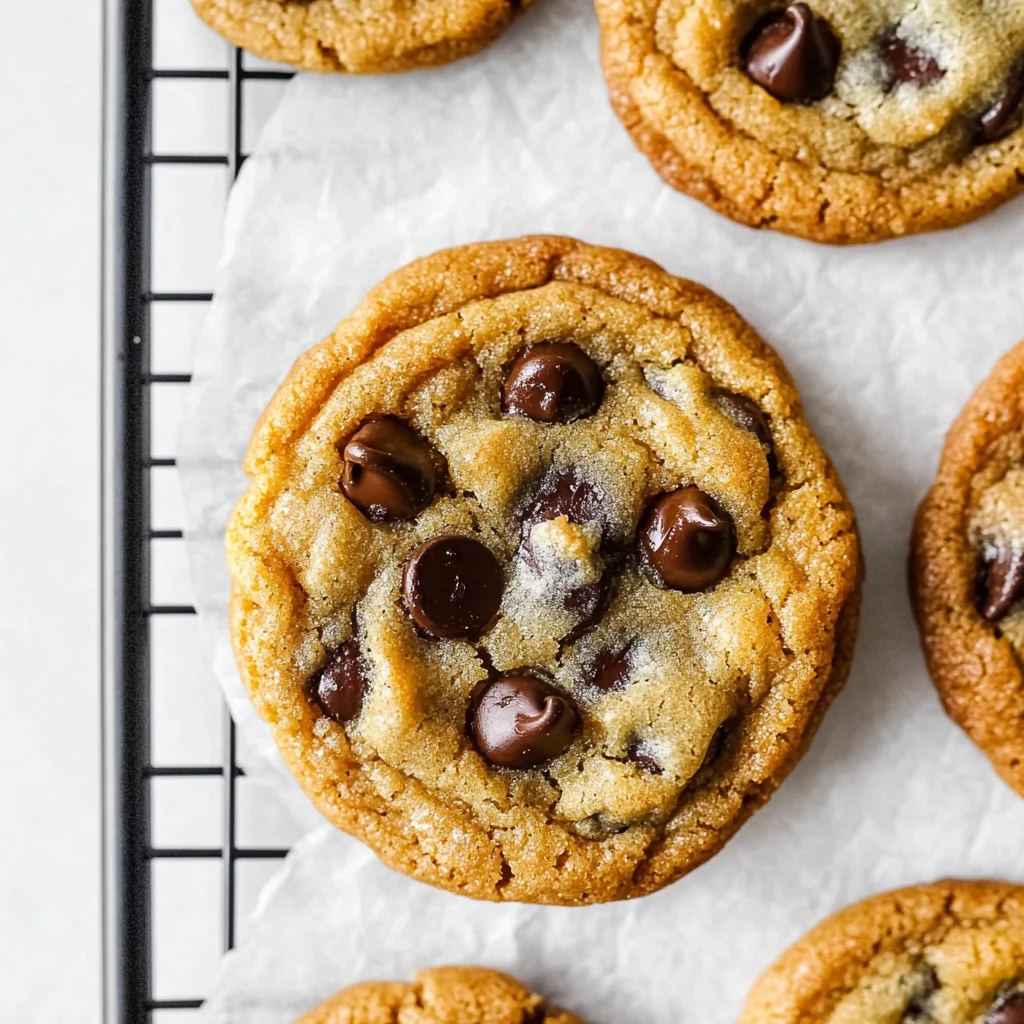
But oh boy, when I finally pulled those golden brown beauties out of the oven, it was worth every crumbly misstep! These Perfect, Soft and Chewy Chocolate Chip Cookies are simply divine — soft with a slight crisp on the edges, packed with rich chocolate chips that practically sing when you bite into them. They stay fresh for days (if they last that long) and are perfect for sharing or indulging all by yourself. So grab your mixing bowl, preheat that oven, and let’s make some magic happen — your taste buds will thank you!
These Perfect, Soft and Chewy Chocolate Chip Cookies are…
….the ultimate indulgence that will make your taste buds dance with joy!
1. They deliver a decadent chocolate experience that is simply irresistible. The combination of semi-sweet chocolate chips ensures every bite is oozing with rich cocoa flavor, perfectly balancing the sweetness from the brown and granulated sugars. This depth of flavor is what makes these cookies truly special.
2. Irresistibly chewy texture – each cookie has a delightful softness at its core while boasting a slightly crisp edge. This is achieved by adding an extra egg yolk, which enriches the dough and creates that perfect chewy bite we all crave.
3. A game-changing technique involves chilling the dough before baking, which allows the flavors to meld beautifully and results in thicker cookies that hold their shape. This simple step elevates these cookies above ordinary versions, giving you that bakery-quality experience right at home.
4. Budget-friendly indulgence – making these cookies at home saves you money compared to store-bought options, and you get to control the quality of ingredients used. With just a few pantry staples like flour, butter, and sugar, you can whip up a batch of Perfect, Soft and Chewy Chocolate Chip Cookies that are sure to impress without breaking the bank.
PS These cookies yield about 24 generous servings. Perfect for sharing or enjoying throughout the week!
Ingredients for the Perfect, Soft and Chewy Chocolate Chip Cookies
Each ingredient in this dish plays an essential role in flavor and texture. Here’s what you’ll need:
2 cups all-purpose flour: Provides structure for a soft and chewy cookie.
1 teaspoon baking soda: Helps the cookies rise and achieve the perfect texture.
1 teaspoon salt: Enhances sweetness and balances flavors.
3/4 cup unsalted butter (softened): Adds rich flavor and moisture for a tender bite.
3/4 cup brown sugar (packed): Contributes sweetness and a hint of caramel flavor.
1/2 cup granulated sugar: Adds sweetness and helps create a crisp edge.
1 teaspoon vanilla extract: Infuses warmth and depth to the overall flavor.
1 large egg: Binds the ingredients together while adding moisture.
1 large egg yolk: Enhances richness, making the cookies extra soft.
2 cups semi-sweet chocolate chips: Delivers melty chocolate goodness in every bite.
You Must Cream the Butter and Sugars. No Shortcuts!
I know, I know—taking the time to cream butter and sugar until it’s light and fluffy may sound tedious, but trust me, this step is crucial for achieving the soft, chewy texture you crave in a chocolate chip cookie. I tried to skip it once, thinking I could save time, and boy, was I wrong! The resulting cookies were dense and sad, leaving me with a strong lesson learned (and a few less-than-perfect cookies).
So why is this technique so vital? When you cream the softened butter with brown and granulated sugars, you’re incorporating air into the mixture. This process creates tiny bubbles that expand during baking, resulting in a lighter cookie. Think of it like whipping air into heavy cream—if you skip that step, you’ll end up with something flat and lifeless instead of the tender treats we all love.
What does creaming do?
- Texture — Creates a lighter cookie by incorporating air, leading to that perfect chewiness.
- Flavor — The sugars caramelize better during baking when creamed properly, enhancing the overall taste.
- Even Baking — Mixing ensures that all ingredients are evenly distributed, preventing any clumps of flour or sugar from causing uneven baking.
- Moisture Retention — Creaming helps maintain moisture in the cookies by trapping air pockets that expand while baking.
- Shelf Life — Well-creamed cookies tend to have a better structure which can help them stay fresh longer.
Different creaming times
- 1 minute (good) — Cookies will still turn out okay but will lack that airy quality; they may be denser than desired.
- 3 minutes (better) — A noticeable improvement in texture; cookies will be softer and more enjoyable.
- 5 minutes (great) — Achieves a light and fluffy mixture; cookies will rise beautifully and have an incredible chew.
- ⭐️ 8 minutes⭐️ — Optimal texture; this is where magic happens—a cookie experience you won’t forget!
Beware: The most common mistake I see is rushing through this step. Don’t just mix until combined—really take your time to whip those sugars into submission! Your cookies deserve it.
How to make Perfect, Soft and Chewy Chocolate Chip Cookies

Are you ready to see how straightforward it is to make the Perfect, Soft and Chewy Chocolate Chip Cookies of your dreams??
1. PREPARE THE DOUGH
Let’s kick off this cookie adventure by whipping up a delicious dough that will have your kitchen smelling heavenly!
1. Preheat – Preheat your oven to 350°F (175°C). This ensures that your cookies bake evenly and gives them that perfect golden color.
2. Whisk – In a mixing bowl, whisk together the flour, baking soda, and salt until well combined. This step helps to distribute the leavening agent evenly throughout the flour for perfectly risen cookies.
3. Cream – In another bowl, cream together the softened butter, brown sugar, and granulated sugar until smooth. You want this mixture to be light and fluffy — this incorporates air into the batter for a softer cookie!
4. Beat – Beat in the vanilla extract, egg, and egg yolk until light and creamy. The extra yolk adds richness and moisture, contributing to that delightful chewiness.
5. Blend – Gradually blend the dry ingredients into the wet mixture until just combined. Be careful not to over-mix; you want a slightly thickened dough that still has a bit of texture.
6. Fold – Fold in the chocolate chips gently until they are evenly distributed throughout the dough. This way, every bite is packed with melty chocolate goodness!
HANDY TIPS
- 💡 TIP: For an extra touch of flavor, let your creamed butter and sugars sit for 5 minutes before adding eggs — it enhances sweetness!
- ❓ Why should you avoid over-mixing? Over-mixing can lead to tough cookies due to gluten formation in the flour.
2. BAKE THE COOKIES
Now that your dough is ready, it’s time to bring these cookies to life in the oven!
7. Drop – Using rounded tablespoons, drop cookie dough onto ungreased baking sheets. Give them some space as they will spread while baking — about 2 inches apart is ideal.
8. Bake – Bake for 10-12 minutes or until the edges are lightly golden but the centers still look soft. This slight under-baking helps maintain that gooey center we all love.
9. Cool – Remove from the oven and let cool on the baking sheet for 5 minutes before transferring them to a cooling rack. This allows them to set up perfectly without becoming too firm.
HANDY TIPS
- ⚠️ Cooling — Don’t skip letting them cool on the baking sheet! It prevents breakage and allows those warm flavors to meld beautifully.
- 💡 TIP: If you prefer smaller cookies, roll into balls instead of discs — bake for 12 to 14 minutes for a perfect mini treat!
And there you have it! You’ve just created Perfect, Soft and Chewy Chocolate Chip Cookies that are sure to impress anyone who tries them! With just a few simple steps and common ingredients like flour and chocolate chips, you’ll have a batch of cookies that can easily become your new favorite treat (I might even say they’re addictive! 😄). Make these once, and I wager they will invade your dreams every night too! – Nagi x
FAQ – Perfect, Soft and Chewy Chocolate Chip Cookies
How long will these cookies keep?
Homemade chocolate chip cookies are best enjoyed fresh, but they can last for about 3 to 5 days when stored properly. If you keep them in an airtight container at room temperature, they’ll be about 97% as good on day 3! However, after day 5, their texture may begin to deteriorate slightly. If you notice them getting a bit stale, try warming them in the microwave for a few seconds to revive their softness.
❄️ Do I really have to chill? YES YOU DO.
Yes, chilling your cookie dough is crucial for achieving the perfect texture and flavor. When you chill the dough for at least 30 minutes, it allows the flour to fully hydrate and the flavors to meld together. Skipping this step can lead to cookies that spread too much while baking, resulting in thin and crispy cookies instead of soft and chewy ones. Trust me; I’ve tested this multiple times!
🥶 Can I freeze these cookies?
Absolutely! You can freeze both the cookie dough and baked cookies for quick treats later. For freezing dough: scoop rounded tablespoons of cookie dough onto a baking sheet lined with parchment paper and freeze until solid, then transfer to a ziplock bag. They can be kept frozen for up to 3 months. To bake from frozen, add an extra minute or two to the baking time. For baked cookies: just make sure they are completely cooled before storing them in an airtight container; they’ll stay fresh for up to 2 months.
🌾 Can these be made gluten free?
Yes, you can make gluten-free chocolate chip cookies by using a gluten-free all-purpose flour blend that contains xanthan gum. I recommend using a high-quality blend such as Bob’s Red Mill or King Arthur Flour. Keep in mind that the texture might differ slightly from traditional all-purpose flour cookies—gluten-free flours can sometimes produce a drier cookie, so consider adding an extra tablespoon of butter or an additional egg yolk to maintain that chewy consistency.
Can I reduce the sugar or substitute with sweeteners?
No, unfortunately, reducing the sugar is not advisable as it affects both texture and flavor significantly. I’ve tried making these cookies with less sugar numerous times—trust me when I say it leads to disappointing results! If you’re looking for alternatives, you could try using coconut sugar instead of brown or granulated sugar; however, keep in mind that it might alter the taste slightly while still maintaining some chewiness.
Why do we cream the butter and sugars together?
Creaming together softened butter with sugars is essential because it incorporates air into the mixture, leading to lighter and fluffier cookies. This process also helps dissolve the sugar which contributes to that delightful chewy texture once baked. If you skip this step or don’t cream long enough (around 2-3 minutes) until light and fluffy, your cookies may turn out dense rather than soft and chewy—definitely not what we want!
Can I add other ingredients like nuts or oats?
Absolutely! Feel free to customize your chocolate chip cookies by adding up to 1 cup of mix-ins like chopped nuts (walnuts or pecans work great), shredded coconut, or even oats if you’re feeling adventurous! Just remember that adding too many extras can affect the balance of moisture in your dough; so if you’re adding more than 1 cup of additional ingredients, consider reducing the amount of flour slightly by a few tablespoons. Happy experimenting!
Troubleshooting
I will continue to add more to this Troubleshooting section as I start seeing questions coming through from people who have made the recipe.
Troubleshooting tips
“My cookies were not as thick as yours! 😢”
- You may have used too much flour, which can happen if you scoop directly from the bag. This can lead to overly dry dough that spreads too much while baking. Make sure to spoon the flour into your measuring cup and level it off for accuracy.
- If your butter was too warm or melted instead of softened, it could cause the cookies to spread excessively. Always aim for butter that is soft but still holds its shape.
I bet they were still YUM though!
“My cookies came out wonky! 🤪”
- If your cookie dough was mixed too long after adding the flour, it could develop too much gluten, resulting in a tougher texture and odd shapes. Mix just until combined!
- Not chilling the dough before baking can also lead to flat and misshapen cookies. Chilling allows the fats to solidify, helping your cookies maintain their shape while baking.
I bet they were still YUM though!
“The surface of my cookies split and had massive crevices 😭”
- Overmixing your wet ingredients can incorporate too much air into the dough, which leads to cracking during baking. Mix until just combined when adding the eggs!
- If you used granulated sugar instead of packed brown sugar or omitted it entirely, this could also contribute to surface cracks due to a lack of moisture-rich ingredients.
I bet they were still YUM though!
“My cookies came out pale and undercooked! 🔥”
- If you didn’t bake them long enough or if your oven temperature is inaccurate (which happens more often than you think!), they may not get that beautiful golden color. Always check with an oven thermometer if you’re unsure!
- Using a dark-colored baking sheet can sometimes lead to quicker browning, so make sure you adjust your bake time accordingly if that’s what you’re using.
I bet they were still YUM though!
Perfect, Soft and Chewy Chocolate Chip Cookies
Ingredients
Method
- Preheat your oven to 350°F (175°C).
- In a mixing bowl, whisk together the flour, baking soda, and salt.
- In another bowl, cream together the softened butter, brown sugar, and granulated sugar until smooth.
- Beat in the vanilla extract, egg, and egg yolk until light and creamy.
- Gradually blend the dry ingredients into the wet mixture.
- Fold in the chocolate chips.
- Drop cookie dough by rounded tablespoons onto ungreased baking sheets.
- Bake for 10-12 minutes or until the edges are lightly golden.
- Remove from the oven and let cool on the baking sheet for 5 minutes before transferring to a cooling rack.