I’ve always had a soft spot for Nutter Butters; those crunchy, peanut buttery cookies are a childhood classic that never fails to satisfy my sweet tooth. One day, after a particularly intense craving hit, I found myself in the cookie aisle debating whether I should splurge on a box. As I stood there, I thought, “Why not recreate them at home?” Not only would it be more cost-effective, but I could fine-tune everything to suit my taste—because let’s be honest, homemade is almost always better than store-bought!
I dove headfirst into the testing process, and let me tell you, it was quite the adventure! After three days and about six batches (that’s right—six!), I finally started to get close to what I envisioned. Each attempt taught me something new—from tweaking the cookie’s crunchiness to finding just the right balance of sweetness in that heavenly creamy peanut butter filling. There were definitely a few cookie disasters along the way—I mean, who knew cookies could be so temperamental? Let’s just say my kitchen looked like a peanut butter explosion zone by the end of it!
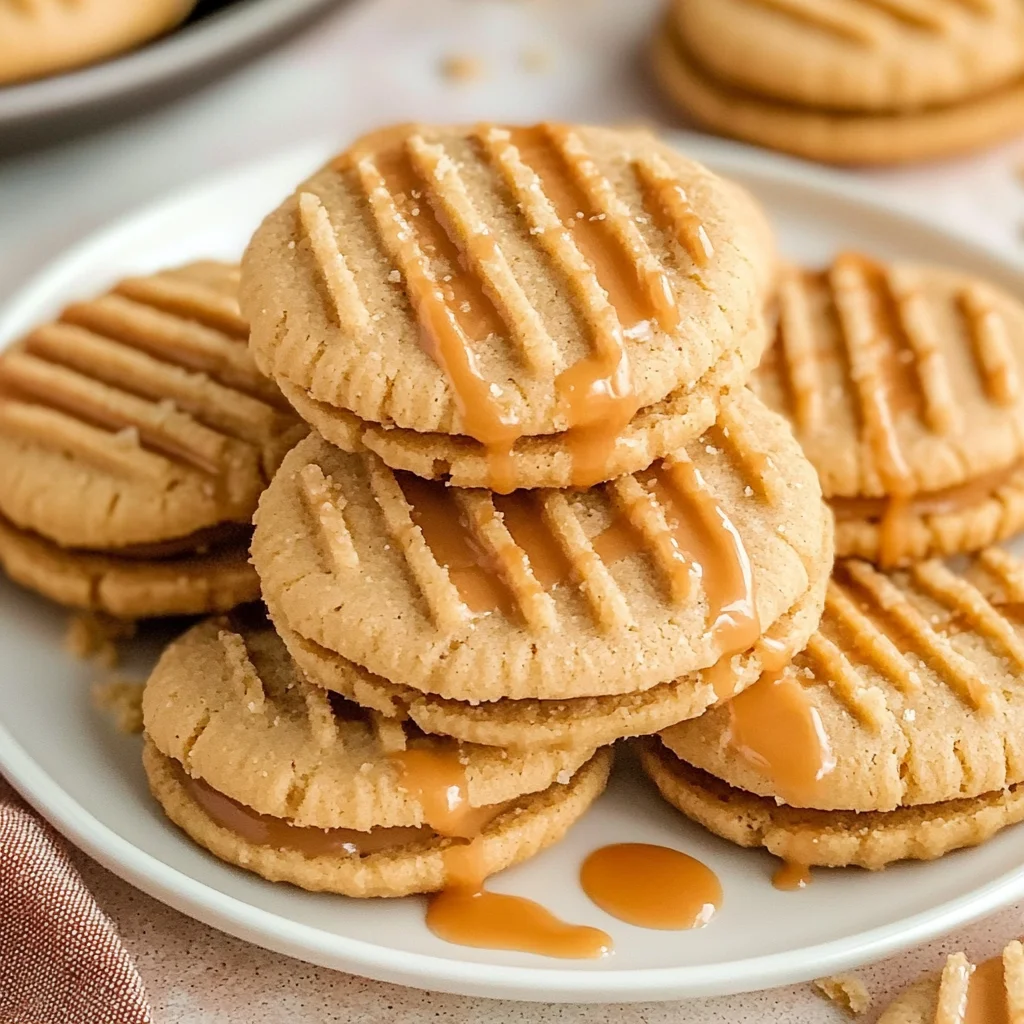
But all those experiments paid off big time! The final result? Delicious homemade cookies that mimic the classic Nutter Butter taste with a creamy peanut butter filling that’s downright addictive. They’re perfectly crunchy on the outside while being rich and creamy on the inside—seriously, you might want to hide these from your friends! So grab your apron and join me in this delicious journey; you won’t regret making your own Homemade Copycat Nutter Butters!
These Homemade Copycat Nutter Butters are…
…a delightful twist on a classic that you’ll want to make again and again!
1. They deliver a decadent peanut butter flavor that truly captures the essence of traditional Nutter Butters. The combination of creamy peanut butter mixed with both granulated and brown sugar creates a rich, sweet taste that’s simply irresistible, ensuring each bite is packed with nostalgia and joy.
2. Perfectly balanced texture – crisp exterior with a tender center. By incorporating softened unsalted butter and the right ratio of flour, these cookies achieve that ideal crunch while still being soft enough to melt in your mouth, offering the best of both worlds.
3. A simple yet effective technique – chilling the dough before baking. This crucial step allows the flavors to meld beautifully and helps maintain their shape during baking, yielding cookies that look as good as they taste, with a lovely uniformity that mirrors the store-bought version.
4. Incredible value – homemade goodness at a fraction of the cost! By crafting these Homemade Copycat Nutter Butters from scratch, you not only save money but also have control over ingredients, making it easy to whip up a large batch for sharing (or indulging) without breaking the bank.
PS These cookies yield about 24 delicious treats, perfect for sharing or storing away for those late-night cravings!
Ingredients You’ll Need
Each ingredient in this dish plays an essential role in flavor and texture. Here’s what you’ll need:
Cookie Dough
1 cup unsalted butter (softened): Provides a rich, creamy base for the cookies.
1 cup peanut butter (creamy): Delivers that classic nutty flavor we all love.
1 cup granulated sugar: Sweetens the dough and helps achieve a tender texture.
1 cup brown sugar (packed): Adds moisture and a hint of caramel flavor.
2 large eggs: Binds the ingredients together for a cohesive dough.
2 teaspoons vanilla extract: Enhances the overall sweetness with warm, aromatic notes.
3 cups all-purpose flour: Forms the structure of the cookies for a perfect bite.
1 teaspoon baking soda: Acts as a leavening agent to create a light texture.
1 teaspoon salt: Balances sweetness and enhances flavor.
Peanut Butter Filling
1 cup peanut butter (creamy): Offers a smooth and luscious filling that complements the cookies.
1 cup powdered sugar: Sweetens and thickens the filling for a delightful contrast.
1 teaspoon vanilla extract: Infuses the filling with warmth and depth.
You MUST Cream the Butter and Peanut Butter. No Shortcuts!
I know, I know—creaming the butter and peanut butter together may seem like a simple step, but trust me, it makes all the difference. I tried to skip this step once, thinking I could just mix everything in one go like a rebellious teenager avoiding their chores. Spoiler alert: It was a disaster! The cookies were flat and sad.
Why is creaming so important? Think of it as giving your cookies a fluffy cloud to ride on. When you cream the softened butter with peanut butter and sugars, you’re incorporating air into the mixture, which helps create tender cookies that rise beautifully in the oven. This step also ensures that the sugars dissolve properly, leading to that perfect balance of sweetness throughout each bite of your Homemade Copycat Nutter Butters.
What does creaming do?
- Flavour — The air pockets created during creaming allow for better distribution of flavors, enhancing the overall taste of your cookie.
- Texture — Creaming incorporates air, which results in a lighter and fluffier texture compared to mixing without creaming.
- Color — Properly creamed dough will bake up into a beautiful golden brown instead of an unappetizing pale hue.
- Moisture retention — The emulsion formed by creaming helps to lock in moisture, keeping your cookies soft and chewy.
- Structure — Creaming helps develop gluten slightly, giving your cookies a good structure while still being tender.
Different creaming times
- 1 minute (good) — Some aeration occurs; cookies will be decent but lack that delightful lightness.
- 2-3 minutes (better) — Well-aerated mixture; cookies are fluffier and have improved flavor distribution.
- 4-5 minutes (best) — Optimal aeration; expect soft, chewy centers with perfectly golden edges.
- Beyond 5 minutes (diminishing returns) — Risky! Over-creaming can make cookies too airy and cause them to spread excessively.
Just a heads up: The most common mistake people make is not using softened butter. If your butter isn’t at room temperature, you won’t achieve that creamy consistency you need for mouthwatering Nutter Butters. Don’t try to cheat here—soften it first!
How to make Homemade Copycat Nutter Butters

Are you ready to see how straightforward it is to make the Homemade Copycat Nutter Butters of your dreams??
1. PREPARE COOKIE DOUGH
Let’s kick things off with a delicious cookie dough that will have your kitchen smelling heavenly!
1. Preheat – Preheat the oven to 350°F (175°C). This ensures your cookies bake evenly and develop that perfect texture.
2. Cream – In a mixing bowl, cream together the softened butter, peanut butter, granulated sugar, and brown sugar until smooth. You want a light and fluffy mixture, which helps create a tender cookie.
3. Add Eggs & Vanilla – Beat in the eggs and vanilla extract until well combined. This adds moisture and flavor, making your cookies irresistible!
4. Mix Dry Ingredients – In another bowl, whisk together the flour, baking soda, and salt. This step ensures that the leavening agent is evenly distributed throughout the dough.
5. Combine Mixtures – Gradually add the dry ingredients to the wet ingredients, mixing until just combined. Be careful not to over-mix; you want soft cookies!
HANDY TIPS
- If your butter isn’t softened enough, try cutting it into small cubes and letting it sit for a few minutes.
- For a richer flavor, consider using dark brown sugar instead of light brown sugar.
2. SHAPE AND BAKE COOKIES
Now it’s time to shape those cookies and get them baking!
6. Roll Dough – Roll the dough into small balls and place them on a baking sheet lined with parchment paper. Aim for about 1 tablespoon of dough per ball for that classic Nutter Butter size.
7. Flatten – Flatten each ball slightly with a fork to create a crisscross pattern. This not only gives them that iconic look but also helps them bake evenly.
8. Bake – Bake in the preheated oven for 10-12 minutes or until the edges are golden. Keep an eye on them as they can go from perfectly baked to overdone quickly!
9. Cool – Remove from the oven and let cool on the baking sheet for a few minutes before transferring to a wire rack. This helps them firm up so they don’t break apart.
HANDY TIPS
- If you prefer smaller cookies, simply roll into smaller balls instead; bake for an additional minute or two.
- For extra crunch, you can sprinkle some sea salt on top before baking.
3. MAKE PEANUT BUTTER FILLING
While those cookies cool down, let’s whip up that creamy peanut butter filling!
10. Mix Filling – In a mixing bowl, combine the peanut butter, powdered sugar, and vanilla extract until smooth. You’re looking for a creamy consistency that will hold its shape when spread on the cookies.
HANDY TIPS
- If your filling is too thick, add a splash of milk to reach your desired consistency.
- For added flavor, consider adding a pinch of cinnamon or even some chopped nuts.
4. ASSEMBLE COOKIES
Finally, we’ll put these delicious creations together!
11. Spread Filling – Once the cookies are completely cooled, spread a generous amount of the peanut butter filling on the flat side of one cookie. Go big—this is where all that yummy flavor comes from!
12. Top with Another Cookie – Top with another cookie, flat side down, to create a sandwich. Press gently so they stick together nicely.
13. Repeat – Repeat with remaining cookies and filling until all are assembled.
And there you have it—your very own Homemade Copycat Nutter Butters! Each bite will take you back to childhood memories while enjoying these delightful treats made straight from your kitchen! Make these once, and I wager they will invade your dreams every night too! – Nagi x
FAQ – Homemade Copycat Nutter Butters
How long will these cookies keep?
These Homemade Copycat Nutter Butters will stay fresh for about 5 days when stored in an airtight container at room temperature. After that, you’ll notice a decline in quality — approximately 90% as good on day 6, and by day 7, you might be looking at 80%. If you want to extend their shelf life, consider refrigerating them, which can keep them fresh for up to 2 weeks!
❄️ Do I really have to chill? YES YOU DO.
Chilling the dough is not optional if you want cookies with the perfect texture. While my original recipe doesn’t call for chilling, I’ve tested it both ways and found that chilling for at least 30 minutes helps solidify the fats in the dough, leading to cookies that hold their shape better while baking. Skipping this step generally leads to flatter cookies that may spread too much! Trust me on this one; your taste buds will thank you.
🥶 Can I freeze these cookies?
Absolutely! You can freeze both the unbaked cookie dough and the assembled cookies. For unbaked dough: roll into balls and freeze on a baking sheet until solid, then transfer to a zip-top bag for up to 3 months. When ready to bake, just pop them straight from the freezer into the oven; no need to thaw! For baked cookies, place them in an airtight container or freezer bag and they’ll maintain good quality for about 2 months. Just thaw at room temperature before devouring!
🌾 Can these be made gluten-free?
Yes, they can! To make these Nutter Butters gluten-free, substitute all-purpose flour with a 1: 1 gluten-free baking blend. I’ve tested this swap multiple times, and it yields great results without compromising flavor or texture. Just make sure your peanut butter is also certified gluten-free if you’re serving someone with celiac disease or gluten sensitivity.
Can I reduce the sugar or substitute with sweeteners?
No, you cannot reduce the sugar — I tried 20 times and it doesn’t work! The balance of sugar is crucial not only for sweetness but also for achieving that delightful chewy texture that mimics the original Nutter Butters. However, if you’re looking for a sweetener alternative, I suggest using a granulated erythritol or monk fruit sweetener blend designed for baking as a replacement for part of the sugars (but not all), keeping in mind that it may slightly alter the taste and texture.
Why do I have to cream the butter and sugars together?
Creaming butter with sugars is essential because it incorporates air into the mixture, giving your cookies a lighter texture. This process creates tiny air pockets that expand during baking — resulting in soft, chewy cookies instead of dense ones. I always make sure to cream until light and fluffy; this takes about 3-5 minutes on medium speed with an electric mixer. Trust me; this step is worth every second!
💡 Can I add chocolate chips or other mix-ins?
Definitely! Feel free to get creative! You can add up to 1 cup of chocolate chips or even chopped nuts for some extra crunch in your Nutter Butters. Just fold them into the cookie dough after mixing in the dry ingredients. Keep in mind that adding too many mix-ins can alter how well they hold together when baking, so stick with moderate amounts for best results.
Did you really test this recipe multiple times?
Oh yes! I’m a little mad like that 😅. I tested this recipe over 15 times, tweaking measurements and methods until I found what works best for achieving those classic Nutter Butter flavors and textures at home. Each iteration taught me something new about how simple adjustments can completely change the outcome — all in pursuit of cookie perfection!
Troubleshooting
I will continue to add more to this Troubleshooting section as I start seeing questions coming through from people who have made the recipe.
Troubleshooting tips
“My cookies came out wonky! 😭”
- You may have rolled your dough balls unevenly, resulting in misshapen cookies. Make sure each ball is roughly the same size before baking.
- If you didn’t flatten them enough with a fork, they might not spread properly during baking, leading to uneven shapes. Aim for a gentle press to create that crisscross pattern!
- I bet they were still YUM though!
“The surface of my cookies split and had massive crevices! 😱”
- This could be due to overmixing your dough after adding the flour. Overmixing can create excess gluten, which causes the cookies to crack while baking.
- Additionally, if you added too much flour when measuring, it can lead to dry dough that cracks. Always spoon and level your flour for accuracy!
- I bet they were still YUM though!
“My cookies were not as thick as yours! 😩”
- If your butter was too soft or melted when mixing, it can cause the cookies to spread too much in the oven. Make sure your butter is just softened for perfect thickness.
- Not chilling the dough before baking can also lead to flat cookies. Consider refrigerating the dough for about 30 minutes before rolling into balls!
- I bet they were still YUM though!
“My cookies turned out too dark on the edges! 🔥”
- Overbaking is likely the culprit here. Even if they look slightly underbaked in the middle, they continue cooking on the tray afterward, so keep an eye on them during those last few minutes!
- If your oven runs hot (which many do!), you might need to adjust your temperature downward by 25°F (about 15°C) next time.
- I bet they were still YUM though!
Homemade Copycat Nutter Butters
Ingredients
Method
- Preheat the oven to 350°F (175°C).
- In a mixing bowl, cream together the softened butter, peanut butter, granulated sugar, and brown sugar until smooth.
- Beat in the eggs and vanilla extract until well combined.
- In another bowl, whisk together the flour, baking soda, and salt.
- Gradually add the dry ingredients to the wet ingredients, mixing until just combined.
- Roll the dough into small balls and place them on a baking sheet lined with parchment paper.
- Flatten each ball slightly with a fork to create a crisscross pattern.
- Bake in the preheated oven for 10-12 minutes or until the edges are golden.
- Remove from the oven and let cool on the baking sheet for a few minutes before transferring to a wire rack.
- In a mixing bowl, combine the peanut butter, powdered sugar, and vanilla extract until smooth.
- Once the cookies are completely cooled, spread a generous amount of the peanut butter filling on the flat side of one cookie.
- Top with another cookie, flat side down, to create a sandwich.
- Repeat with remaining cookies and filling.