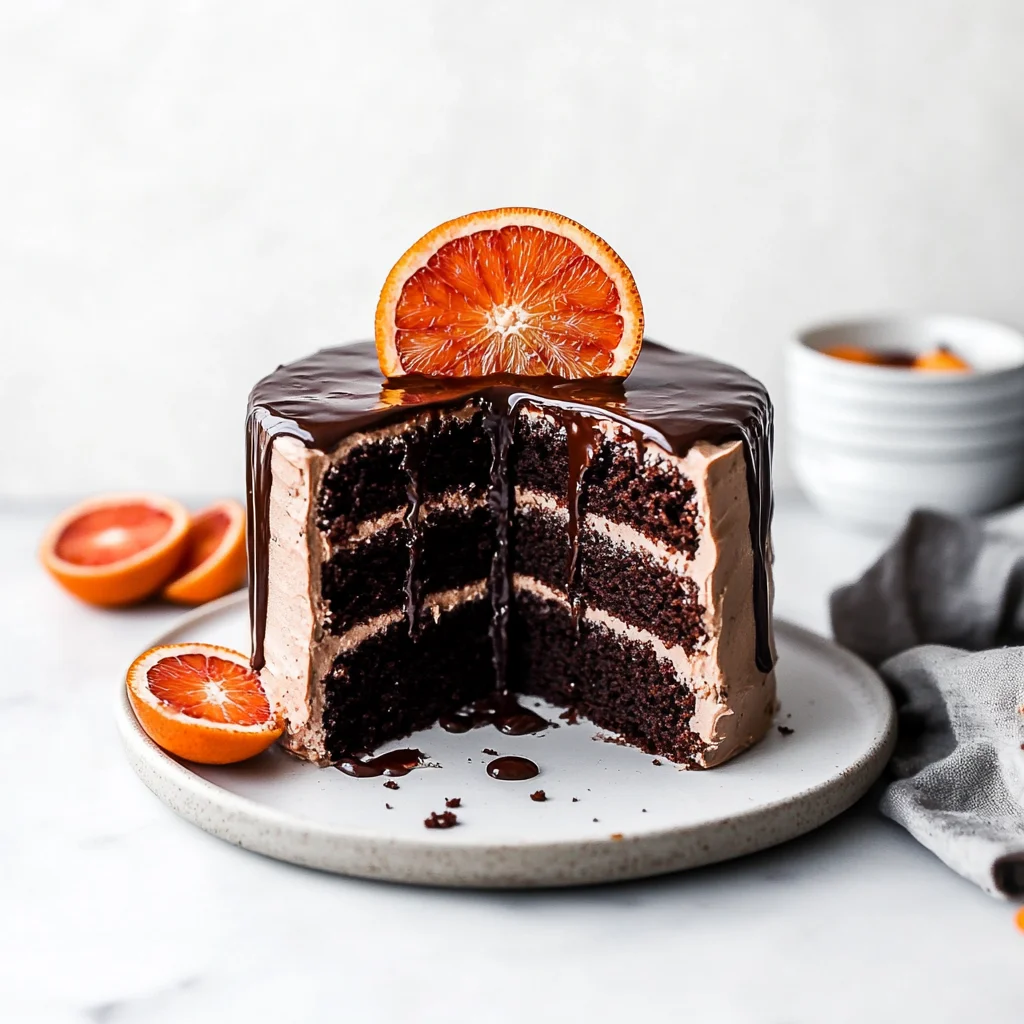
I first stumbled upon the idea for this Dark Chocolate Blood Orange Cake while dining at a charming little bistro that had an array of desserts displayed like pieces of art. I was drawn to a slice of cake that looked so indulgent and vibrant, with its deep chocolate hue perfectly contrasted by the bright blood orange glaze. The combination of rich dark chocolate and zesty blood oranges was simply irresistible, but let’s be real — my wallet wasn’t ready for those restaurant prices. So, I decided to take matters into my own hands and recreate this mouthwatering dessert at home, hoping to not only save some cash but also make it even better than what I’d experienced!
Let me tell you, perfecting this Dark Chocolate Blood Orange Cake Recipe wasn’t a walk in the park. I spent an entire week testing different ratios of chocolate to orange, experimenting with various baking times, and let’s just say there were a few cakes that went straight into the bin (sorry, neighbors!). With each attempt, I was trying to find that perfect balance between the richness of the dark chocolate and the refreshing zestiness of the blood oranges. At one point, I may have even had a mini existential crisis over whether I should add more chocolate or more zest!
But oh boy, was it worth every single failed attempt! The final cake emerged as a rich and decadent creation that’s sure to impress anyone lucky enough to taste it. With its moist texture, intense chocolate flavor, and that delightful citrus kick from the blood oranges, this cake is truly something special — perfect for any occasion or when you just want to treat yourself! I can’t wait for you to try making it; trust me, your taste buds will thank you!
These Dark Chocolate Blood Orange Cake are…
…a stunning celebration of flavors that will leave your guests raving about dessert long after the last slice is gone!
1. They deliver a luxurious depth of flavor with every bite, thanks to the combination of dark chocolate and blood orange zest. The rich cocoa powder enhances the cake’s chocolatey essence, while the citrus notes from the zest add a refreshing twist that balances the sweetness beautifully.
2. Expect a moist and velvety texture that melts in your mouth. This is achieved through the perfect blend of melted unsalted butter and buttermilk, which not only adds richness but also ensures that the cake remains tender and soft, making it an indulgent treat for any occasion.
3. A key technique in this recipe involves using both baking powder and baking soda, which creates an ideal rise. This combination allows the cake to maintain its structure while achieving that delightful, fluffy texture we all crave in a cake—no dense or dry bites here!
4. It offers incredible value, as you can create a gourmet dessert at home for a fraction of what you’d pay at a fancy bakery. With simple ingredients like all-purpose flour and granulated sugar, this Dark Chocolate Blood Orange Cake Recipe is not only accessible but also easy to whip up whenever you want to impress.
PS This cake serves 8 generous slices, making it perfect for sharing during special gatherings or celebrations!
Ingredients You’ll Need
Each ingredient in this dish plays an essential role in flavor and texture. Here’s what you’ll need:
1 cup all-purpose flour: Provides structure and a light crumb.
1/2 cup unsweetened cocoa powder: Infuses the cake with rich chocolate flavor.
1 cup granulated sugar: Sweetens the cake while balancing the bitterness of cocoa.
1/2 cup unsalted butter (melted): Adds moisture and a tender texture.
2 large eggs: Act as a binding agent, enriching the cake’s structure.
1/2 cup buttermilk: Contributes to a moist crumb and subtle tanginess.
1 teaspoon vanilla extract: Enhances overall flavor with warmth and depth.
1 teaspoon baking powder: Helps the cake rise to a perfect height.
1/2 teaspoon baking soda: Works with acidity to create a light, fluffy texture.
1/4 teaspoon salt: Balances sweetness and enhances flavors throughout.
- 1 tablespoon blood orange zest: Adds vibrant citrus notes that brighten the chocolate.
You must let the cake cool completely. No shortcuts!
I know, I know—waiting is the hardest part! I tried to rush this step once, thinking a little warmth wouldn’t hurt, but oh boy, was I wrong! The result was a gooey mess that fell apart instead of the beautiful, rich masterpiece I envisioned. Trust me, you don’t want to skip this.
Letting the cake cool completely is essential for achieving that perfect texture and structure. When you pull a cake out of the oven, it’s still very hot and continues to cook slightly from residual heat. Cooling it allows the crumb to set properly—imagine trying to slice through a lava cake rather than a perfectly baked one! This means your Dark Chocolate Blood Orange Cake will be easier to slice and serve without crumbling away.
What does cooling do?
- Texture — The cake firms up as it cools, making it easier to slice without falling apart.
- Moisture retention — Allowing the cake to cool prevents moisture loss that happens when it’s cut too soon.
- Flavor development — Some flavors continue to develop as the cake cools, enhancing that rich chocolate and zesty blood orange combination.
- Appearance — A cooled cake holds its shape beautifully and prevents unsightly cracks or collapses.
- Glaze adherence — A completely cooled cake allows the glaze to set evenly without melting into a puddle.
Different cooling times
- 10 minutes in the pan (good) — This initial cooling helps prevent sticking but isn’t enough for proper texture.
- 30 minutes on a wire rack (better) — The cake is mostly cool but may still feel warm; great for slicing but not ideal for glazing.
- 1 hour (best) — The cake is fully cooled and has firmed up nicely, ready for that luscious blood orange glaze!
- 2 hours or more (ultimate) — Perfectly cooled with maximum flavor development; this is when your patience really pays off!
Don’t make the common mistake of glazing while the cake is still warm; the glaze will melt right off and make a mess of your beautiful creation. Let it cool completely—it’s non-negotiable!
How to make Dark Chocolate Blood Orange Cake

Are you ready to see how straightforward it is to make the Dark Chocolate Blood Orange Cake of your dreams??
1. PREPARE THE CAKE
Let’s get started on this indulgent cake that’s sure to impress!
1. Preheat – Preheat the oven to 350°F (175°C). This ensures a perfectly baked cake, so don’t skip this step! Grease and flour a 9-inch round cake pan to prevent sticking, allowing for an easy release once baked.
2. Whisk Dry Ingredients – In a mixing bowl, whisk together the all-purpose flour, cocoa powder, baking powder, baking soda, and salt. This step helps to evenly distribute the leavening agents and ensures your cake rises beautifully.
3. Mix Wet Ingredients – In another bowl, mix the melted butter and granulated sugar until combined. Add in the eggs, buttermilk, vanilla extract, and blood orange zest. Mix well until smooth and creamy; the melted butter adds richness while the buttermilk gives moisture.
4. Combine Mixtures – Gradually add the dry ingredients to the wet ingredients, mixing until just combined. Be careful not to overmix; a few lumps are okay! This will keep your cake tender and fluffy.
5. Pour Batter – Pour the batter into the prepared cake pan and smooth the top with a spatula. Make sure it’s evenly spread out for consistent baking.
6. Bake – Bake for 30-35 minutes or until a toothpick inserted in the center comes out clean. Watch for that beautiful rise and slight cracking on top — that’s when you know it’s done!
7. Cool Down – Let the cake cool in the pan for 10 minutes before transferring it to a wire rack to cool completely. This cooling phase is crucial as it allows flavors to deepen and makes frosting easier later on.
HANDY TIPS
- For a richer chocolate flavor, use Dutch-processed cocoa powder instead of natural cocoa.
- If you don’t have buttermilk on hand, you can substitute it with milk mixed with a teaspoon of vinegar or lemon juice.
- Make sure your butter is melted but not hot; if too hot, it could cook your eggs!
2. MAKE THE GLAZE
Now let’s add that luscious glaze that brings everything together!
8. Whisk Glaze – In a small bowl, whisk together the powdered sugar and blood orange juice until smooth. The glaze should be thick yet pourable; adjust with more juice or sugar as needed for desired consistency.
9. Drizzle Glaze – Once the cake is completely cool, drizzle the glaze over the top of the cake using a spoon or spatula for an artistic touch! Let it set for a few minutes before slicing into this decadent delight.
HANDY TIPS
- For extra zestiness in your glaze, consider adding more blood orange zest—just be cautious not to overpower.
- If you want an elegant finish, use a piping bag to drizzle the glaze in beautiful patterns over your cooled cake!
What an accomplishment — you’ve just created a stunning Dark Chocolate Blood Orange Cake that’s perfect for any special occasion! Each slice is bursting with rich chocolate flavor paired with vibrant citrus notes — simply divine! Make this once, and I wager it will invade your dreams every night too! – Nagi x
FAQ – Dark Chocolate Blood Orange Cake
🍫 How long will this cake keep?
The Dark Chocolate Blood Orange Cake will stay fresh for about 3-4 days when stored properly at room temperature. After the second day, I’d rate its quality at about 90%, and by day four, it drops to around 80%. To keep it moist, always cover it with plastic wrap or place it in an airtight container. If you notice any dryness, a quick drizzle of blood orange juice or a light syrup can help revive it!
⏳ Can I skip cooling the cake before glazing?
No, you can’t skip cooling the cake before adding the glaze! I’ve tried and learned the hard way that glazing a warm cake leads to a runny mess that doesn’t stick beautifully on top. Allowing the cake to cool completely ensures that the glaze sets perfectly, creating a lovely finish. I usually let mine cool for at least 30 minutes on the wire rack after removing it from the pan.
❄️ Can I freeze this cake for later?
Yes, you can freeze this Dark Chocolate Blood Orange Cake! To do so, wrap it tightly in plastic wrap or aluminum foil after it’s completely cooled. I recommend slicing it first; this allows you to thaw just what you need later. When you’re ready to enjoy, thaw it in the fridge overnight and let it sit at room temperature for about 30 minutes before serving. The taste remains great—about 85% as good as fresh!
🌾 Is there a gluten-free option for this recipe?
Absolutely! You can make this cake gluten-free by substituting all-purpose flour with a 1: 1 gluten-free flour blend. I recommend using blends that contain xanthan gum since they provide better structure and moisture retention. Just be sure to check your cocoa powder and other ingredients for gluten-free certification to avoid cross-contamination.
🥛 Can I substitute buttermilk with something else?
If you don’t have buttermilk on hand, no worries! You can easily create a substitute by mixing 1/2 cup of milk (whole or low-fat) with 1/2 tablespoon of vinegar or lemon juice. Let it sit for about 5-10 minutes until it thickens slightly—this mimics the acidity of buttermilk which helps activate the baking soda in your recipe.
🔍 Why do we add blood orange zest to the batter?
Blood orange zest adds vibrant flavor and aromatic oils to your cake, enhancing its overall taste profile. The zest brings out citrusy notes that complement the rich dark chocolate beautifully. If you’re wondering how much is enough, I typically use about a tablespoon; it strikes the perfect balance without overwhelming the chocolate flavor.
💡 Can I add nuts or other flavors to this cake?
You definitely can customize this cake! Feel free to fold in some chopped walnuts or hazelnuts into the batter for added texture and flavor. For an extra twist, consider mixing in chocolate chips or even orange liqueur into your glaze for additional depth. Just remember that every addition may slightly alter baking times or textures, so keep an eye on things while baking!
Troubleshooting
I will continue to add more to this Troubleshooting section as I start seeing questions coming through from people who have made the recipe.
Troubleshooting tips
“My cake came out too flat! 😩”
- This often happens if you didn’t properly measure your baking powder. Too little baking powder can lead to inadequate rising during baking, resulting in a flat cake.
- Another possibility is that your oven temperature was off. If it was cooler than 350°F (175°C), the cake wouldn’t rise adequately.
- I bet it still tasted delicious, though!
“My cake is dry and crumbly! 😭”
- Dryness usually results from overbaking. Make sure to check your cake a few minutes before the recommended baking time; every oven is different!
- Additionally, using too much flour can soak up moisture, so be careful when measuring your all-purpose flour.
- I bet it was still YUM though!
“The top of my cake cracked! 😲”
- Cracking on top can occur if the oven temperature is too high or if the batter was mixed too vigorously, incorporating too much air. Both can cause rapid rising and subsequent cracking.
- Make sure your oven is preheated correctly and mix until just combined next time!
- It probably still looked beautiful inside, though!
“My glaze turned out lumpy! 🤔”
- Lumps in your glaze often come from not sifting the powdered sugar before mixing it with blood orange juice. Sifting helps ensure a smooth consistency.
- Also, make sure you’re mixing thoroughly until it’s completely smooth—no one likes a lumpy glaze!
- I bet it still added a lovely flavor to your cake!
“My cake didn’t rise evenly! 😕”
- Uneven rising can result from not leveling the dry ingredients properly when measuring, especially with flour and cocoa powder. The excess weight can lead to uneven structure.
- Also, make sure you’re pouring the batter into the pan evenly for a uniform bake.
- But hey, a unique shape adds character to any dessert!
Dark Chocolate Blood Orange Cake
Ingredients
Method
- Preheat the oven to 350°F (175°C). Grease and flour a 9-inch round cake pan.
- In a mixing bowl, whisk together the flour, cocoa powder, baking powder, baking soda, and salt.
- In another bowl, mix the melted butter and sugar until combined. Add the eggs, buttermilk, vanilla extract, and blood orange zest, and mix well.
- Gradually add the dry ingredients to the wet ingredients, mixing until just combined.
- Pour the batter into the prepared cake pan and smooth the top.
- Bake for 30-35 minutes or until a toothpick inserted in the center comes out clean.
- Let the cake cool in the pan for 10 minutes, then transfer to a wire rack to cool completely.
- In a small bowl, whisk together the powdered sugar and blood orange juice until smooth.
- Once the cake is completely cool, drizzle the glaze over the top of the cake.