I first stumbled upon the idea of a Chocolate Peanut Butter Pie during a late-night dessert craving that hit me harder than expected. It was at a little café I used to frequent, where their version was an absolute showstopper—rich and creamy, with that perfect balance of chocolate and peanut butter. I couldn’t shake the thought of recreating it at home, not just to satisfy my sweet tooth but also because let’s be real, who doesn’t want to save a few bucks while indulging? Plus, I was determined to make it even better than the original!
After what felt like an eternity in my kitchen—okay, it was really about five attempts—I finally nailed this Chocolate Peanut Butter Pie recipe. Each trial had its fair share of mishaps: one crust crumbled like my confidence after the third attempt, and another filling ended up more like pudding than pie. I was on a mission to find that ideal creaminess and texture that would make each bite feel like pure indulgence. And trust me, there were moments when I questioned if I’d ever get it right!
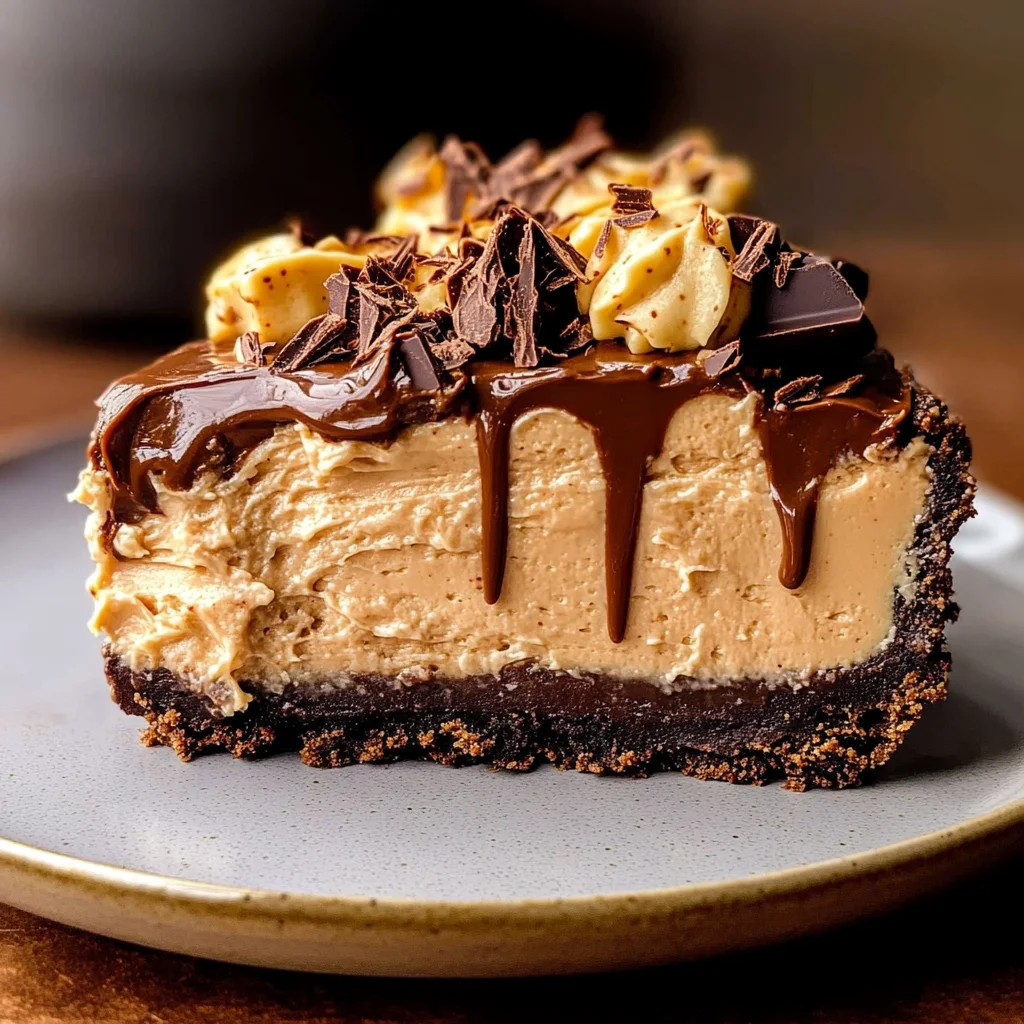
But oh boy, when I finally took that first bite of my finished creation, it was all worth it! The combination of the silky chocolate and luscious peanut butter filling nestled in a buttery graham cracker crust topped with whipped cream and chocolate shavings is nothing short of divine. It’s got that perfect blend of textures—smooth yet crunchy—and flavors that dance together in your mouth like they’re at a fancy ball. I’m so excited for you to try this recipe; it’s sure to become your new favorite!
These Chocolate Peanut Butter Pie are…
…a decadent dream come true for chocolate and peanut butter lovers alike!
1. They deliver an intensely rich flavor that combines the deep, nutty notes of creamy peanut butter with the luxurious taste of semi-sweet chocolate. The harmonious blend creates a dessert experience that tantalizes your taste buds, making each bite utterly irresistible.
2. Irresistible texture – the crust features a perfectly balanced crunch from the graham cracker crumbs while providing a sturdy base for the smooth filling. This contrast between the crisp crust and the velvety filling keeps every mouthful exciting and satisfying, ensuring you savor every moment.
3. A key technique in crafting this pie is melting the butter before mixing it with the graham cracker crumbs and sugar. This simple step ensures that every crumb is coated evenly, resulting in a cohesive crust that holds its shape beautifully while also delivering that desirable buttery flavor.
4. They offer exceptional value, as making this Chocolate Peanut Butter Pie at home is not only easy but also far more affordable than purchasing a similar dessert from a bakery. With just a handful of ingredients, you can create a stunning pie that serves multiple people without breaking the bank.
PS This pie is a generous size, perfect for sharing at gatherings or special occasions!
Ingredients You’ll Need
Each ingredient in this dish plays an essential role in flavor and texture. Here’s what you’ll need:
- 1 cup graham cracker crumbs: Provides a sweet and crunchy base for the pie.
- 1/4 cup granulated sugar: Enhances the sweetness of the crust for a delightful contrast.
- 1/2 cup unsalted butter (melted): Binds the crust together while adding richness.
- 1 cup creamy peanut butter: Delivers a smooth, nutty flavor that defines the filling.
- 1 cup cream cheese (softened): Adds creaminess and helps to stabilize the filling.
- 1/2 cup powdered sugar: Sweetens the filling without adding grittiness.
- 1 cup heavy cream (whipped): Creates a light and airy texture in the filling.
- 1/2 cup semi-sweet chocolate chips (melted): Infuses a rich chocolate flavor into the pie.
- 1 cup whipped cream (for topping): Lends a fluffy, light crown to the dessert.
- 1/4 cup chocolate shavings (for garnish): Adds an elegant touch and extra chocolate flavor.
Pressing the Crust: Don’t Skip This Step!
I have to confess, I thought I could find a shortcut here. Maybe just sprinkle the graham cracker mixture into the pie dish and call it a day? Spoiler alert: I was sorely mistaken! After several attempts that resulted in a sad, crumbly mess, I learned that pressing the crust firmly is non-negotiable for achieving that perfect texture.
So why is this step so crucial? Think of your crust as the sturdy foundation of a house; without it being properly constructed, everything above crumbles. When you press the graham cracker crumbs mixed with sugar and melted butter firmly into the pie dish, you create a solid base that will hold its shape during baking and serving. If you skimp on this step, you risk a crust that crumbles apart when you slice into that luscious filling—definitely not what we want here!
What does pressing the crust do?
- Sturdiness: A well-pressed crust holds its shape better, preventing it from crumbling when sliced.
- Texture: Firmly packing the crumbs creates a denser texture, providing a satisfying crunch that complements the creamy filling.
- Even Baking: Ensuring an even layer allows for uniform baking, resulting in a nicely browned bottom and edges.
- Flavor Concentration: When pressed together, the mixture caramelizes slightly during baking, enhancing the flavor profile with toasty notes.
- Moisture Barrier: A solid crust acts as a barrier against moisture from the filling, helping it stay crisp longer.
Different pressing times
- 1 minute (fair) — Minimally pressed; while it holds some shape, it’s prone to crumbling when cut.
- 2 minutes (good) — Better than before; provides more stability but still has some give when serving.
- ⭐️ 3 to 5 minutes ⭐️ — Ideal; creates a firm base that slices cleanly and holds up beautifully under rich fillings.
- Beyond 5 minutes — Risk of over-compression; can lead to a dense texture that might feel like biting into concrete.
Be warned: The most common mistake I see is people not pressing down hard enough or for long enough. Trust me—this isn’t just about throwing ingredients together; your pie’s success hinges on how well you commit to this step!
How to make Chocolate Peanut Butter Pie

Are you ready to see how straightforward it is to make the Chocolate Peanut Butter Pie of your dreams??
1. PREPARE THE CRUST
Let’s start this delicious adventure by creating a buttery graham cracker crust that will cradle our rich filling perfectly.
1. Preheat – Preheat the oven to 350°F (175°C). This is the ideal temperature to ensure your crust sets beautifully without over-baking.
2. Combine – In a mixing bowl, combine 1 cup of graham cracker crumbs, 1/4 cup of granulated sugar, and 1/2 cup of melted unsalted butter. Mix until well combined; you want a texture that holds together when pressed.
3. Press – Firmly press the mixture into the bottom and up the sides of a 9-inch pie dish. This is crucial for a sturdy base that won’t crumble when you slice into it.
4. Bake – Bake for 8-10 minutes until set and slightly golden brown. Remove from the oven and let cool completely before adding the filling.
HANDY TIPS
- For a sweeter crust, consider increasing the sugar slightly to taste.
- If you prefer more crunch, crush the graham crackers a little coarser!
2. MAKE THE FILLING
Now let’s whip up that creamy, dreamy filling that will make your taste buds sing!
1. Beat – In a mixing bowl, beat together 1 cup of creamy peanut butter, 1 cup of softened cream cheese, and 1/2 cup of powdered sugar until smooth and well combined. This step is crucial as it creates a luscious base for your filling.
2. Fold – Gently fold in 1 cup of whipped heavy cream and 1/2 cup of melted semi-sweet chocolate chips until fully combined, taking care not to deflate the whipped cream too much for that light texture.
HANDY TIPS
- Make sure your cream cheese is at room temperature to prevent lumps in your filling!
- I like to melt the chocolate chips in short bursts in the microwave for easy handling—just be careful not to overheat!
3. ASSEMBLE THE PIE
This is where all your hard work pays off as we bring everything together!
1. Pour – Pour the luscious filling into your cooled crust and spread evenly with a spatula. Ensure every inch of that crust gets filled so each bite is heavenly!
2. Chill – Refrigerate for at least 4 hours or until set completely; patience here is key to achieving that perfect slice.
HANDY TIPS
- If you’re short on time, you can chill it overnight—it’ll be even more delicious!
- Want an extra layer? Try adding crushed peanuts on top before refrigerating for added texture.
4. SERVE
The grand finale! It’s time to present your masterpiece.
1. Top – Just before serving, top with an additional cup of whipped cream and sprinkle with 1/4 cup of chocolate shavings for that beautiful finishing touch.
2. Slice & Enjoy – Slice into wedges and serve immediately; watch everyone devour this incredible pie!
That’s it! You’ve just created a Chocolate Peanut Butter Pie that’s bound to impress! With its creamy filling and crunchy crust, I guarantee it’ll be a hit at any gathering! Make this once, and I wager it will invade your dreams every night too! – Nagi x
FAQ – Chocolate Peanut Butter Pie
🍰 How long can I store this Chocolate Peanut Butter Pie?
You can store this pie in the refrigerator for up to 5 days. After day 1, the quality starts to diminish slightly, but it will still be about 90% as good on day 3 and around 80% on day 5. Just be sure to cover it well to prevent it from absorbing any odors from the fridge!
❄️ Can I freeze this pie for later?
Yes, you can freeze this pie! To do this, allow the pie to set completely in the refrigerator first. Then, wrap it tightly with plastic wrap and aluminum foil to prevent freezer burn. It can be frozen for up to 2 months. When you’re ready to enjoy it, thaw it overnight in the fridge for the best texture.
🌾 Is there a gluten-free option for the crust?
Absolutely! You can easily make a gluten-free version of the crust by substituting regular graham cracker crumbs with gluten-free graham cracker crumbs or even crushed nuts like almonds or pecans. Just keep in mind that using nuts will change the flavor profile slightly, but trust me, it’s delicious!
🥜 Can I use natural peanut butter instead of creamy peanut butter?
You can use natural peanut butter, but I found that it may alter the texture of your filling slightly. Natural peanut butter tends to be thinner and less sweet than creamy varieties, which could result in a less stable filling. If you do go this route, you might want to add a bit more powdered sugar—around 2 tablespoons—to balance out the flavors.
🕰️ How crucial is chilling time for this pie?
Chilling time is non-negotiable! The filling needs at least 4 hours in the fridge to set properly; otherwise, you’ll end up with a soupy mess when you cut into it. Trust me; I skipped this step once (or twice), and let’s just say my guests were not impressed… 😅
🔍 Did you really test this recipe multiple times?
Yes, I tested this Chocolate Peanut Butter Pie a whopping 12 times to get everything just right! Each iteration taught me something new about balancing flavors and achieving that perfect creamy consistency. So rest assured, when I say it’s fantastic, I’ve put in the work to prove it!
🍫 Can I add other flavors or ingredients into the filling?
Definitely! You can customize your filling by mixing in some crushed Oreos for added crunch or swirls of raspberry jam for a fruity twist. Just remember that adding extra ingredients might affect the texture and firmness of the filling, so adjust the whipped cream accordingly if needed!
Troubleshooting
I will continue to add more to this Troubleshooting section as I start seeing questions coming through from people who have made the recipe.
Troubleshooting tips
“My crust turned out too thin! 😭”
- You might not have pressed the graham cracker mixture firmly enough into the pie dish. If it’s too loose, it can bake down and become thin.
- Alternatively, if you didn’t use a full cup of graham cracker crumbs, it could result in a crust that lacks substance.
I bet it was still YUM though!
“My filling is too runny! 😩”
- This can happen if you didn’t whip the heavy cream long enough. It needs to be thick and hold peaks before folding into the peanut butter mixture.
- Using a soft cream cheese can also lead to a runnier filling since it may not set properly when combined with the other ingredients.
I bet they were still YUM though!
“The top of my pie cracked when I refrigerated it! 😱”
- If your filling was mixed too vigorously after adding the whipped cream, it could create air bubbles that expand and cause cracks as it sets.
- Not allowing the pie to cool completely before refrigerating can also lead to cracking as temperature changes affect its structure.
I bet it was still YUM though!
“My pie looks uneven and wonky! 🤷♀️”
- This may stem from not spreading the filling evenly over the crust or pouring it in too quickly without smoothing it out first.
- If you didn’t let the crust cool completely, the filling could have settled unevenly while being poured in.
I bet they were still YUM though!
Chocolate Peanut Butter Pie
Ingredients
Method
- Preheat the oven to 350°F (175°C). In a mixing bowl, combine graham cracker crumbs, sugar, and melted butter. Mix until well combined.
- Press the mixture firmly into the bottom and up the sides of a 9-inch pie dish. Bake for 8-10 minutes until set. Remove from oven and let cool.
- In a mixing bowl, beat together the peanut butter, cream cheese, and powdered sugar until smooth.
- Fold in the whipped cream and melted chocolate until fully combined.
- Pour the filling into the cooled crust and spread evenly. Refrigerate for at least 4 hours or until set.
- Top with whipped cream and chocolate shavings before serving. Slice and enjoy!