I still remember that day when I walked into my favorite café craving something sweet, and there they were: freshly made chocolate mini donuts, glistening with a rich chocolate glaze. They were so adorable, sitting in their little display case, practically begging me to take them home. I couldn’t resist! But after that first blissful bite of soft, chocolatey goodness, I was left wondering why I didn’t have a stash of these delightful treats at home. So, I decided to recreate them myself—because let’s be honest, it’s way more satisfying (and economical) to whip up a batch of Chocolate Mini Donuts in your own kitchen!
Let me tell you, the journey to perfect these little bites of joy wasn’t as easy as I’d hoped. It took me no less than seven attempts (yes, you read that right!) to get them just right. I tried everything from adjusting the flour ratios to experimenting with baking times—let’s just say my kitchen looked like a chocolate explosion zone more than once! Each iteration brought me closer and closer to the dreamy texture and rich flavor I was after. I may have had a few epic fails along the way (who knew donuts could be so finicky?), but it was all part of the fun!
But oh boy, was it worth it! The final result is a batch of Chocolate Mini Donuts that are unbelievably soft and decadently rich, with a texture that’s just the right amount of fluffy. They have this melt-in-your-mouth quality that’ll make you forget all about those store-bought ones! Plus, they stay fresh for days—if you can resist devouring them all at once! Trust me, you’ll want to dive into this recipe immediately; your taste buds will thank you later!
These Chocolate Mini Donuts are….
….the ultimate indulgence for chocolate lovers craving a delightful treat!
1. They deliver a decadent chocolate flavor that’s simply irresistible, thanks to the generous addition of unsweetened cocoa powder. This rich cocoa not only enhances the sweetness but also creates a depth of flavor that will have you reaching for seconds (and maybe thirds!).
2. Incredibly soft texture – each bite feels like a cloud of chocolate bliss. The combination of all-purpose flour and milk achieves that perfect tender crumb, ensuring these mini donuts are melt-in-your-mouth delicious without being overly dense.
3. A crucial baking technique is using baking powder alongside baking soda, which works wonders in achieving that perfect rise and lightness. This clever combination elevates these donuts from ordinary to extraordinary, giving them a delightful lift and an airy feel that contrasts beautifully with their rich flavor.
4. Unbeatable value – making these mini donuts at home is not only budget-friendly but also incredibly easy! With simple pantry staples like flour and sugar, you can whip up a batch that rivals any café offering, saving you both time and money while satisfying your sweet tooth.
PS These mini donuts are bite-sized and yield about 12 pieces, making them perfect for sharing or enjoying on your own!
Ingredients for the Chocolate Mini Donuts
Each ingredient in this dish plays an essential role in flavor and texture. Here’s what you’ll need:
1 cup all-purpose flour: Provides the structure and base for the donuts.
1/2 cup granulated sugar: Sweetens the donuts and helps create a tender crumb.
1/3 cup unsweetened cocoa powder: Infuses rich chocolate flavor into every bite.
1 teaspoon baking powder: Acts as a leavening agent for lightness and fluffiness.
1/2 teaspoon baking soda: Enhances the rise and contributes to a tender texture.
1/4 teaspoon salt: Balances sweetness and boosts overall flavor.
1 large egg: Binds ingredients together while adding moisture and richness.
1/2 cup milk (whole or 2%): Keeps the donuts moist and adds creaminess.
1/4 cup vegetable oil: Ensures a soft, tender texture in each donut.
1 teaspoon vanilla extract: Adds warmth and depth of flavor to the batter.
1/2 cup powdered sugar: Sweetens the glaze for a smooth finish on top.
2 tablespoons unsweetened cocoa powder: Deepens the chocolate taste of the glaze.
2 tablespoons milk: Adjusts the consistency of the glaze for perfect drizzling.
1 teaspoon vanilla extract: Enhances the sweetness and complexity of the glaze.
Don’t Overmix the Batter! Trust Me on This One!
I have to confess, I tried to skip this step in my quest for the perfect mini donuts. I thought, “How much difference could it really make?” Well, after several batches and a few too many dry, rubbery disasters, I learned that overmixing is a cardinal sin in donut-making. Seriously, don’t make the same mistake I did!
When you overmix the batter, you’re activating the gluten in the flour too much. Think of gluten as elastic bands in your batter—too many elastic bands mean tough donuts instead of soft ones. The goal here is to keep things light and fluffy, allowing those lovely air bubbles to form during baking and give you that melt-in-your-mouth texture we all crave in chocolate mini donuts.
What does not overmixing do?
- Texture — Prevents toughness by keeping the donuts light and airy.
- Moisture — Results in a softer crumb that holds onto moisture better, thanks to less gluten formation.
- Rise — Allows for better rising during baking as air pockets remain intact.
- Flavor — Creates a more balanced flavor profile by preventing dry spots from forming.
- Appearance — Ensures a uniform shape and look; overmixed batters can lead to unevenly shaped donuts.
Different Mixing Times
- Under 30 seconds (great) — The batter is slightly lumpy but will yield soft, tender donuts with a wonderful consistency.
- 1 minute (good) — A little bit smoother but still acceptable; however, some lumps may remain for added texture.
- 2 minutes (okay) — This is where things start to go downhill; the batter will be relatively smooth but may result in slightly tougher donuts.
- 3 minutes or more (bad) — You’ve officially crossed into tough territory. The donuts will be dense and chewy—definitely not what you want!
If there’s one thing to remember from this section, it’s that overmixing is the quickest way to ruin your chocolate mini donuts. Just stop stirring once everything is combined! No ifs or buts about it. Trust me—your taste buds will thank you!
How to make Chocolate Mini Donuts

Are you ready to see how straightforward it is to make the Chocolate Mini Donuts of your dreams??
1. PREPARE THE DONUT BATTER
Let’s kick things off by mixing our dry and wet ingredients to create the perfect batter!
1. Preheat – Preheat your oven to 350°F (175°C). This is an important step as it ensures that your mini donuts bake evenly and rise perfectly! Don’t forget to grease the mini donut pan with cooking spray to prevent sticking.
2. Whisk Dry Ingredients – In a mixing bowl, whisk together the dry ingredients: 1 cup of all-purpose flour, 1/2 cup of granulated sugar, 1/3 cup of unsweetened cocoa powder, 1 teaspoon of baking powder, 1/2 teaspoon of baking soda, and 1/4 teaspoon of salt until well combined. This step helps to aerate the flour and mix in the cocoa for a consistent chocolate flavor throughout!
3. Mix Wet Ingredients – In another bowl, mix together 1 large egg, 1/2 cup of milk (whole or 2%), 1/4 cup of vegetable oil, and 1 teaspoon of vanilla extract until well combined. The oil adds moisture while the milk balances the batter for a soft texture.
4. Combine Mixtures – Pour the wet ingredients into the dry ingredients and stir until just combined. Do not overmix! Overmixing can lead to dense donuts instead of fluffy ones.
HANDY TIPS
- 💡 TIP: Sift your cocoa powder before adding it to avoid clumps that could affect the texture.
- 💡 TIP: For richer chocolate flavor, consider using dark cocoa powder instead!
2. BAKE THE DONUTS
Now it’s time to transform that delicious batter into mini donut magic!
5. Spoon Batter – Spoon the batter into the mini donut pan, filling each cavity about 2/3 full. This allows space for them to rise without overflowing! A piping bag makes this step easier and neater.
6. Bake – Bake in the preheated oven for 8-10 minutes, or until a toothpick inserted into the center comes out clean. You’ll know they’re done when they look nicely puffed and slightly spring back when touched.
7. Cool Down – Allow the donuts to cool in the pan for 5 minutes before transferring them to a cooling rack. This prevents them from getting soggy while cooling in their own steam!
HANDY TIPS
- 💡 TIP: If you have leftover batter, try baking it in muffin tins; just adjust your baking time accordingly!
- ⚠️ WARNING: Avoid opening the oven door too early; this can cause your donuts to sink!
3. PREPARE THE CHOCOLATE GLAZE
Let’s finish off these delightful donuts with a rich chocolate glaze!
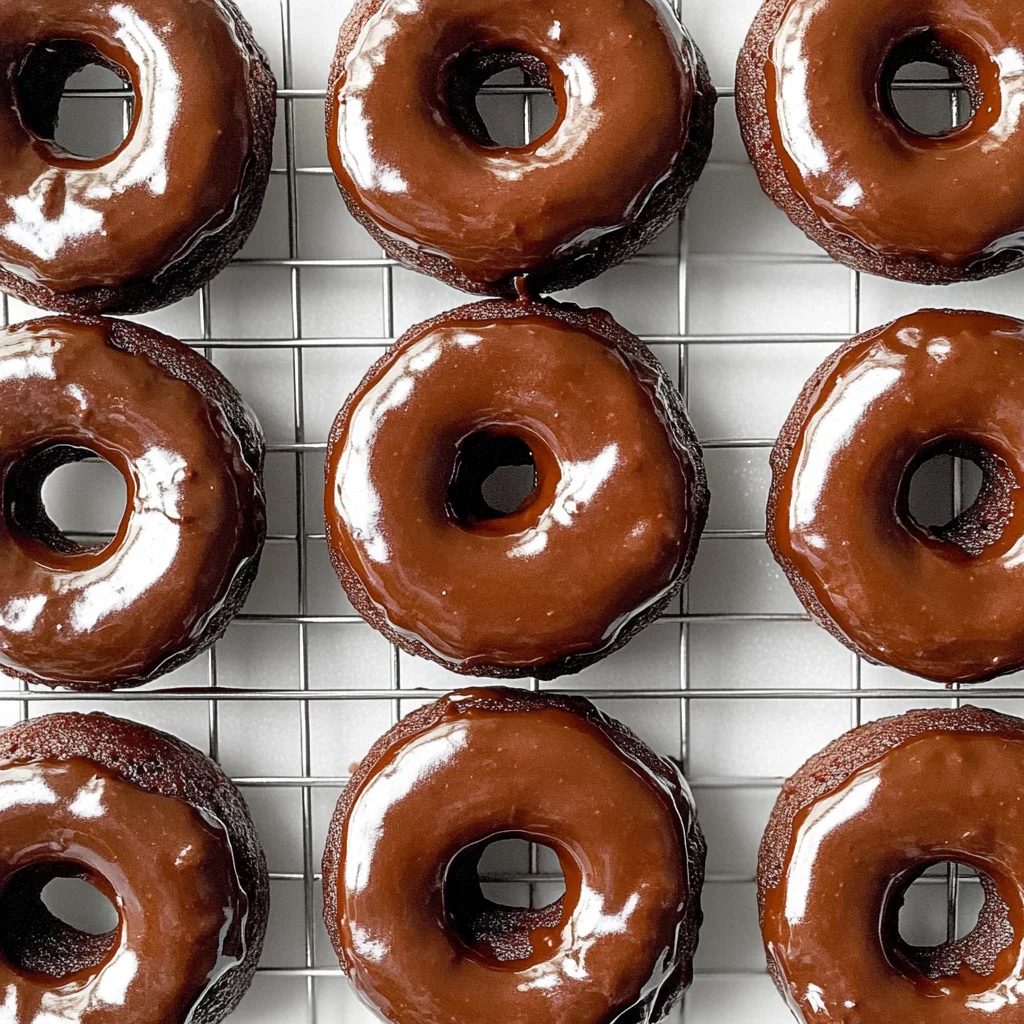
8. Mix Glaze – In a small bowl, whisk together 1/2 cup of powdered sugar, 2 tablespoons of unsweetened cocoa powder, 2 tablespoons of milk, and 1 teaspoon of vanilla extract until smooth. The glaze should be slightly thick but still fluid enough to dip.
9. Dip Donuts – Dip each cooled donut into the glaze, allowing any excess to drip off back into the bowl. This will give you that perfect glossy finish!
10. Set Glaze – Place the glazed donuts back on the cooling rack to set for a few minutes—this will help prevent them from sticking if you stack them later.
HANDY TIPS
- 💡 TIP: For an extra crunch, sprinkle some crushed nuts or sprinkles on top immediately after glazing!
- 💡 TIP: If you want a thicker glaze, simply add more powdered sugar until you reach your desired consistency.
Now you’ve mastered making these scrumptiously soft Chocolate Mini Donuts that are sure to impress! With minimal effort and maximum flavor, I know you’ll love every bite! Make these once, and I wager they will invade your dreams every night too! – Nagi x
FAQ – Chocolate Mini Donuts
🍩 How long will these mini donuts keep?
These Chocolate Mini Donuts will stay fresh for about 2-3 days when stored in an airtight container at room temperature. After day 1, I’d say they are about 95% as good, but by day 3, they drop to around 85%. If you want to keep them for longer, consider freezing them. Just be sure to wrap each donut individually in plastic wrap to maintain their softness.
⏳ Can I skip letting the batter rest before baking?
No, you can’t skip resting the batter. While this recipe doesn’t specifically call for a resting period, allowing it to sit for even just a few minutes after mixing can help hydrate the flour better and enhance the texture of your donuts. This extra step gives you that super soft and tender bite we all love!
❄️ Can I freeze these mini donuts?
Absolutely! To freeze these Chocolate Mini Donuts, let them cool completely after baking. Then, place them in a single layer on a baking sheet and freeze until solid. Once frozen, transfer them to a zip-top freezer bag or an airtight container. They can be stored for up to 2 months. When you’re ready to enjoy them, simply thaw at room temperature or pop them in the microwave for about 10-15 seconds.
🌾 Can I make these donuts gluten-free?
Yes! You can definitely make these Chocolate Mini Donuts gluten-free by substituting the all-purpose flour with a 1: 1 gluten-free baking blend. Just ensure that your blend contains xanthan gum or add it separately according to package instructions—this helps achieve that fluffy texture you want!
🔄 Can I substitute the vegetable oil?
If you’d like to substitute the vegetable oil in this recipe, I recommend using melted coconut oil or unsweetened applesauce as alternatives. Both options will work nicely; however, using applesauce may slightly alter the flavor and texture—giving you a denser donut. Stick with vegetable oil if you want that classic lightness!
🥛 Can I use a dairy-free milk alternative?
Yes! You can use any dairy-free milk alternative like almond milk, oat milk, or soy milk in place of regular milk in this recipe. Just choose one that is unsweetened to keep the balance of flavors intact. I’ve tested it with almond milk and found it works beautifully without any compromise on taste!
🧪 How many times did you test this recipe?
I actually tested these Chocolate Mini Donuts over ten times to get it just right! Each batch had me tweaking things like oven time and glaze consistency until I was absolutely satisfied with their soft texture and rich chocolate flavor. So trust me when I say they’re worth every ounce of effort!
Troubleshooting
I will continue to add more to this Troubleshooting section as I start seeing questions coming through from people who have made the recipe.
Troubleshooting tips
“My donuts came out flat! 😱”
- Your batter may have been overmixed, which can lead to a loss of air and result in flat donuts. When combining wet and dry ingredients, you should only mix until just combined.
- If your baking powder or baking soda are expired, they might not provide the necessary rise for your donuts. Always check the expiration dates before using leavening agents.
I bet they were still YUM though!
“My donuts are too dry! 🥵”
- If you measured your flour incorrectly, it could lead to too much flour in the batter, resulting in dry donuts. Make sure to spoon the flour into your measuring cup and level it off with a knife for accuracy.
- Baking them for too long can also cause dryness; keep an eye on them and do the toothpick test at 8 minutes.
I bet they were still YUM though!
“The tops of my donuts cracked! 😭”
- Overmixing your batter can create too much gluten, resulting in a tough texture that leads to cracking during baking. Mix until just combined for a softer donut.
- If your oven temperature is too high, it can cause the outside to set before the inside has fully baked, leading to cracks. Use an oven thermometer to ensure accurate temperature.
I bet they were still YUM though!
“My donuts turned out unevenly baked! 🔥”
- If you didn’t fill each cavity of the mini donut pan evenly (about 2/3 full), some donuts may bake faster than others, resulting in uneven doneness. Use a spoon or piping bag for even distribution.
- Opening the oven door too often while baking can cause temperature fluctuations, leading to uneven baking. Try to resist peeking!
I bet they were still YUM though!
Chocolate Mini Donuts
Ingredients
Method
- Preheat your oven to 350°F (175°C). Grease the mini donut pan with cooking spray.
- In a mixing bowl, whisk together the dry ingredients: flour, sugar, cocoa powder, baking powder, baking soda, and salt.
- In another bowl, mix the wet ingredients: egg, milk, vegetable oil, and vanilla extract until well combined.
- Pour the wet ingredients into the dry ingredients and stir until just combined. Do not overmix.
- Spoon the batter into the mini donut pan, filling each cavity about 2/3 full.
- Bake in the preheated oven for 8-10 minutes, or until a toothpick inserted into the center comes out clean.
- Allow the donuts to cool in the pan for 5 minutes before transferring them to a cooling rack.
- In a small bowl, whisk together the powdered sugar, cocoa powder, milk, and vanilla extract until smooth.
- Dip the cooled donuts into the glaze, allowing the excess to drip off.
- Place the glazed donuts back on the cooling rack to set.