When I first laid eyes on a Brain Cake at a quirky little bakery in my neighborhood, I couldn’t help but be captivated. It was Halloween season, and this whimsical cake, complete with intricate pink frosting that looked just like a brain, caught my attention immediately. I couldn’t shake the thought of creating my own version at home—not only to save some cash but also to put my own delicious twist on it. After all, who wouldn’t want to impress their friends at a Halloween party with an edible masterpiece that’s both creepy and delightful?
Let me tell you, perfecting this Brain Cake was no walk in the park. It took me five attempts (yes, five!) to get it just right—mostly because I kept trying to make it look more realistic while simultaneously nailing the flavor. Each round was a mix of laughter and minor disasters; let’s just say there were a few “brain blobs” that didn’t quite make the cut! I experimented with different sponge recipes and frosting techniques, all in pursuit of that ideal blend of moist texture and sweet creaminess that would wow anyone brave enough to take a slice.
But oh boy, was it worth every single sticky kitchen disaster! The final result is nothing short of spectacular: a visually striking cake that really does resemble a brain, yet tastes utterly divine with its moist layers and luscious frosting. The combination of flavors is surprisingly delightful—think fluffy vanilla cake paired with creamy raspberry buttercream for that extra punch. I can’t wait for you to try making this Brain Cake yourself; it’s guaranteed to be the star of your Halloween or themed party! Happy baking!
These Brain Cake are…
….the ultimate showstopper for Halloween parties that will leave your guests both amazed and delighted!
1. Deliciously indulgent flavor — The combination of unsweetened cocoa powder and granulated sugar creates a deeply chocolatey taste profile that is irresistibly rich. I find that the buttermilk adds a subtle tang, balancing the sweetness and enhancing the overall flavor, making every bite feel like a decadent treat.
2. Perfectly moist texture — Thanks to the buttermilk and vegetable oil, these cakes have an incredibly moist crumb that melts in your mouth. Unlike dry cakes that can be a chore to eat, this Brain Cake maintains its softness and tenderness, ensuring it’s always a crowd favorite.
3. Elevated baking technique — By incorporating baking soda with buttermilk, I create a chemical reaction that gives the cake its perfect rise and fluffiness. This method sets it apart from ordinary recipes, ensuring your Brain Cake has a light and airy structure that’s both satisfying and impressive.
4. Budget-friendly appeal — With basic ingredients like all-purpose flour and eggs, this recipe is not only easy to whip up but also cost-effective. You can create a stunning cake at home without breaking the bank, which makes it an excellent choice for themed parties or gatherings.
PS This Brain Cake yields enough to serve a small crowd, so it’s ideal for sharing at festive celebrations!
Ingredients for the Brain Cake
Each ingredient in this dish plays an essential role in flavor and texture. Here’s what you’ll need:
- 1 cup all-purpose flour: Provides the structure and base for the cake.
- 1 cup granulated sugar: Sweetens the cake and helps create a tender crumb.
- 1/2 cup unsweetened cocoa powder: Infuses rich chocolate flavor and color.
- 1 tsp baking powder: Acts as a leavening agent for a light texture.
- 1 tsp baking soda: Enhances leavening for a fluffy cake.
- 1/2 tsp salt: Balances sweetness and enhances overall flavor.
- 1 cup buttermilk: Adds moisture and a slight tang for depth of flavor.
- 1/2 cup vegetable oil: Keeps the cake moist and tender.
- 2 large eggs: Binds ingredients together and adds richness.
- 2 tsp vanilla extract: Imparts warm, aromatic flavor to the cake.
You Must Let the Cake Cool Completely. No Exceptions!
I know, I know. Waiting is the hardest part, especially when you’re staring at a glorious cake that’s just begging to be frosted. I tried to rush this step once—just a little, I thought—but the result was a melty mess instead of the perfect canvas for my whimsical brain design. Trust me, patience is key here.
Cooling the cake completely is crucial because it allows the structure to set properly. Think of it like letting dough rest; if you don’t give it time, it’ll just collapse under pressure. For our Brain Cake, if you frost it while it’s still warm, you’ll end up with frosting slipping and sliding all over instead of a beautifully decorated brain!
What does cooling completely do?
- Texture — A properly cooled cake has a firmer crumb that holds up better to frosting and decorating without crumbling.
- Flavor — As the cake cools, flavors meld and deepen, enhancing that rich chocolatey goodness from the cocoa powder.
- Frosting adherence — A cool surface ensures that your frosting sticks and sets nicely without melting into a gooey puddle.
- Presentation — A well-cooled cake gives you clean edges and defined layers for that Instagram-worthy look.
- Sliceability — When cool, the cake slices beautifully without tearing, making every piece as pretty as can be.
Different cooling times
- 10 minutes (okay) — The cake will be warm but not too hot; decent for frosting but expect some slippage.
- 30 minutes (good) — The outer layer cools down; better for applying frosting but still risky for detailed decorations.
- 1 hour (better) — The cake is mostly cool; great for a stable foundation for your frosting.
- 2 hours (best) — Fully cooled and ready! Ideal for achieving those precise brain-like patterns without any melting or oozing.
Don’t make the mistake of rushing this step! Frosting a warm cake can lead to disastrous results where your beautiful brain design becomes an amorphous blob. Let it cool completely—I promise it’s worth the wait!
How to make Brain Cake
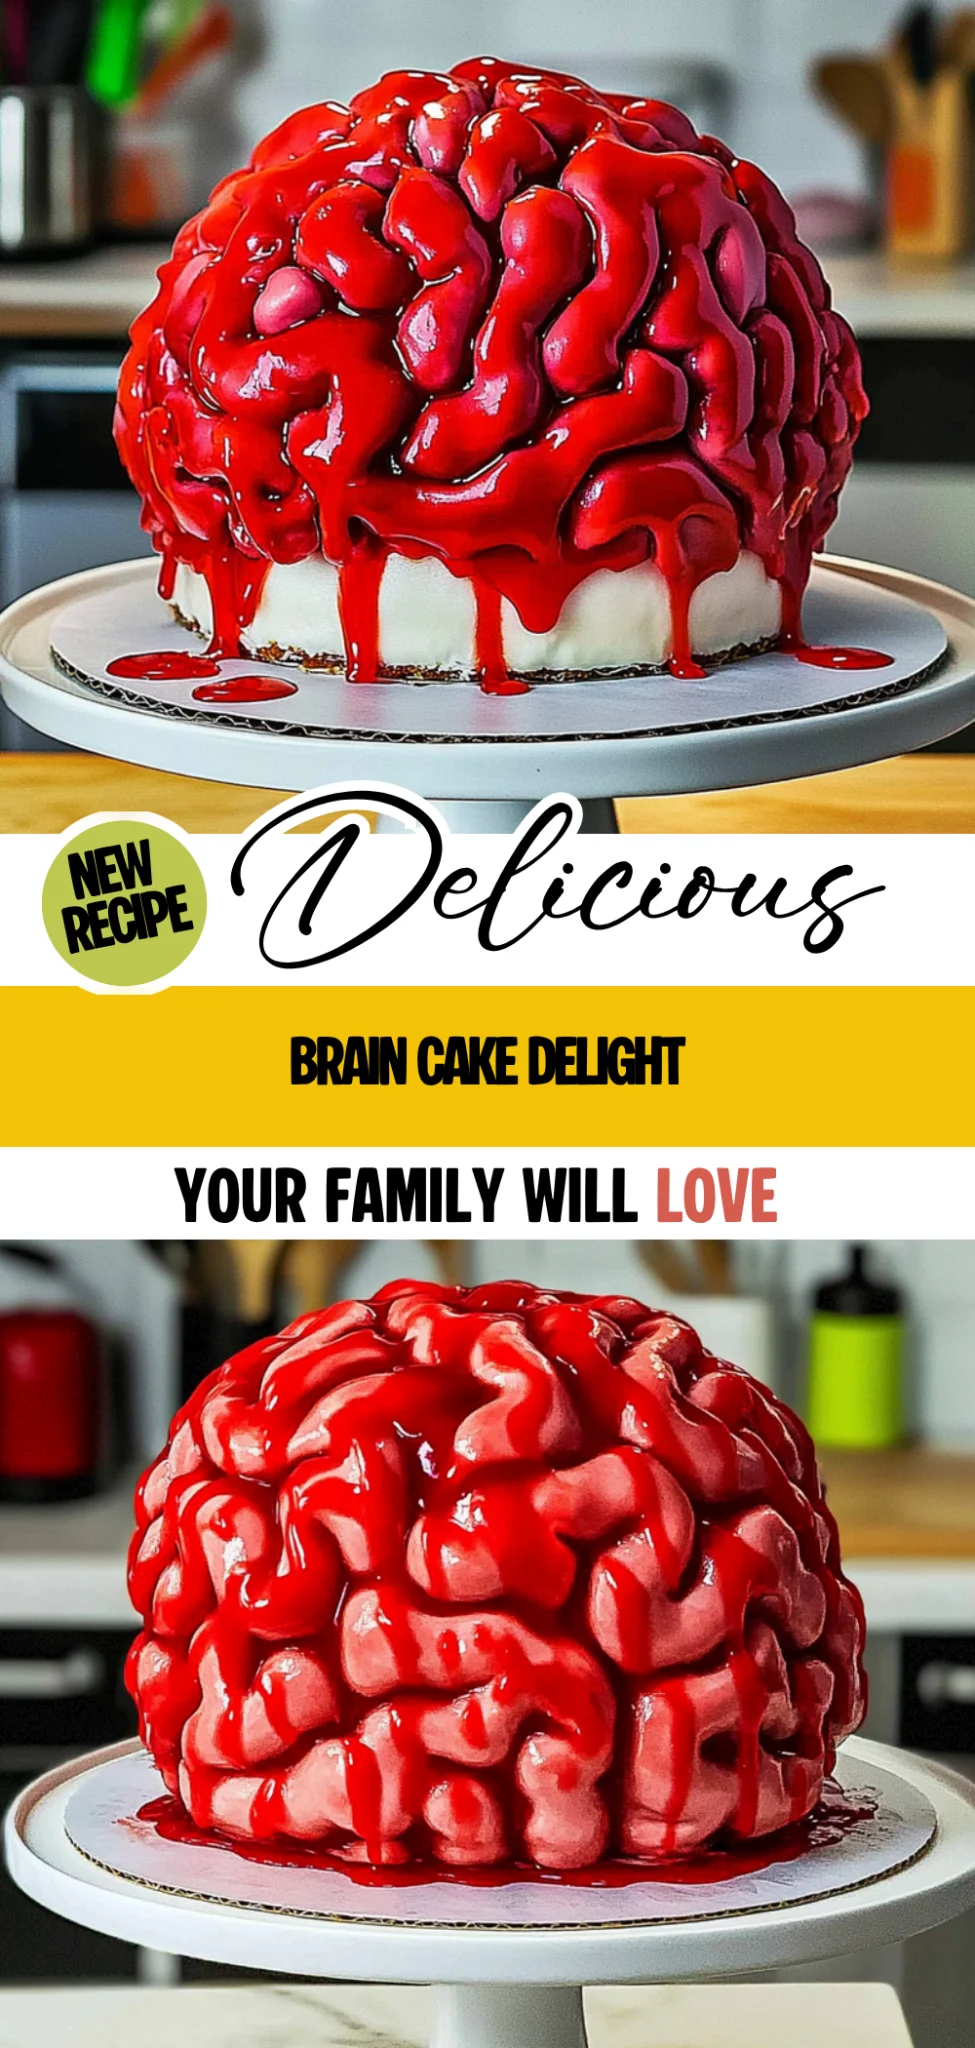
Are you ready to see how straightforward it is to make the Brain Cake of your dreams??
1. PREPARE THE CAKE
Let’s get started on crafting this whimsical creation!
1. Preheat – Preheat the oven to 350°F (175°C). This will ensure that your cake bakes evenly and rises beautifully. Don’t forget to grease and flour your cake pan, as this will help prevent sticking and allow for a smooth release after baking.
2. Combine Dry Ingredients – In a mixing bowl, combine 1 cup of all-purpose flour, 1 cup of granulated sugar, ½ cup of unsweetened cocoa powder, 1 tsp of baking powder, 1 tsp of baking soda, and ½ tsp of salt. Mixing these dry ingredients first helps to evenly distribute the leavening agents throughout the flour, ensuring a uniform rise for your cake.
3. Mix Wet Ingredients – In another bowl, mix together 1 cup of buttermilk, ½ cup of vegetable oil, 2 large eggs, and 2 tsp of vanilla extract until smooth. This mixture adds moisture and flavor to the batter while also acting as a binding agent.
4. Combine Mixtures – Carefully combine the wet and dry ingredients by folding them together until just combined. Overmixing can lead to a dense cake, so be gentle here!
5. Bake – Pour the batter into the prepared cake pan and bake for 30-35 minutes or until a toothpick inserted in the center comes out clean. You’ll know it’s done when you see it pull away slightly from the edges of the pan and has a nice dome shape on top!
6. Cool – Let the cake cool completely before frosting. This waiting period is crucial; frosting a warm cake can cause it to melt and slide off—no one wants that!
HANDY TIPS
- 💡 TIP: To check if your cake is done without cracking it open too soon, gently press on top; it should spring back when done!
- ⚠️ Remember: While cooling is essential, don’t leave it out too long—keep an eye on those pesky crumbs getting caught in the frosting later!
2. MAKE THE FROSTING
Now for the fun part—making that brainy frosting!
7. Beat Butter – In a stand mixer, beat 1 cup of softened unsalted butter until creamy. This step is key for creating a light and fluffy texture in your frosting; soft butter incorporates air better than cold butter does.
8. Add Sugar & Cream – Gradually add 4 cups of powdered sugar alternating with ¼ cup of heavy cream, mixing until fluffy between each addition. This method prevents sugar clouds and ensures a smoother consistency without lumps!
9. Flavor It Up – Add in 1 tsp of vanilla extract and mix well to enhance that sweet flavor profile—trust me; this makes all the difference!
10. Color The Frosting – Divide your frosting into two bowls; color one with 2 tbsp of red food coloring and the other with 2 tbsp of pink food coloring. The contrasting colors will create a realistic brain effect that’ll wow your guests!
HANDY TIPS
- 💡 TIP: If you want an even more vibrant color for your frosting, use gel food coloring instead of liquid—it packs more punch!
- ⚠️ Watch out: Frosting can be sticky if it’s too warm; if you feel it’s not holding its shape well while piping, pop it in the fridge for about 10 minutes before decorating.
3. DECORATE THE CAKE
Finally, let’s bring this masterpiece to life!
11. Set The Stage – Place the cooled cake on a serving platter where it will dazzle all who lay eyes on it!
12. Pipe Red Frosting – Using a piping bag fitted with a round tip, pipe the red frosting in a brain-like pattern on top of the cake; think squiggly lines that mimic those intricate brain folds!
13. Fill In Gaps – Next, fill in any gaps with pink frosting using another piping bag or simply spread it with an offset spatula to create depth and realism.
14. Chill To Set – Chill the decorated cake for about 30 minutes to set the frosting before serving—this helps everything hold its shape beautifully when cut.
HANDY TIPS
- 💡 TIP: For added detail, you can use different sized piping tips for various textures in your brain design—think small tips for fine lines!
- ⚠️ Be careful: When chilling your decorated cake, make sure it’s covered lightly so that no air prevents that gorgeous finish from setting perfectly!
Make this Brain Cake once at your next Halloween bash or themed party, and I guarantee it will steal the show—and hearts! 🎃 Happy baking! – Nagi x
FAQ – Brain Cake
🥳 Can I make this cake in advance?
Absolutely! You can bake the cake base ahead of time. Just let it cool completely, then wrap it tightly in plastic wrap and store it at room temperature for up to 3 days. If you want to keep it longer, you can freeze the cake for up to 2 months. Just make sure to thaw it in the fridge overnight before frosting it. When you’re ready to serve, frost and decorate as usual!
❄️ How long can I store leftovers?
The Brain Cake stays fresh for about 3-4 days when stored properly in an airtight container at room temperature. After day 3, I find it’s still about 90% as good if you keep it in the fridge, but the frosting may firm up a bit due to the cold. If you love your cake soft and fluffy, sticking with room temp storage is best!
🌾 Can I make this cake gluten-free?
Yes, you can! Substitute the all-purpose flour with a gluten-free flour blend that is designed for baking. Make sure to check that it’s 1: 1 ratio with regular flour for best results. Additionally, ensure all other ingredients are gluten-free, particularly the baking powder and any added flavorings.
🍭 Can I substitute the buttermilk?
Certainly! If you don’t have buttermilk on hand, you can easily make a substitute by mixing 1 cup of milk with 1 tablespoon of vinegar or lemon juice. Let it sit for about 5-10 minutes until it thickens slightly before using. This will mimic the acidity and moisture of buttermilk perfectly.
🎨 Why do I need to chill the cake after frosting?
Chilling helps set the frosting so that it holds its shape better when serving. If you skip this step, your beautifully piped brain design may start to melt or lose definition at room temperature. Trust me; I’ve made that mistake before! Chilling for just 30 minutes does wonders for presentation.
🤔 Can I use different colors for the frosting?
Absolutely! While red and pink give a classic brain look, feel free to get creative with colors that suit your theme or personal preference. Just remember that food coloring strength varies between brands, so start with less and add more until you achieve your desired shade!
🔄 How many times did you test this recipe?
I lost count after trying this cake six times during development because I was so determined to get both the texture and decoration just right! Each iteration taught me something new—like how piping technique really makes a difference in achieving that brainy effect. So yes, rest assured this recipe is tried-and-true!
Troubleshooting
I will continue to add more to this Troubleshooting section as I start seeing questions coming through from people who have made the recipe.
Troubleshooting tips
“My cake came out too dry! 😭”
- You might have overbaked the cake. If you left it in the oven longer than 35 minutes, that can dry it out, so keep an eye on it in the last few minutes.
- You may not have added enough moisture. Ensure you’re measuring your buttermilk accurately and not missing any of it, as it helps create a moist cake.
- Using too much flour due to improper measuring can also lead to dryness. Make sure to spoon and level your flour rather than scooping directly from the bag.
I bet it still tasted delicious though!
“My cake sank in the middle! 😢”
- If you opened the oven door while baking, that could cause a temperature drop, leading to a sunken center. Try to resist peeking until the minimum bake time is up!
- Another reason could be underbaking; make sure your toothpick comes out clean or with just a few crumbs attached before taking it out of the oven.
- Lastly, if your batter was overmixed after combining wet and dry ingredients, that can create excess air pockets that collapse during baking.
But hey, a little sunken center just means more frosting in there, right?
“My frosting turned out too runny! 😩”
- You might have added too much heavy cream when mixing the frosting. Start with less cream and add gradually until you reach that fluffy consistency.
- If your butter wasn’t soft enough, that could lead to an imbalance in texture as well. Make sure it’s softened but not melted when you start mixing.
- Lastly, if you added too much powdered sugar without adjusting for moisture, that can also throw off the consistency.
I’m sure it still spread nicely on your cake!
“The color of my frosting ended up uneven! 🔴”
- It’s possible that you didn’t mix the food coloring evenly throughout the frosting. Try using a small whisk or spatula for better distribution next time.
- If you added too much food coloring at once, it might not blend as well. Gradually add and mix until you achieve the desired shade instead!
- Poor lighting can also affect how colors appear while decorating — make sure you’re in a well-lit area to gauge your colors accurately.
Even if it was uneven, I’m certain it still looked fabulous on your spooky Brain Cake!