I’ve always had a soft spot for the classic Black Forest cake, with its rich layers of chocolate, cream, and cherries. I remember the first time I tasted it at a charming little café during a family vacation; it was love at first bite! The combination of flavors was so intoxicating that I decided to take on the challenge of recreating that experience at home, but in bar form. Let’s be honest—who doesn’t want to enjoy a decadent dessert without the fuss of slicing layers? Plus, making it myself meant I could tweak the recipe to suit my taste buds while keeping costs down.
After several attempts—okay, maybe more than several; let’s just say my kitchen saw more cheesecake bars than I care to admit—I finally nailed it. My mission was clear: achieve a creamy filling that perfectly complemented a rich chocolate crust while ensuring the cherry topping wasn’t just an afterthought but rather the star of the show. Each iteration taught me something new, from the right balance of sweetness to how not to end up with a cheesecake that tasted like rubber (don’t ask!). It’s safe to say my friends and family have been my very patient taste testers through this journey!
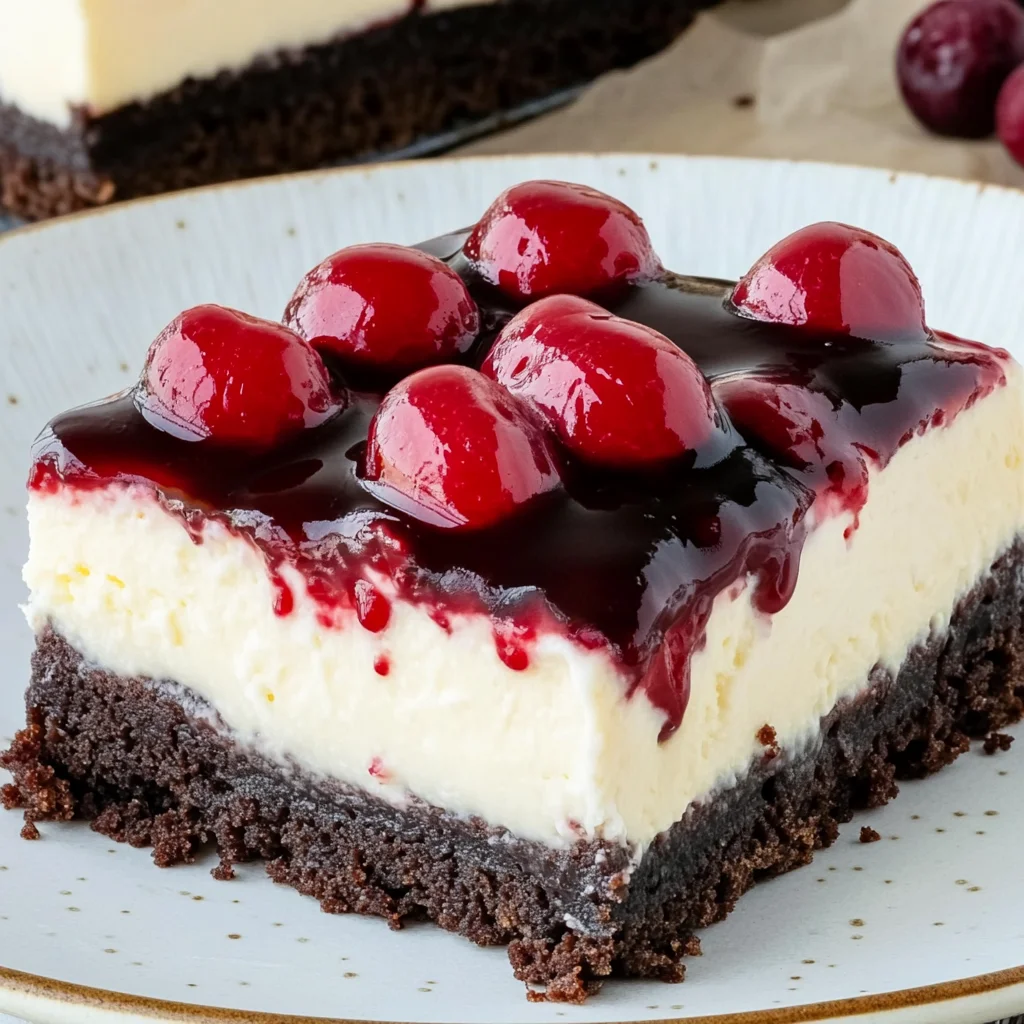
But let me tell you, all those trials were worth it! The final result is nothing short of heavenly—these Black Forest Cheesecake Bars are decadently creamy with a luscious chocolate crust and topped with sweet-tart cherries that sing with flavor. The contrast between the silky filling and crunchy base is simply divine, and they hold up beautifully in the fridge for days. Trust me, once you try these bars, you’ll be as hooked as I am! So grab your ingredients and let’s get baking—I can’t wait for you to experience these delicious bites!
These Black Forest Cheesecake Bars are….
….the ultimate indulgence for any dessert lover!
1. They deliver a decadent chocolate flavor that will have your taste buds singing! The combination of chocolate graham cracker crumbs and granulated sugar creates a rich, sweet base that perfectly complements the creamy cheesecake filling. This depth of flavor is what truly sets these bars apart from ordinary cheesecake desserts.
2. You’ll experience an irresistible texture that strikes the perfect balance between crispy and creamy. The melted butter binds the crust ingredients beautifully, ensuring it bakes into a crunchy, yet tender layer that contrasts perfectly with the smooth cheesecake filling. Each bite offers a delightful crunch followed by velvety creaminess.
3. The key technique here is melting the butter before mixing it with the crumbs and sugar, which ensures an even distribution and moisture throughout the crust. This method not only enhances the flavor but also guarantees that every square of crust holds together flawlessly, giving you that ideal bite every time.
4. These bars offer incredible value, providing a restaurant-quality dessert at a fraction of the price! By using readily available ingredients like chocolate graham cracker crumbs and basic pantry staples, you can whip up these luxurious Black Forest Cheesecake Bars at home without breaking the bank or sacrificing on taste.
PS These bars are cut into generous squares, making them perfect for sharing—or keeping all to yourself!
Ingredients You’ll Need
Each ingredient in this dish plays an essential role in flavor and texture. Here’s what you’ll need:
- 1 cup chocolate graham cracker crumbs: Provides a rich, chocolatey base for the bars.
- 1/4 cup granulated sugar: Sweetens the crust for a balanced flavor.
- 1/2 cup unsalted butter (melted): Binds the crust ingredients together while adding richness.
- 16 oz cream cheese (softened): Creates a smooth and creamy cheesecake filling.
- 1/2 cup sour cream: Adds tanginess and depth to the filling.
- 1/2 cup granulated sugar: Sweetens the filling to complement the tart cherry topping.
- 1 teaspoon vanilla extract: Enhances the overall flavor profile with warm notes.
- 2 large eggs: Helps set the filling, giving it structure and creaminess.
- 1 cup cherry pie filling: Delivers a burst of sweetness and tartness on top.
- 1 tablespoon chocolate shavings (for garnish): Adds an elegant touch and extra chocolate flavor.
Pressing Your Crust: No Skipping This Step!
I’ll be honest, I tried to find a shortcut here. I thought, “Surely I can just sprinkle the crumbs in and call it a day.” Spoiler alert: I was wrong. The moment I skipped the pressing part, my crust crumbled like an overly ambitious New Year’s resolution — not pretty and definitely not what we want for our Black Forest Cheesecake Bars!
So why is pressing your crust so critical? Think of it like laying the foundation for a house; if you don’t pack it down, everything built on top will wobble and fall apart. By firmly pressing the chocolate graham cracker crumbs mixed with sugar and butter into the baking pan, you’re creating a solid base that holds its shape when the cheesecake filling is poured over. This simple act transforms your crust from a loose pile of crumbs into a firm, delectable layer that perfectly complements that creamy filling.
What does pressing your crust do?
- Texture — A well-pressed crust creates a sturdier base that holds together beautifully when cut into bars.
- Flavor — Pressing ensures even distribution of the butter and sugar, enhancing the overall taste by bringing out richer chocolate notes.
- Stability — A compact crust prevents crumbling when you slice into your cheesecake bars, allowing for clean cuts and beautiful presentation.
- Baking Uniformity — Pressing helps achieve an even bake across the entire crust, so every bite is consistently delicious.
- Shelf Life — A firmer crust retains moisture better, preventing sogginess over time and keeping your bars fresh longer.
Different pressing times
- Barely pressed (good) — If you give it just a light press, you’ll end up with a crumbly base that won’t hold up well when slicing.
- Moderately pressed (better) — A decent press provides improved stability but may still lead to some crumbling at the edges.
- Firmly pressed (best) — This is where magic happens! A good press creates an incredibly sturdy crust that stays intact and enhances flavor.
- Overly pressed (diminished returns) — If you go too far and press too hard, you risk compacting it too much, leading to a dense texture rather than that perfect balance.
Here’s my warning: Don’t skimp on pressing! The most common mistake is thinking a light pat will do. Trust me; without proper pressure, your cheesecake bars will not only look sad but also taste less than stellar. No one wants a dessert that falls apart before they can enjoy it!
How to make Black Forest Cheesecake Bars
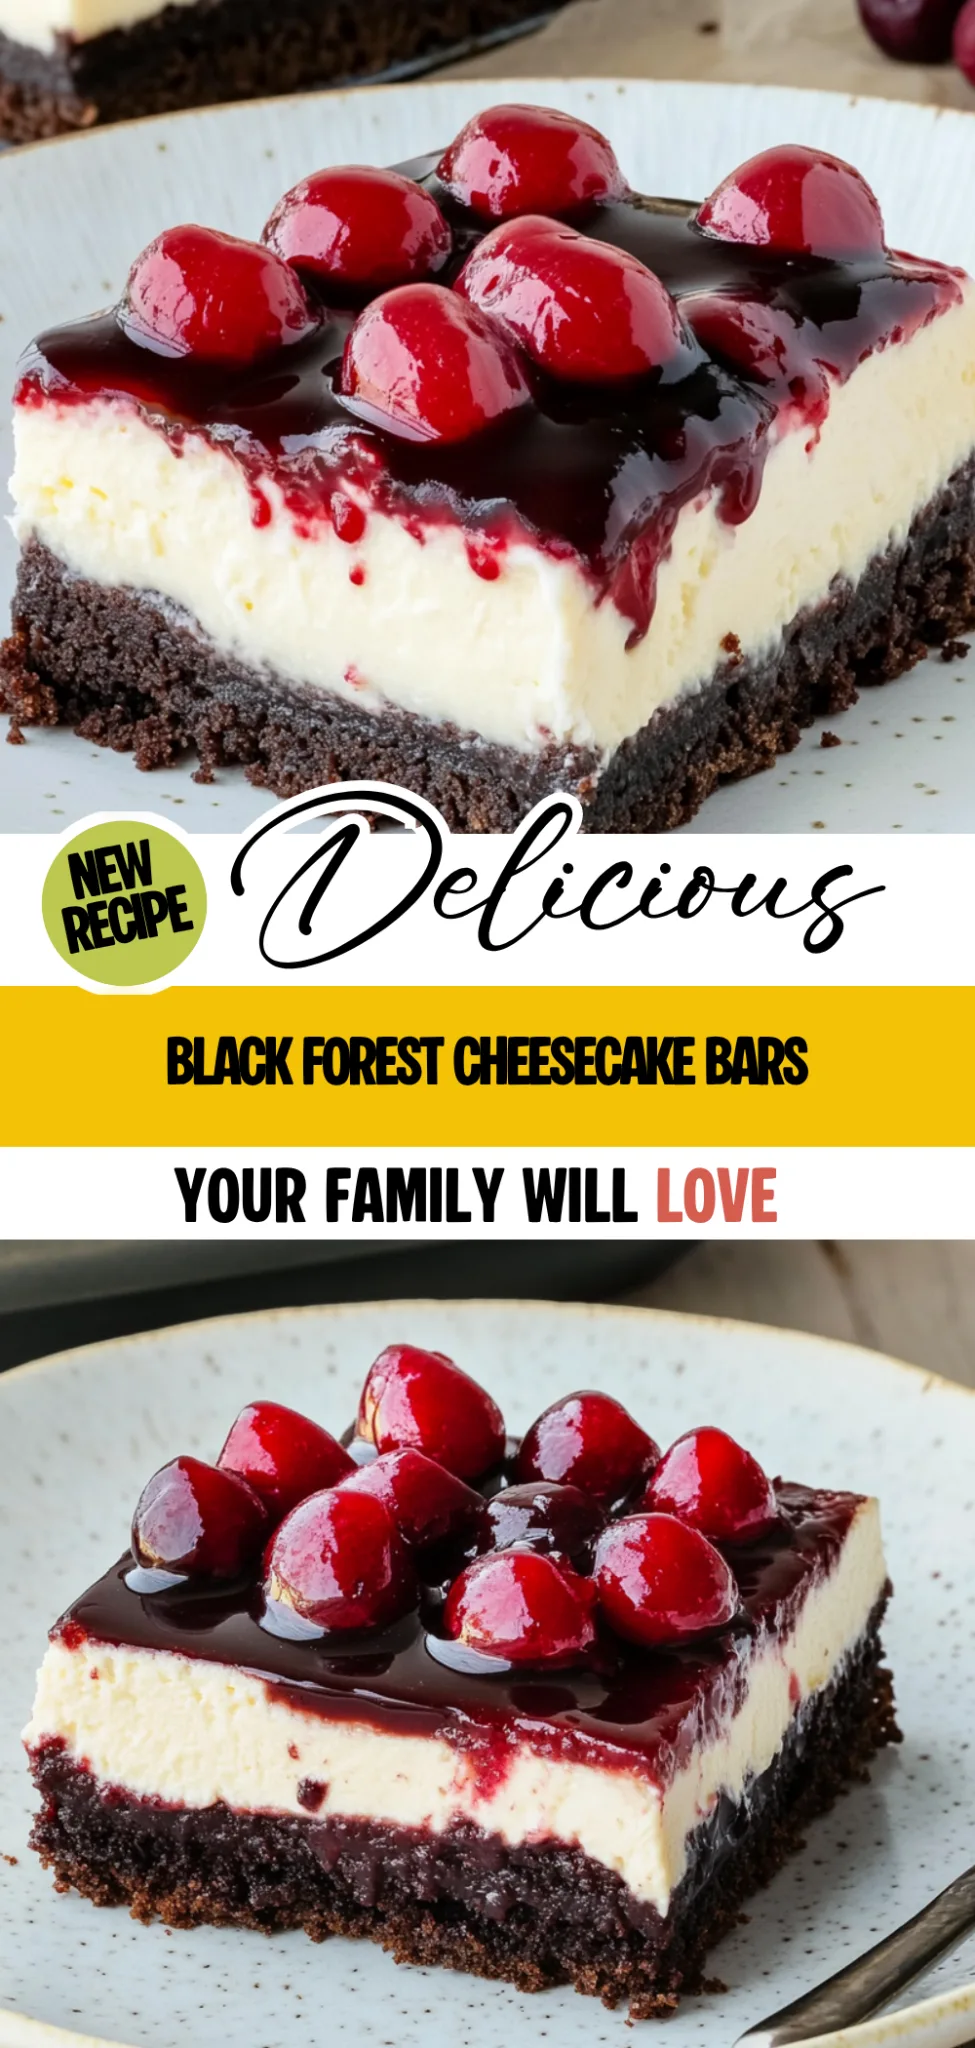
Are you ready to see how straightforward it is to make the Black Forest Cheesecake Bars of your dreams??
1. PREPARE THE CRUST
Let’s kick things off with a rich and chocolaty crust that sets the stage for this indulgent treat!
1. Preheat – Preheat the oven to 350°F (175°C). This step is crucial as it ensures your crust bakes evenly, achieving that perfect texture.
2. Combine – In a mixing bowl, combine 1 cup of chocolate graham cracker crumbs, 1/4 cup of granulated sugar, and 1/2 cup of melted unsalted butter. Mix until well combined; you want a consistent mixture that holds together when pressed.
3. Press – Press the mixture firmly into the bottom of a 9×13 inch baking pan lined with parchment paper. Make sure it’s compacted well so it forms a sturdy base!
4. Bake – Bake for 10 minutes until fragrant and slightly set, then remove from the oven and let cool completely before adding the cheesecake filling.
HANDY TIPS
- For an extra crunchy crust, consider adding a tablespoon of cocoa powder to your graham cracker crumbs!
- If you prefer a thicker crust, simply increase the quantity of chocolate graham cracker crumbs by 1/4 cup.
2. MAKE THE CHEESECAKE FILLING
Now we move on to creating that creamy cheesecake layer that makes these bars so irresistible!
5. Beat – In a large bowl, beat 16 oz of softened cream cheese using an electric mixer until smooth. This helps eliminate lumps for a silky texture in your filling!
6. Add – Add in 1/2 cup of sour cream, 1/2 cup of granulated sugar, and 1 teaspoon of vanilla extract. Mix until well combined; you’ll know it’s ready when everything is fully incorporated and creamy!
7. Incorporate Eggs – Add in the eggs one at a time, mixing on low speed until just combined after each addition—be careful not to overmix as this can create cracks!
8. Pour – Pour the cheesecake filling over the cooled crust and spread it evenly across the surface with a spatula for uniform baking.
9. Bake – Bake for 30-35 minutes or until the center is set but still slightly jiggles when you gently shake the pan—this means it’s perfectly done! Remove from oven and let cool completely.
HANDY TIPS
- If you like a tangier cheesecake, try increasing the sour cream by an extra tablespoon!
- Avoid overbaking; keep an eye on your cheesecake during those last few minutes as ovens can vary!
3. ADD THE CHERRY TOPPING
Finally, let’s add that vibrant cherry topping that brings all the flavors together beautifully!
10. Spread – Once your cheesecake has cooled completely to room temperature, spread 1 cup of cherry pie filling evenly over the top; this adds both sweetness and tartness to balance out the richness of the cheesecake.
11. Refrigerate – Refrigerate for at least 2 hours before cutting into bars to allow everything to set properly—this step is vital!
12. Garnish – Just before serving, garnish with chocolate shavings for an elegant touch that elevates your dessert!
HANDY TIPS
- For added visual appeal, use fresh cherries instead of pie filling as a topping if they’re in season!
- You can also make these bars up to three days in advance—perfect for planning ahead!
Make these once, and I wager they will invade your dreams every night too! – Nagi x
FAQ – Black Forest Cheesecake Bars
How long will these cheesecake bars keep?
These Black Forest Cheesecake Bars can be stored in the refrigerator for up to 5 days. After day 1, I’d say the quality is about 95% as good, but by day 3 you might notice a slight decline in texture, dropping to around 90%. By day 5, they’re still edible but at about 85% quality—still delicious, but the creamy filling may lose some of its initial fluffiness. Just make sure they are covered tightly to prevent them from absorbing any fridge odors!
❄️ Do I really have to chill them before cutting?
Yes, you absolutely must chill these bars for at least 2 hours before cutting into them! Chilling allows the cheesecake filling to set properly, which makes slicing much easier and gives you those clean edges we all love. If you skip this step, you’ll end up with a gooey mess that won’t hold its shape—trust me, I’ve been there more times than I’d like to admit!
🥶 Can I freeze Black Forest Cheesecake Bars?
Absolutely! These cheesecake bars freeze beautifully. To freeze, cut them into individual bars and wrap each piece tightly in plastic wrap, followed by aluminum foil. They can be frozen for up to 3 months. When you’re ready to enjoy them again, simply transfer them to the fridge to thaw overnight. Just be aware that while they’ll still taste great after freezing, the texture might change slightly—so if you’re big on texture (like I am!), enjoy them fresh if possible.
🌾 Can these be made gluten-free?
Yes! You can easily make these cheesecake bars gluten-free by using gluten-free chocolate graham cracker crumbs for the crust. Many brands offer delicious alternatives that work just as well as traditional crumbs. Additionally, double-check your cherry pie filling for any gluten-containing ingredients or additives if you’re avoiding gluten entirely.
Can I reduce the sugar or substitute with sweeteners?
Nope, unfortunately, you cannot reduce the sugar in this recipe or substitute it with sweeteners without affecting the overall structure and taste of the cheesecake bars. I tested various sweetener options but found they either left an unpleasant aftertaste or altered the texture significantly—especially since sugar plays a vital role in helping the cheesecake set properly. So keep it classic here; your taste buds will thank you!
Why do I need to beat the cream cheese until smooth?
Beating the cream cheese until it’s completely smooth is crucial because any lumps remain will lead to a lumpy cheesecake filling—definitely not what we want! If your cream cheese isn’t softened properly before mixing (I usually let it sit out for at least an hour), it won’t blend smoothly even if you beat it like crazy! So give it some time; your future self will appreciate that creamy texture when you bite into these bars.
💡 Can I add other toppings or flavors?
Absolutely! While cherry topping is classic for Black Forest desserts, feel free to get creative! You could use raspberry or blueberry pie filling for a different fruit flavor profile. For added richness, consider drizzling some chocolate ganache over the top instead of the cherry pie filling—or even adding crushed nuts for a little crunch. The options are endless—just remember: sometimes less is more when it comes to flavors harmonizing together!
Troubleshooting
I will continue to add more to this Troubleshooting section as I start seeing questions coming through from people who have made the recipe.
Troubleshooting tips
“My cheesecake bars came out too thin! 😩”
- You may not have pressed the crust mixture firmly enough into the pan, which can lead to a thinner base. Ensure you pack it down well before baking!
- If your crust didn’t rise at all during baking, it’s likely because you didn’t use enough melted butter, which binds the crumbs together. Make sure to use the full 1/2 cup of melted butter next time!
- I bet they were still YUM though!
“The filling was too soft and didn’t set properly!”
- If you overmixed your cheesecake filling, it can incorporate too much air, preventing it from setting firm enough. Mix on low speed and just until combined!
- Not baking long enough can also cause a soft center. Make sure to bake until the center is slightly jiggly but mostly set after 30-35 minutes in the oven.
- I bet they were still YUM though!
“My bars cracked on top and looked wonky! 😭”
- Cracks often happen if the cheesecake filling is overbaked or baked at too high a temperature. Keep an eye on them and make sure your oven is calibrated correctly!
- Rapid cooling can also cause cracks; let your cheesecake cool gradually in the oven with the door slightly ajar for a while before transferring it outside.
- I bet they were still YUM though!
“The crust was too dry and crumbly!”
- This could be due to adding too many chocolate graham cracker crumbs or not enough melted butter. Stick to the 1 cup of crumbs and use all 1/2 cup of butter for a moist, cohesive crust.
- If you baked it for longer than 10 minutes, that could dry it out as well; keep an eye on it as it bakes!
- I bet they were still YUM though!
Black Forest Cheesecake Bars
Ingredients
Method
- Preheat the oven to 350°F (175°C). In a mixing bowl, combine chocolate graham cracker crumbs, sugar, and melted butter. Mix until well combined.
- Press the mixture firmly into the bottom of a 9x13 inch baking pan lined with parchment paper. Bake for 10 minutes, then remove from oven and let cool.
- In a large bowl, beat the softened cream cheese until smooth using an electric mixer.
- Add sour cream, sugar, and vanilla extract. Mix until well combined.
- Add eggs one at a time, mixing on low speed until just combined. Do not overmix.
- Pour the cheesecake filling over the cooled crust and spread evenly.
- Bake for 30-35 minutes, or until the center is set and slightly jiggles. Remove from oven and let cool completely.
- Once the cheesecake is cooled, spread the cherry pie filling evenly over the top.
- Refrigerate for at least 2 hours before cutting into bars.
- Garnish with chocolate shavings before serving.