I first stumbled upon the concept of a Bacon, Pear and Fig Grilled Cheese at a cozy little café that had a knack for turning classic comfort food into something extraordinary. The combination of crispy bacon, sweet pears, and rich fig jam was like an explosion of flavor in my mouth—so delicious I found myself daydreaming about it long after I left. Inspired by this delightful creation, I decided to tackle making it at home, hoping to save a few bucks and maybe even elevate the original with my own twist. After all, who doesn’t want to indulge in gourmet flavors without breaking the bank?
Let me tell you, perfecting this grilled cheese wasn’t as easy as I thought it would be. I went through what felt like a mountain of bread and cheese—four attempts to be exact—each one more comically disastrous than the last. I tried different cheeses (who knew that not all cheeses melt beautifully?), adjusted the ratios of bacon to pear, and experimented with various bread types until I finally nailed down the magic formula. Each iteration was a lesson learned, sometimes from my mistakes (hello, burnt edges!) but always fueled by my determination to create something truly special.
But oh boy, was it worth every bit of effort! The final result is a sensational Bacon, Pear and Fig Grilled Cheese that’s crispy on the outside and gooey on the inside; it’s a beautiful balance of savory and sweet that’ll have you coming back for seconds. The crunchy bacon adds a satisfying texture while the fresh pear brings a burst of juiciness against that luscious fig jam—seriously, it’s like a party in your mouth! I’m so excited for you to try this; it’s comfort food at its finest and honestly, you won’t regret diving into this indulgent masterpiece!
These Bacon, Pear and Fig Grilled Cheese are…
….the ultimate indulgence for your taste buds!
1. They deliver a sweet and savory explosion that will have you craving more with every bite. The combination of crispy bacon, juicy pear, and rich fig jam creates a flavor profile that’s both comforting and exciting, elevating the classic grilled cheese to new heights.
2. Expect a perfectly crispy texture on the outside while maintaining a soft, gooey center. The sourdough bread is my go-to choice here; its sturdy crust holds everything together beautifully, ensuring that each sandwich is easy to handle without sacrificing the delightful meltiness of the sharp cheddar cheese inside.
3. A key technique I use is spreading softened unsalted butter generously on the outside of each slice of bread before grilling. This not only guarantees an even golden-brown crust but also adds an extra layer of flavor that enhances the overall taste experience, making it impossible to resist.
4. This recipe offers incredible value because it’s simple to make at home using affordable ingredients without compromising on quality. With just a handful of pantry staples, you can whip up these Bacon, Pear and Fig Grilled Cheese sandwiches in no time—far cheaper than indulging at a trendy café!
PS These sandwiches are best enjoyed fresh off the grill while the cheese is still oozy and warm!
Ingredients for the Bacon, Pear and Fig Grilled Cheese
Each ingredient in this dish plays an essential role in flavor and texture. Here’s what you’ll need:
8 slices sourdough bread: Provides a hearty base with a delightful chew.
8 slices sharp cheddar cheese: Offers rich, tangy flavor that complements the sweetness.
4 slices bacon: Adds a savory crunch that enhances the overall taste.
1 medium pear: Brings natural sweetness and a juicy texture to the sandwich.
4 tablespoons fig jam: Introduces a luscious sweetness that ties all the flavors together.
4 tablespoons unsalted butter: Ensures a golden, crispy exterior with rich flavor.
You must cook the bacon until it’s crispy. No shortcuts!
I’ll be the first to admit that I tried to skip this step. A little less time on the stove, a little more bacon for my sandwiches, right? But after multiple attempts (and some rather sad, floppy bacon), I finally accepted that crispy bacon is non-negotiable for this Bacon, Pear and Fig Grilled Cheese. Trust me on this one—I’ve learned my lesson!
Cooking the bacon until it’s crispy isn’t just about texture; it also plays a vital role in balancing the sweet and savory elements of this sandwich. Think of it like laying the foundation for a sturdy house—without that crunch, you risk ending up with a soggy situation that just can’t support all those delicious fillings. The crispiness adds depth and contrast against the creamy cheddar cheese and juicy pear, making every bite a delightful experience.
What does cooking bacon until crispy do?
- Flavor — Crispy bacon releases more savory notes and enhances the overall flavor profile of the sandwich, melding beautifully with the fig jam.
- Texture — The crunch adds a satisfying bite that contrasts with the creaminess of melted cheddar and softness of fresh pear.
- Color — Golden-brown bacon not only looks appealing but also caramelizes slightly, imparting a rich color that makes your grilled cheese more appetizing.
- Moisture Control — Crisping out excess fat prevents sogginess from seeping into your bread, ensuring each bite stays intact and enjoyable.
- Layering Balance — The crispy texture balances the sweetness of fig jam and juiciness of pear, creating an ideal harmony between sweet and savory.
Different cooking times for crispy bacon
- 5 minutes (good) — Some crispness achieved, but still chewy; not quite there for our grilled cheese dreams.
- 7 minutes (better) — More golden brown with decent crunch; starts to elevate your sandwich game!
- 9 minutes (great) — Perfectly crisped edges while still retaining some chew; this is where magic begins!
- Beyond 10 minutes (risky) — Potential for overcooked bacon. You lose that tender chewiness which is essential for our gourmet sandwich.
A word of caution: don’t rush this step! The most common mistake is pulling the bacon off too soon. If you think it might be done but it’s still bendable or soft at all, give it another minute or two. Floppy bacon has no place in this glorious grilled cheese!
How to make Bacon, Pear and Fig Grilled Cheese

Are you ready to see how straightforward it is to make the Bacon, Pear and Fig Grilled Cheese of your dreams??
1. PREPARE THE INGREDIENTS
Let’s get everything ready so we can dive into this deliciousness!
1. Cook – In a skillet over medium heat, cook the bacon until crispy, which should take about 6-8 minutes. Once it’s perfectly golden and fragrant, remove it from the skillet and drain on paper towels to absorb any excess grease.
2. Slice – While the bacon cools, grab your pear and slice it into thin wedges. Set these aside for assembling your sandwich.
HANDY TIPS
- Use thick-cut bacon for extra flavor and crunch!
- Choose a ripe pear for a naturally sweet addition that balances perfectly with the savory bacon.
2. ASSEMBLE THE SANDWICHES
Now comes the fun part—layering all those incredible flavors!
3. Spread – Take one slice of your sourdough bread and spread fig jam generously on one side. Repeat this for all eight slices.
4. Layer – On four of the slices (jam side up), layer crispy bacon, followed by sliced pear, and then top with sharp cheddar cheese. Finally, place the remaining four slices of bread on top (jam side down) to complete your sandwiches.
HANDY TIPS
- For an extra kick, try adding a sprinkle of black pepper or fresh herbs between layers!
- Make sure to use enough fig jam; it’s what brings that delightful sweetness to each bite!
3. GRILL THE SANDWICHES
Time to grill these beauties until they’re golden brown and melty!
5. Heat – In the same skillet over medium heat, add 1 tablespoon of softened unsalted butter. Allow it to melt completely.
6. Grill – Place one sandwich in the skillet once the butter is bubbling gently. Grill for about 3-4 minutes per side until golden brown and the cheese starts melting. Repeat this process with the remaining sandwiches, adding more butter as needed for even browning.
HANDY TIPS
- Keep an eye on the heat—too high and you’ll burn the bread before the cheese melts!
- If you like your sandwiches extra crispy, press down gently with a spatula while grilling.
4. SERVE
The moment you’ve been waiting for has arrived!
7. Slice – Remove each sandwich from the skillet carefully, slice them in half diagonally for that perfect presentation, and serve warm while that cheese is still gooey!
Make these once, and I wager they will invade your dreams every night too! – Nagi x
FAQ – Bacon, Pear and Fig Grilled Cheese
🥪 How long will these sandwiches keep?
If stored properly, your Bacon, Pear and Fig Grilled Cheese sandwiches will last for about 2 days in the refrigerator. They’ll be 90% as good on day 1 and drop to around 80% by day 2. To store, wrap each sandwich tightly in plastic wrap or place them in an airtight container. Just remember, the longer they sit, the softer the bread will become, and you might lose that delightful crunch!
⏳ Can I skip cooking the bacon?
Nope! You cannot skip cooking the bacon — it adds that essential crispy texture and flavor that perfectly complements the sweetness of the pear and fig jam. I’ve tried making this sandwich with raw bacon, and trust me, it just doesn’t work out well. Cooking it until crispy is crucial for both taste and texture.
❄️ Can these be frozen for later?
Yes, you can freeze these sandwiches! To do so, assemble them without grilling. Wrap each sandwich tightly in plastic wrap followed by aluminum foil to prevent freezer burn. They can be frozen for up to 1 month. When you’re ready to enjoy one, let it thaw in the refrigerator overnight before grilling as per the recipe. This way, you’ll retain all those wonderful flavors!
🌾 Can I make this recipe gluten-free?
Absolutely! To make a gluten-free version of this Bacon, Pear and Fig Grilled Cheese, simply swap out the sourdough bread for your favorite gluten-free bread. Just ensure it’s sturdy enough to hold up to grilling and has a good flavor profile; otherwise, it can turn into a soggy mess! I’ve tested this with several brands, and they can yield excellent results.
🧀 Can I use a different cheese instead of sharp cheddar?
Yes! While I personally love sharp cheddar for its bold flavor that pairs beautifully with sweet fig jam and pear, you can use other cheeses like Gruyère or even brie for a creamier option. Just keep in mind that different cheeses will alter the overall taste; I found that brie adds an utterly decadent richness but may require more grilling time to melt completely.
🔍 Why do I need to spread fig jam on one side of each slice?
Spreading fig jam on one side of each slice ensures that every bite has that sweet-savory balance! It also helps prevent the bread from getting soggy during grilling while allowing the flavors to meld beautifully with the melted cheese and crisp bacon. Trust me; don’t skimp on this step — it’s where a lot of the magic happens!
👩🍳 How many times did you test this recipe?
I tested this Bacon, Pear and Fig Grilled Cheese at least 10 times to get it just right! Each iteration was delicious in its own way (yes, even when they were a bit burnt!), but I wanted to perfect that balance between sweet figs, salty bacon, and creamy cheese. I promise you’ll taste all those hours of obsessive tweaking when you take your first bite!
Troubleshooting
I will continue to add more to this Troubleshooting section as I start seeing questions coming through from people who have made the recipe.
Troubleshooting tips
“My grilled cheese came out too flat! 😩”
- You might have used bread that was too thin or soft, which can lead to a flatter sandwich. Sourdough is ideal for this recipe because it has enough structure to hold all the delicious fillings.
- If you pressed down too hard while grilling, that can also flatten your sandwich. Gently pressing is best to keep that perfect height!
- I bet it was still YUM though!
“My cheese didn’t melt properly! 😱”
- If your skillet was too hot or you didn’t cover the pan, the bread might brown too quickly while the cheese remains unmelted. Keep it at medium heat and consider using a lid for even melting.
- Using cheese that’s not sharp cheddar can also affect melting; choose a high-quality cheddar for the best results.
- I bet it was still YUM though!
“Why is my bacon soggy? 😢”
- If you didn’t cook your bacon until crispy, it can make the sandwich soggy instead of adding that crunchy texture we love. Make sure to cook it well before assembling!
- Also, if you layered the bacon on warm bread without letting it drain on paper towels first, excess grease could seep into the bread.
- I bet it was still YUM though!
“My sandwich is unevenly browned! 🔥”
- You may not be flipping the sandwiches at the right time; if you move them around too much in the pan, they won’t get that nice golden color. Stick to 3-4 minutes per side for even browning.
- If you’re grilling multiple sandwiches at once, make sure they’re spread out enough in the pan so they cook evenly rather than crowding them together.
- I bet it was still YUM though!
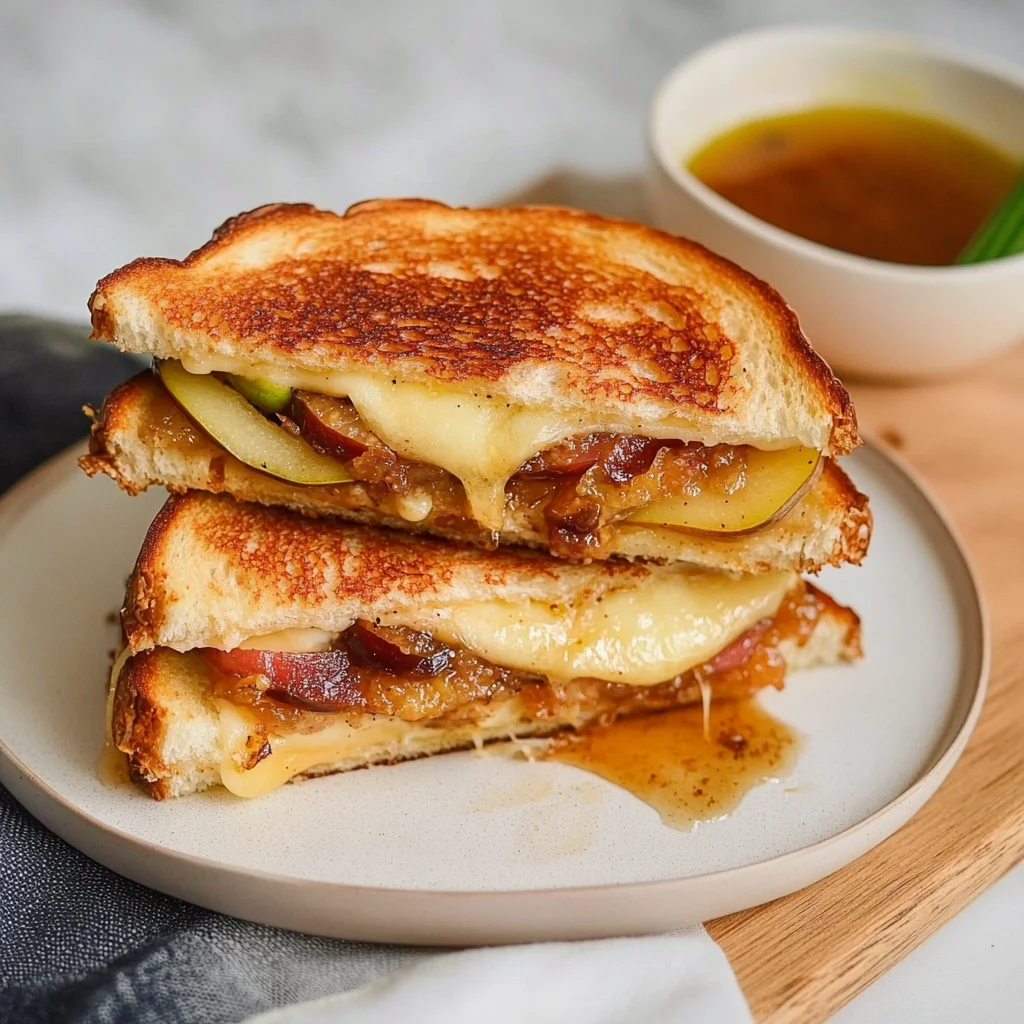
Bacon, Pear and Fig Grilled Cheese
Ingredients
Method
- Cook the bacon in a skillet over medium heat until crispy. Remove and drain on paper towels.
- Slice the pear and set aside.
- Spread fig jam on one side of each slice of bread.
- Layer the bacon, sliced pear, and cheddar cheese on four of the slices, then top with the remaining slices of bread, jam side down.
- Heat a skillet over medium heat and add 1 tablespoon of butter.
- Once melted, place one sandwich in the skillet and grill until golden brown, about 3-4 minutes per side. Repeat with remaining sandwiches, adding more butter as needed.
- Remove from skillet, slice in half, and serve warm.