I’ve always been a sucker for snickerdoodle cookies—they remind me of home and childhood baking adventures. It was during one of my frequent visits to a quaint little bakery that I stumbled upon their seasonal offering: Apple Cider Snickerdoodle Cookies. The moment I took a bite, I was hooked; the warm spices mingling with that unmistakable apple cider flavor felt like a cozy hug on a chilly autumn day. I knew I had to recreate that magic at home, not just because it was delicious, but also because let’s face it—baking fresh cookies is way more satisfying (and cost-effective) than buying them!
Let me tell you, perfecting this recipe wasn’t a walk in the park. I went through no less than five batches before I finally nailed it! Each time, I tweaked the spice levels or played around with the apple cider until I got the balance just right. There were moments when my kitchen looked like a scene from a cookie disaster movie—flour everywhere, and let’s not even talk about the dough that refused to cooperate. But every batch brought me closer to that perfect cookie, so I kept at it, fueled by sheer determination (and an alarming amount of snickerdoodles).
And oh boy, was it worth the effort! The final result? Deliciously spiced snickerdoodle cookies infused with apple cider flavor, perfectly chewy on the inside with slightly crisp edges and an aroma that’ll make your taste buds dance. They’re not just cookies; they’re little bites of fall bliss that can stay fresh for days (if you can resist eating them all at once). So grab your apron and let’s make some Apple Cider Snickerdoodle Cookies together—I promise you won’t regret it!
These Apple Cider Snickerdoodle Cookies are….
…a delightful fusion of cozy fall flavors that will elevate your cookie game to new heights!
1. They deliver a wonderfully warm flavor with a perfect balance of sweet and spiced notes, thanks to the addition of fresh apple cider. This ingredient not only enhances the overall taste but also infuses each bite with the essence of autumn, making them a seasonal favorite.
2. Irresistible texture – these cookies have a delightful softness with a slight crispness on the edges. The combination of granulated and brown sugars creates a chewy center, while the baking process allows for that perfect contrast between crunchy outside and tender inside.
3. Elevated technique – I incorporate cream of tartar in this dough to achieve that signature snickerdoodle tanginess. This key ingredient not only contributes to the unique flavor profile but also helps create that characteristic soft and chewy texture that sets these cookies apart from ordinary versions.
4. Exceptional value – making these cookies at home is not just about saving money; it’s about enjoying an abundance of warm, fresh-baked goodness whenever you crave it! With simple ingredients like flour, sugar, and apple cider, you can whip up a batch without breaking the bank or sacrificing quality.
PS These cookies yield about 24 deliciously spiced treats, making them perfect for sharing—or indulging all by yourself!
Ingredients for the Apple Cider Snickerdoodle Cookies
Each ingredient in this dish plays an essential role in flavor and texture. Here’s what you’ll need:
1 cup unsalted butter (softened): Provides rich flavor and a tender, melt-in-your-mouth texture.
1 cup granulated sugar: Contributes sweetness and helps create a light, airy cookie.
1 cup brown sugar (packed): Adds depth of flavor with its molasses notes and moisture.
2 large eggs: Acts as a binder while enriching the cookies’ texture.
1/4 cup apple cider (fresh): Infuses a delightful apple flavor that captures the essence of fall.
3 cups all-purpose flour: Forms the structure of the cookies, ensuring they hold their shape.
2 teaspoons cream of tartar: Creates a soft and chewy texture while enhancing the cookie’s rise.
1 teaspoon baking soda: Provides leavening for a light and fluffy cookie.
1 teaspoon cinnamon: Imparts warm, comforting spice that complements the apple cider beautifully.
1/2 teaspoon salt: Balances the sweetness and enhances overall flavors.
Cinnamon Sugar Coating
1/4 cup granulated sugar: Adds a sweet crunch to the exterior of each cookie.
1 tablespoon cinnamon: Elevates the spiced aroma and taste, perfect for autumn indulgence.
You Must Cream the Butter and Sugars Properly. No Shortcuts!
I have to confess, I tried to rush this step. I thought, “Surely, there’s a way to shortcut the creaming process!” But after multiple batches and some very flat cookies later, I learned my lesson the hard way. Trust me, this step is non-negotiable if you want those perfectly puffed-up Apple Cider Snickerdoodle Cookies.
When you cream the softened butter with the sugars until light and fluffy, you’re incorporating air into the mixture. This is crucial because that trapped air expands during baking, giving your cookies their delightful height and chewy texture. It’s a bit like blowing up a balloon—skip this step, and you’ll end up with sad little cookie pancakes instead of the soft, pillowy treats you envisioned.
What does proper creaming do?
- Height — The air incorporated during creaming helps your cookies rise beautifully in the oven.
- Texture — A well-creamed mixture creates a lighter, chewier cookie that has a satisfying bite.
- Flavor — Properly creamed butter and sugars meld together to enhance your cookie’s overall taste, making them rich and indulgent.
- Even Mixing — Ensures all ingredients blend evenly throughout the dough, preventing any pockets of flour or sugar.
- Golden Color — A well-creamed dough contributes to a more appealing golden-brown color when baked.
Different creaming times
- 1 minute (average) — Cookies will bake but may be denser than desired; minimal air incorporation.
- 2 minutes (good) — Better rise; still not optimal for that dreamy texture we’re after.
- 3 minutes (very good) — Ideal for achieving a light and fluffy dough; cookies will rise nicely.
- ⭐️4 minutes⭐️ — Best results! Maximum air incorporation leads to perfect texture and height.
Beware of the temptation to skip or rush through the creaming process! If you don’t cream long enough, you’ll end up with cookies that are flatter and denser than you’d like. No one wants an Apple Cider Snickerdoodle Cookie that resembles a pancake! So take your time—those extra moments will pay off in deliciousness.
How to make Apple Cider Snickerdoodle Cookies

Are you ready to see how straightforward it is to make the Apple Cider Snickerdoodle Cookies of your dreams??
1. PREPARE THE DOUGH
Let’s get that delicious dough ready for baking!
1. Preheat – Preheat your oven to 350°F (175°C). This step is crucial for achieving perfectly baked cookies, so don’t skip it!
2. Cream – In a mixing bowl, cream together the softened butter, granulated sugar, and brown sugar until the mixture is light and fluffy. This process incorporates air into the dough, which helps your cookies rise beautifully.
3. Add Eggs – Add the eggs one at a time, mixing well after each addition. Then, stir in the apple cider. The cider adds a lovely fall flavor and moisture to your cookies!
4. Whisk Dry Ingredients – In another bowl, whisk together the flour, cream of tartar, baking soda, cinnamon, and salt. This ensures that your leavening agents are evenly distributed throughout the dough.
5. Combine – Gradually add the dry ingredients to the wet ingredients, mixing until just combined. Be careful not to overmix; you want a soft dough that’s slightly sticky.
HANDY TIPS
- Use room temperature butter for easier creaming with sugars.
- If you want an extra apple flavor, consider adding more cider (up to 1/3 cup) but adjust the flour slightly to maintain texture.
- For a more pronounced cinnamon flavor in your cookies, increase the amount of cinnamon in your dry mix.
2. SHAPE AND BAKE
Now it’s time to shape those sweet little treats!
6. Mix Coating – In a small bowl, combine the granulated sugar and cinnamon for the coating. This delicious mixture will give your cookies that classic snickerdoodle finish!
7. Scoop Dough – Using a cookie scoop, form balls of dough and roll them in the cinnamon sugar mixture until fully coated. This step is essential for that charming crust we all love.
8. Place on Sheet – Place the coated dough balls on a baking sheet lined with parchment paper, spacing them about 2 inches apart to allow for spreading during baking.
9. Bake – Bake in the preheated oven for 8-10 minutes or until the edges are lightly golden and centers look set but still soft—this ensures chewy centers!
10. Cool – Remove from the oven and let cool on the baking sheet for a few minutes before transferring them to a wire rack to cool completely.
HANDY TIPS
- Want smaller cookies? Roll smaller balls instead; just adjust baking time down by 1–2 minutes.
- If using chilled dough from refrigeration, let it sit at room temperature for about 10 minutes before scooping; this helps with shaping.
- For thicker cookies, refrigerate your rolled dough balls for about 30 minutes before baking—they’ll hold their shape better!
Make these once, and I wager they will invade your dreams every night too! – Nagi x
FAQ – Apple Cider Snickerdoodle Cookies
How long will these cookies keep?
These Apple Cider Snickerdoodle Cookies can be stored at room temperature in an airtight container for about 5 days. After day 1, they’ll start to lose their freshness, but I’d say they’re still around 90% as good on day 3, and about 75% by day 5. If you want them to last longer, consider freezing them!
❄️ Can I freeze these cookies?
Absolutely! To freeze the cookies, allow them to cool completely after baking. Then, place them in a single layer on a baking sheet and freeze until firm. Once frozen, transfer them to a zip-top freezer bag or airtight container. They can be frozen for up to 3 months. When you’re ready to enjoy them, just thaw at room temperature for about an hour or pop them into a warm oven (around 300°F or 150°C) for a few minutes to refresh.
🌾 Can these be made gluten free?
Yes, you can make these snickerdoodles gluten-free! I recommend using a high-quality gluten-free all-purpose flour blend that includes xanthan gum. Important: Make sure the blend is designed for baking as it will provide the right texture. I tested this recipe with Bob’s Red Mill Gluten Free 1-to-1 Baking Flour, and it worked wonderfully!
Can I reduce the sugar or substitute with sweeteners?
No, unfortunately, you cannot reduce the sugar without affecting the texture and taste of these cookies. The sugar not only sweetens but also helps create that perfect chewy texture. I tried several variations with less sugar and they just didn’t come out right — they were either too dry or crumbled apart. If you’re looking for sweetness alternatives, I’d suggest using a granulated erythritol or monk fruit sweetener designed for baking, but keep in mind that this might slightly change the flavor.
🥚 Why do I need cream of tartar in this recipe?
Cream of tartar plays a crucial role in this recipe by providing stability to the egg proteins and helping create the soft texture we love in snickerdoodles. It also adds a slight tanginess that balances out the sweetness beautifully. If you find yourself without cream of tartar, you could substitute it with an equal amount of lemon juice or white vinegar; however, I highly recommend sticking with cream of tartar if you can!
💡 What if my dough is too sticky?
If your dough feels too sticky after mixing in the dry ingredients, don’t panic! This can happen depending on humidity levels and how precisely you measured your flour. You can add more flour gradually—about one tablespoon at a time—until it reaches a workable consistency. Just remember: err on the side of caution because too much flour can lead to tough cookies!
How many times did you test this recipe?
I tested this Apple Cider Snickerdoodle Cookie recipe ten times (yes, I’m slightly mad 😅). Each batch had little tweaks until I found the perfect balance between flavor and texture. Trust me when I say that every bite is worth it!
Troubleshooting
I will continue to add more to this Troubleshooting section as I start seeing questions coming through from people who have made the recipe.
Troubleshooting tips
“My cookies came out flat! 😱”
- Your dough may have been too warm when baking, which can cause the cookies to spread excessively. Make sure to chill the dough in the refrigerator for at least 30 minutes before baking.
- If you didn’t measure your flour correctly, it could lead to an imbalance in the dough. Too little flour means less structure, so make sure to spoon and level your flour when measuring.
- You might not have creamed your butter and sugars long enough. This step is crucial for incorporating air into the dough, which helps the cookies rise. Don’t rush it!
I bet they were still YUM though!
“My cookies are too dry and crumbly! 😩”
- Overmixing your dough after adding the flour can develop gluten, leading to tougher cookies. Mix until just combined for a tender texture.
- If you accidentally added too much flour, it can result in dry cookies. Be sure to measure accurately next time!
- Using cold butter instead of softened butter can also affect moisture levels, so ensure your butter is at room temperature before you start creaming.
I bet they were still YUM though!
“The tops of my cookies cracked and split! 😬”
- If your dough was over-mixed, it could lead to excess gluten formation, causing cracks on top. Remember, mix just until combined!
- Baking soda that is too old or expired may not activate properly, leading to crackly surfaces instead of a smooth finish. Always check your leavening agents!
- Not rolling the dough balls tightly enough before coating them in cinnamon sugar can also contribute to a rough surface. Roll them well for a better appearance!
I bet they were still YUM though!
“My cookies are browning unevenly! 😕”
- If your baking sheet is dark or non-stick, it can cause uneven browning. Consider using a light-colored baking sheet for even heat distribution.
- It’s essential to rotate your baking tray halfway through cooking; this helps ensure that all cookies get equal exposure to heat.
- Also, if you placed your cookies too close together on the baking sheet, some may bake faster than others due to lack of airflow. Leave at least 2 inches between each cookie!
I bet they were still YUM though!
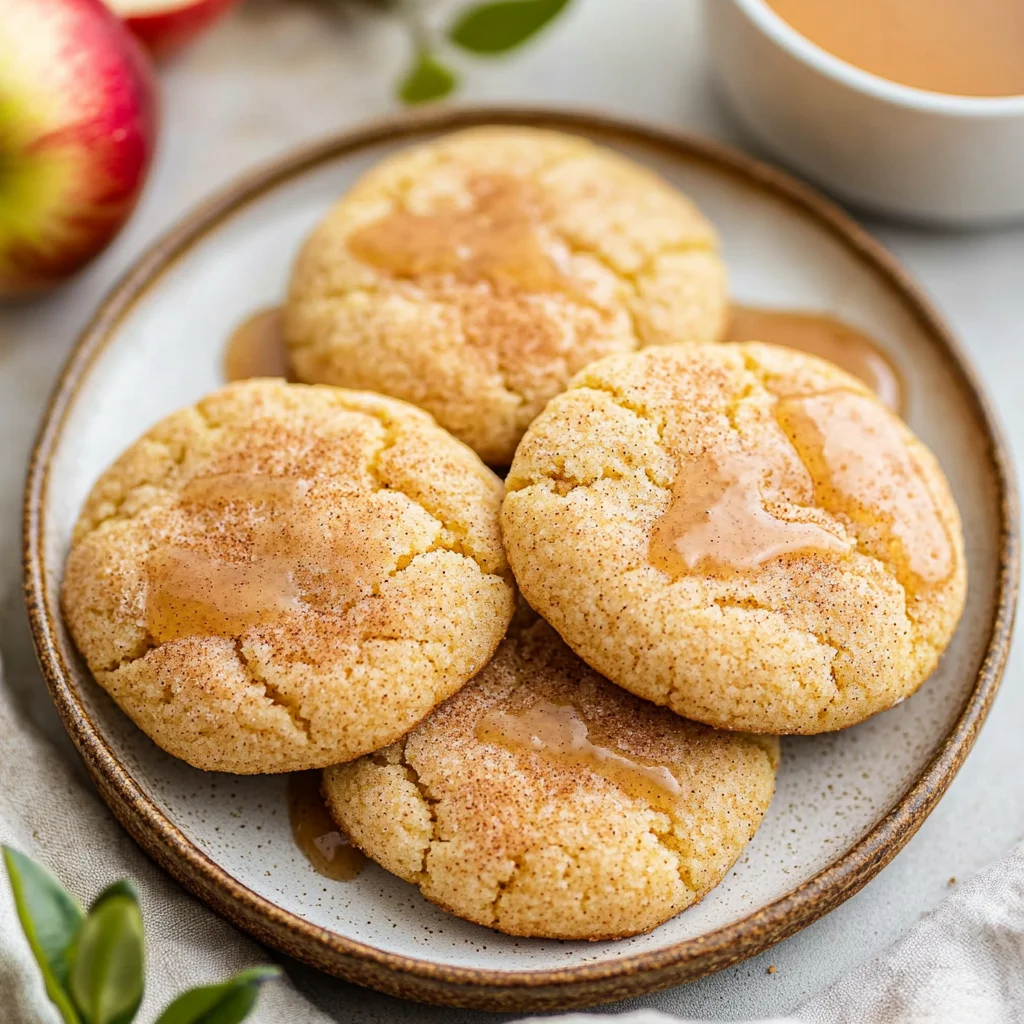
Apple Cider Snickerdoodle Cookies
Ingredients
Method
- Preheat the oven to 350°F (175°C).
- In a mixing bowl, cream together the softened butter, granulated sugar, and brown sugar until light and fluffy.
- Add the eggs one at a time, mixing well after each addition. Stir in the apple cider.
- In another bowl, whisk together the flour, cream of tartar, baking soda, cinnamon, and salt.
- Gradually add the dry ingredients to the wet ingredients, mixing until just combined.
- In a small bowl, combine the granulated sugar and cinnamon for the coating.
- Using a cookie scoop, form balls of dough and roll them in the cinnamon sugar mixture.
- Place the coated dough balls on a baking sheet lined with parchment paper, spacing them about 2 inches apart.
- Bake in the preheated oven for 8-10 minutes, or until the edges are lightly golden.
- Remove from the oven and let cool on the baking sheet for a few minutes before transferring to a wire rack to cool completely.