It all started on a sun-drenched afternoon at my favorite little Mediterranean café, where I stumbled upon their vibrant Light Orzo Olive Salad. I was captivated by the way they effortlessly combined orzo pasta, briny olives, and colorful fresh veggies into a dish that felt like summer on a plate. The flavors danced together so beautifully that I couldn’t shake the craving for it once I got home. My wallet also appreciated the idea of recreating this delightful bowl of sunshine rather than splurging on takeout every week!
After several attempts—okay, more like five or six—I finally cracked the code to my version of this salad. Each iteration had its own little mishap; one time, I overcooked the orzo to the point it resembled mushy cement! But through each disaster and triumph, I was determined to find that perfect balance of flavors and textures—something refreshing yet hearty enough to stand alone as a meal or shine as a side dish at summer barbecues. Let’s just say my kitchen looked like a pasta war zone by the end!
But oh boy, was it worth it! The final result is nothing short of glorious: tender orzo laced with crisp veggies and briny olives, all tossed in a light dressing that makes your taste buds sing. It’s not just refreshing; it’s also incredibly versatile, packing in flavor without feeling heavy. I can’t wait for you to dive into this Light Orzo Olive Salad—trust me, once you taste it, you’ll be as hooked as I am!
These Light Orzo Olive Salad are… the ultimate summertime delight that you’ll want to make again and again!
1. They deliver a burst of Mediterranean flavors that transport you straight to the sunny shores of Greece. The combination of kalamata olives and crumbled feta cheese adds a briny richness that perfectly complements the fresh cherry tomatoes and crunchy cucumber, creating a salad that’s as vibrant in taste as it is in color.
2. Incredible texture – This salad is a delightful mix of soft orzo pasta and crisp vegetables. The tender orzo serves as the perfect base, while the diced cucumber and halved cherry tomatoes provide a refreshing crunch with every bite, keeping the experience exciting and satisfying.
3. A key technique I swear by is allowing the orzo to cool before mixing it with the vegetables. This step helps prevent the veggies from wilting while also allowing them to maintain their bright colors and textures, ensuring every forkful is light and full of freshness.
4. This recipe offers fantastic value—it’s not only budget-friendly but also incredibly easy to whip up at home compared to pricey restaurant salads. With simple ingredients like pasta, olives, and fresh veggies, you can serve a generous portion that feeds multiple people for a fraction of the cost.
PS This Light Orzo Olive Salad yields about 4 servings, making it an ideal choice for a summer picnic or as a refreshing side at your next barbecue!
Ingredients for the Light Orzo Olive Salad
Each ingredient in this dish plays an essential role in flavor and texture. Here’s what you’ll need:
- 1 cup orzo pasta (uncooked): Provides a delightful, chewy base that absorbs all the flavors.
- 1 cup cherry tomatoes (halved): Adds juicy sweetness and vibrant color to the salad.
- 1 cup cucumber (diced): Offers refreshing crunch and a cooling element to balance the dish.
- 1 cup kalamata olives (pitted and sliced): Brings a briny depth that enhances the overall flavor profile.
- 1/2 cup red onion (finely chopped): Contributes a sharp bite that complements the other ingredients beautifully.
- 1/4 cup feta cheese (crumbled): Introduces creamy tanginess that elevates the salad’s taste.
Rinsing the Orzo is a Must – No Skipping This Step!
I’ll be honest—I tried to skip rinsing the orzo after cooking, thinking it wouldn’t make a difference. I figured it was just an extra step that added time and effort. After a few attempts, I learned my lesson: if you want the best version of this Light Orzo Olive Salad, don’t even think about skipping this crucial moment!
Rinsing orzo isn’t just a suggestion; it’s essential to achieving that perfect texture. When you drain and rinse the pasta, you stop the cooking process immediately, preventing it from becoming mushy. Think of it like cooling down a hot pizza stone before adding toppings—it’s all about controlling the temperature and preserving quality! In this salad, perfectly cooked orzo plays nicely with fresh veggies and tangy olives, ensuring each bite is delightful and not a clump of sticky pasta.
What does rinsing the orzo do?
- Texture — Rinsing prevents the orzo from continuing to cook and getting mushy, yielding al dente pasta that holds up beautifully in the salad.
- Separation — The rinse washes away excess starch that can cause the orzo to stick together, ensuring each piece stands alone for a lovely bite.
- Temperature control — Cooling the orzo quickly helps maintain the crispness of fresh vegetables like cucumber and cherry tomatoes, creating a refreshing contrast.
- Flavor enhancement — By keeping the orzo cool, you allow the dressing to adhere better without wilting the salad components too quickly.
- Presentation — Rinsed orzo has a cleaner look on your plate, making for an appealing dish overall with distinct colors from tomatoes, cucumbers, and olives.
Different rinsing times
- Immediate rinse (⭐️best⭐️) — The ideal approach; stops cooking instantly while keeping pasta texture intact.
- 1 minute delay (good) — Slightly overcooked; still manageable but beginning to lose that perfect al dente bite.
- 2-3 minutes delay (fair) — Noticeably mushier texture; not ideal for a refreshing salad.
- Over 5 minutes (not recommended) — Pasta becomes sticky and clumpy; no longer suitable for presentation or enjoyment!
Remember, skipping the rinse might seem like a small mistake, but it’s one of those game-changers in this recipe! Trust me—no one wants a bowl of soggy orzo swimming in olive oil. Make sure you rinse it well so your Light Orzo Olive Salad shines bright at your next gathering!
How to make Light Orzo Olive Salad
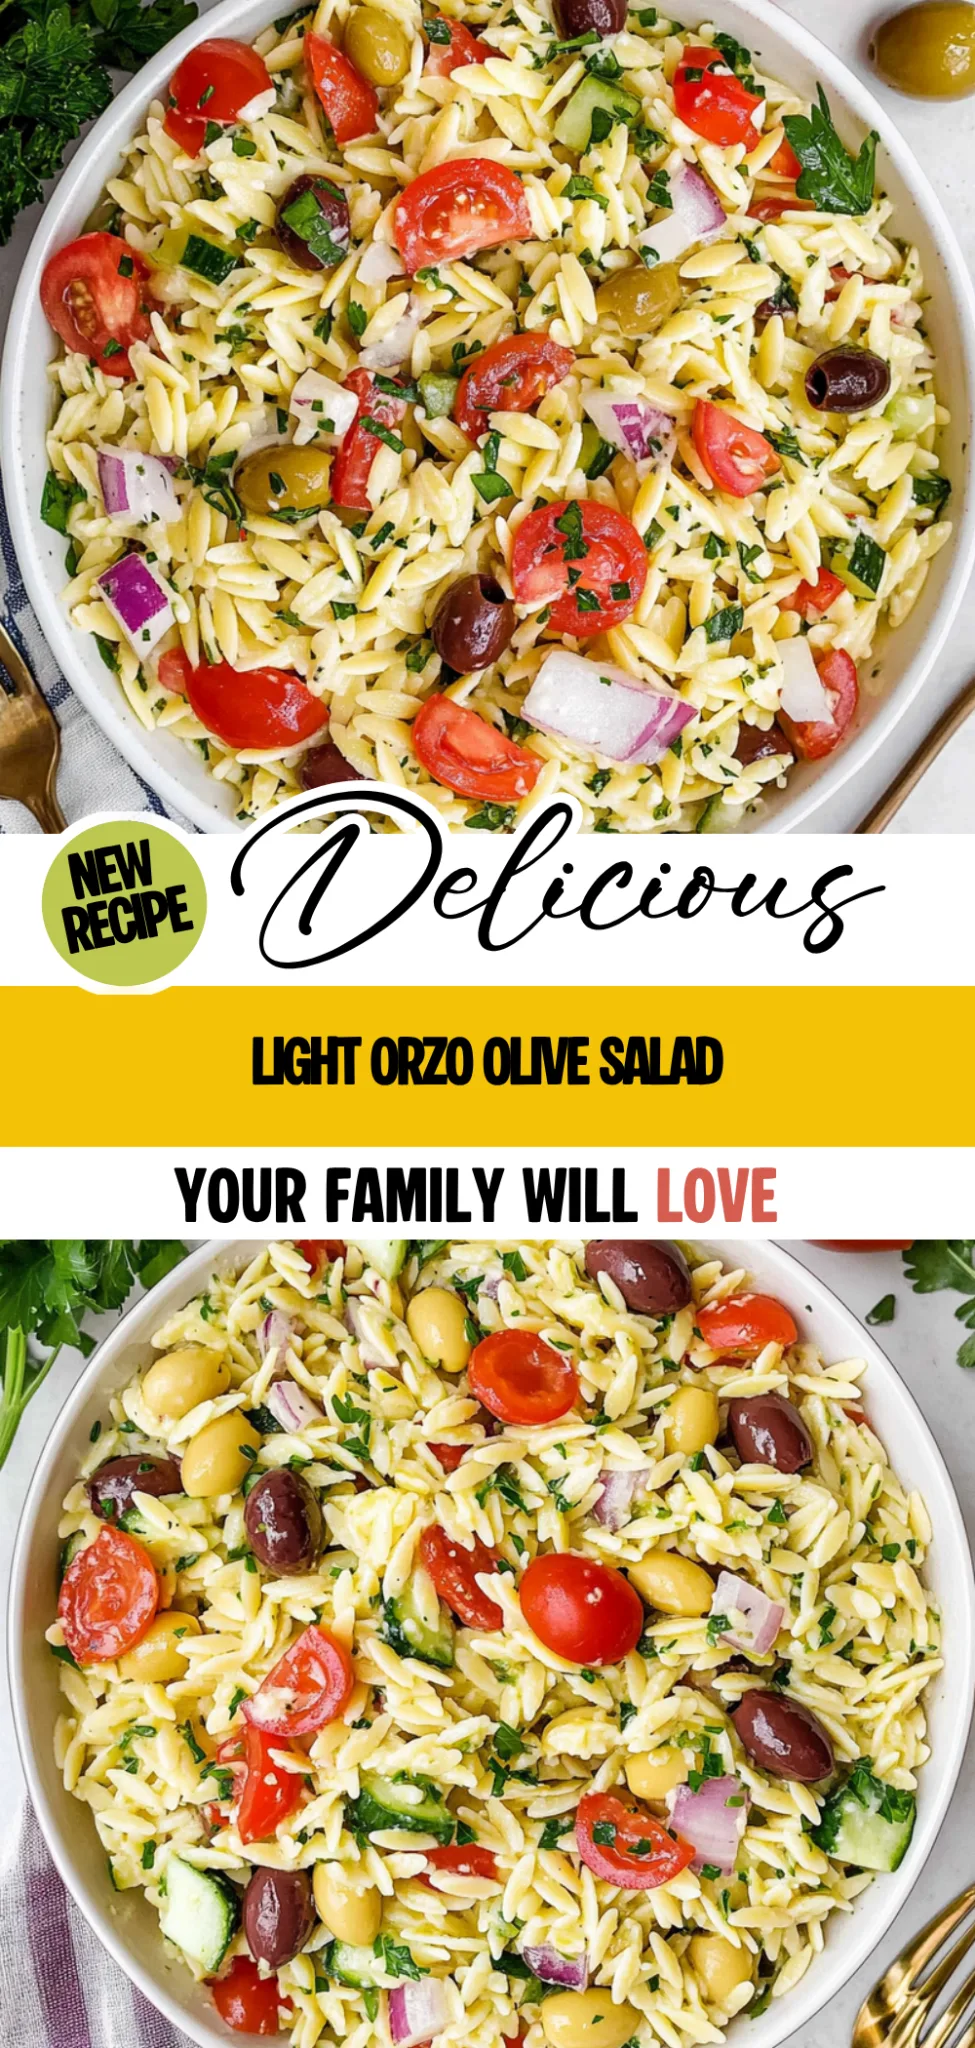
Are you ready to see how straightforward it is to make the Light Orzo Olive Salad of your dreams??
1. COOK THE ORZO
Let’s get that orzo perfectly cooked and ready for a delightful salad!
Boil – Bring a large pot of salted water to a boil. This step is crucial because the salt enhances the flavor of the orzo as it cooks. Add the 1 cup of uncooked orzo pasta and cook according to package instructions until al dente, which typically takes about 8-10 minutes. You want it tender but still with a slight bite!
Drain – Once cooked, drain the orzo in a colander and rinse it under cold water to stop the cooking process. This helps maintain that lovely texture we’re aiming for. Set aside while you prepare the rest.
HANDY TIPS
- Make sure the water is adequately salted; it should taste like the sea!
- If you want a bit more flavor, consider adding a bay leaf or garlic clove to the boiling water.
2. PREPARE THE SALAD
Now, let’s bring all those vibrant ingredients together!
Combine – In a large mixing bowl, combine the cooked orzo, along with 1 cup of halved cherry tomatoes, 1 cup of diced cucumber, 1 cup of pitted and sliced kalamata olives, 1/2 cup of finely chopped red onion, and 1/4 cup of crumbled feta cheese. The combination of colors and textures will make your salad pop!
HANDY TIPS
- For extra crunch, try using English cucumbers as they have fewer seeds and stay crisp longer.
- Feel free to adjust the amount of feta based on your preference; who doesn’t love more cheese?
3. MAKE THE DRESSING
A flavorful dressing ties everything together beautifully!
Whisk – In a small bowl, whisk together 1/4 cup of extra virgin olive oil, 2 tablespoons of red wine vinegar, 1 teaspoon of dijon mustard, 1 minced garlic clove, and season with salt (to taste) and freshly ground black pepper (1/4 teaspoon). Whisk until well combined; you want it slightly thickened and creamy!
HANDY TIPS
- Allow your dressing to sit for a few minutes before adding it to let the flavors meld together. 💡 TIP: You can also make this dressing ahead of time—just store it in an airtight container in the fridge for up to a week!
4. COMBINE AND SERVE
It’s almost time to dig in!
Pour – Pour the dressing over your salad mixture and toss gently to combine all those delicious flavors evenly. Make sure every piece is coated nicely! Garnish with fresh parsley for that final touch and serve immediately for maximum freshness or chill in the refrigerator for about 30 minutes before serving if you prefer it cold.
HANDY TIPS
- For an extra refreshing twist, add some lemon zest or juice just before serving—it brightens everything up! 🍋
What an achievement—this Light Orzo Olive Salad is not only colorful but also bursting with flavor! With just a handful of ingredients, you’ve created a delightful dish perfect for summer gatherings or light meals anytime. Enjoy every bite! – Nagi x
FAQ – Light Orzo Olive Salad
🥗 How long will this salad last in the fridge?
This Light Orzo Olive Salad will keep well in the refrigerator for about 3 days. However, I find that it’s best enjoyed within the first 24-48 hours for optimal freshness and flavor. After day 3, you might notice a decrease in quality — it’s about 80% as good by then, as the vegetables can start to wilt and the feta may become soggy. If you want to keep it fresher longer, consider storing the dressing separately until you’re ready to serve!
❄️ Can I make this salad ahead of time?
Absolutely! You can prepare the salad a day in advance. Just follow all the steps but skip adding the dressing until you’re ready to serve. Store the salad in an airtight container in the fridge; it will be at its peak flavor when dressed right before eating. If you do mix it early, expect it to be about 90% as good by serving time, with some texture loss from the vegetables.
🌾 Is there a way to make this salad gluten-free?
Yes, you can easily make this salad gluten-free by substituting orzo pasta with a gluten-free alternative. There are various options available such as quinoa or gluten-free pasta made from rice or corn. Just be sure to cook them according to their package instructions, and you’ll have a delicious gluten-free version of this salad!
🧀 What can I use instead of feta cheese?
If you’re not a fan of feta or simply don’t have any on hand, there are several great alternatives! You could use crumbled goat cheese for a tangy flavor or even diced mozzarella for a milder taste. For dairy-free options, try using vegan feta made from nuts or tofu. Each substitute will give your salad a unique twist!
🍅 Why do I need to rinse the orzo after cooking?
Rinsing the orzo is crucial because it stops the cooking process immediately and prevents it from becoming mushy. Trust me; I’ve tried skipping this step several times (more than I care to admit!), and each time resulted in overcooked pasta that ruined my otherwise perfect salad. So don’t skip this step—your future self will thank you!
🌱 Can I customize this salad with other ingredients?
Absolutely! This salad is incredibly versatile, and you can add any vegetables you love or have on hand. Consider including bell peppers for sweetness, spinach for extra greens, or even artichokes for a Mediterranean touch. You could also toss in some protein like grilled chicken or chickpeas if you’re looking for something heartier.
❓ How should I store leftover dressing?
If you have any leftover dressing, store it in an airtight container in the fridge, where it will last about a week. Just give it a good shake before using again since ingredients can separate over time—trust me, nobody wants chunky dressing! And yes, I’ve learned that lesson firsthand! 😅
Troubleshooting
I will continue to add more to this Troubleshooting section as I start seeing questions coming through from people who have made the recipe.
Troubleshooting tips
“My salad turned out too mushy! 😱”
- You may have overcooked the orzo, which can lead to a gummy texture. Make sure to cook it according to package instructions and taste for doneness a minute or two before the suggested time.
- If you didn’t rinse the orzo under cold water after draining, the residual heat can continue cooking it, making it mushy. Always rinse with cold water to stop the cooking process right away.
I bet it was still YUM though!
“My salad is too dry and doesn’t have enough dressing!”
- You might not have added enough dressing to coat all the ingredients evenly. The amount of olive oil and vinegar can vary based on personal preference, so feel free to adjust as needed.
- Alternatively, if you let your salad sit too long before serving, it may absorb some of the dressing, leading to dryness. Serve immediately after tossing, or add a splash more dressing if chilling first.
I bet it was still YUM though!
“The cucumbers in my salad are too watery! 💧”
- If you didn’t remove the seeds from the cucumbers before dicing, they can release excess moisture into your salad. Try using seedless cucumbers or removing seeds next time for a crunchier texture.
- Also, if your cucumbers sat for a while before being mixed with other ingredients, they might have released water. Consider adding them just before serving!
I bet they were still YUM though!
“My olives are overpowering the flavor! 😬”
- Using a different type or brand of olives can result in varying saltiness and brininess levels. Kalamata olives are quite strong, so if you’re sensitive to that flavor, consider using fewer olives or rinsing them briefly before adding.
- Mixing in extra vegetables like cherry tomatoes or cucumber can help balance out stronger flavors—don’t be shy about adding more!
I bet they were still YUM though!